PG460's stats
- Review count122
- Helpfulness votes539
- First reviewJanuary 24, 2014
- Last reviewMarch 17, 2024
- Featured reviews0
- Average rating4.6
Reviews comments
- Review comment count0
- Helpfulness votes0
- First review commentNone
- Last review commentNone
- Featured review comments0
Questions
- Question count0
- Helpfulness votes0
- First questionNone
- Last questionNone
- Featured questions0
Answers
- Answer count0
- Helpfulness votes0
- First answerNone
- Last answerNone
- Featured answers0
- Best answers0

Unleash the power of the Samsung 980 PRO with Heatsink for next-level computing. With a PCIe® 4.0 NVMe™ interface, get up to 2x the data transfer rate of PCIe® 3.0¹ while remaining compatible with PCIe® 3.0. ¹Results are based on a comparison with Samsung PCIe® 3.0 NVMe SSDs and SATA SSDs.
Customer Rating

5
Super Fast Super Cool SSD
on January 15, 2022
Posted by: PG460
from Pennsylvania
I have a new gaming pc that supports PCIe 4.0 but it unfortunately came equipped with a 3.0 drive. Recognizing the large performance advantage awaiting me I was eager to upgrade to a PCIe 4.0 SSD. I’ve used Samsung SSDs for years so the new Samsung 980 PRO Heatsink seemed like a perfect choice. I was excited to learn that Samsung had a heatsink SSD. SSDs can run very hot at temperatures reaching over 80° C. Overheating negatively impacts drive performance and drive lifespan. Samsung’s heatsink should effectively control these temperatures.
Installing an NVMe drive is a breeze and is about as easy as upgrading RAM so don’t be intimidated. I’d say the most difficult aspect is dealing with the miniature post screw that holds the SSD in place. I would suggest purchasing a magnetic NVMe screwdriver which makes dealing with this screw much easier. The hardware install takes minutes. Once installed you need to format this drive in Windows using Disk Management utility. Once formatted I next installed the Samsung Magician program which is a great optimization and monitoring tool for your new drive. My first step was to check for a firmware update within Magician. The update downloaded and installed after a reboot. My next step was to clone my existing SSD to the 980 Pro Heatsink so I could make it my boot drive and realize the full speed advantages of this PCIe 4.0 drive.
After cloning I was up and running. First noticeable improvement was a perkier boot speed which is almost instantaneous. Next I wanted to run a few benchmarks on the 980 Pro Heatsink. Using CrystalDiskMark and Samsung Magician I was blown away by read speeds of about 6,800 MB/sec and write speeds of 5,000 MB/sec. Amazing! Twice the speeds of my previous PCIe 3.0 drive. After hours of gaming temps were in the ballpark of 50° C. Make sure to explore the Samsung Magician for an array of settings and info. Highly recommended.
Mobile Submission: False
I would recommend this to a friend!


Share this review:
0points
0of 0voted this as helpful.
Upgrade from the last generation with the new ROG Strix G10CE, a Windows 11 gaming desktop that delivers exhilarating gaming experiences powered by an 11th Gen Intel® Core™ i7-11700F processor and NVIDIA® GeForce RTX™ 3060 graphics.
Customer Rating

4
A Solid Performer With A few Quirks
on December 28, 2021
Posted by: PG460
from Pennsylvania
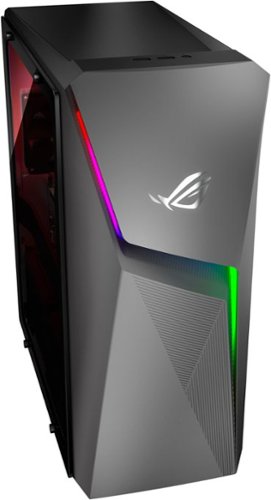
As a long time gamer I’m always eager to try new gaming hardware. The Asus ROG Gaming Desktop specifications looked very intriguing with an Intel Core i7-11700F processor, 16GB of 3200mhz DDR4 RAM, a NVIDIA GeForce RTX 3060 with 12GB GDDR6, a 1TB 7200 rpm mechanical hard drive, a 512GB NVMe SSD, Wifi 6, Bluetooth 5, and Windows 11. Onboard you’ll find 8 total USB ports, 1 ethernet port, integrated video ports include 1 hdmi and 1 display port, video card ports include 1 hdmi plus 3 display port, and audio and headphone ports. Disappointing is the lack of USB C ports while oddly including obsolete PS2 mouse and keyboard ports. Baffling! Unboxing revealed a nicely packed and padded computer, a disposable keyboard and mouse (not sure why they even bother), a plexiglass side panel and screws, 2 extra power supply expansion cables, and some warranty info.
Upon removing the Asus ROG computer from its packaging I was a bit surprised by the size of this system. It’s definitely a mid tower case and certainly on the smaller side. I am torn about the design. Attractive enough but in comparison to other systems on the market I’d say it’s pretty dated looking and overall somewhat unimpressive. There is an interesting looking RGB lighting element on the front of the case. The system comes with a metal side panel attached but includes a plexiglass side panel as an option. You need to remove 2 phillips head screws to remove the ugly metal side panel. Asus couldn't apparently include 2 far more convenient thumb screws. The whole plexiglass side panel left me baffled again. Why 2 side panels? The case interior includes RGB lighting so why would you not want to see it? The plexiglass panel attaches with 4 screws which makes for some serious inconvenience when wanting to access the case interior. Also, while the metal side panel has a grill for ventilation the plexi panel has none. There is also an odd gap around the perimeter of the the side panel when attached which I suppose is to provide some form of ventilation. While on the topic of ventilation, I would also note that the front panel does not appear to have any any significant venting and this is concerning since there is only one case fan.
Upon setting up the computer I was surprised to find the usual Windows setup replaced instead with an Asus replacement. For the most part a similar and simple enough process but again I found myself baffled again by the Windows 11 download and setup process which took about 30 minutes to complete. Not exactly what I expected for a computer that’s advertised as having Windows 11 included. Sure, included after you wait while it installs. Annoying.
In terms of upgradeability, you can consider this Asus system a system to to use as is or as a project to improve over time. Onboard you’ll find 16GB of DDR4 RAM. Unfortunately Asus includes a single 16GB stick. Better performance would be realized with 2 sticks of dual channel DDR. The 16GB will be more than adequate for most users but you can upgrade to a whopping 64GB total in the available 4 DIMM slots. Based on speeds the 512GB NVMe SSD appears to be a pcie 3 drive but the slot supports PCIe 4 so a larger sized PCIe 4 drive would be a significant performance boost. Also onboard is a second M.2 NVMe slot but this one supports only PCIe 3. Asus fails to include the standoff and screw for this slot. You can buy them for a $1 but I’ll never understand why they’re not included. You can also upgrade your video card if you can find and afford one.
After setup was complete I installed Steam and some favs so I could get gaming. I started with some games that I’ve played for years on my previous gaming system including COD, Fortnite, Counter Strike, and Team Fortress. After playing a game for so long one develops a feel for how a game feels and performs. I was impressed. I could definitely sense an increased overall responsiveness to my gameplay which became evident in better personal gaming performance. I was already really good at some of these games but now I was noticeably better. That’s what it’s all about. I will say that the system is surprisingly noisy when the fan really kicks in. While adequate ventilation was a concern I didn’t notice any overheating issues.
While there are some quirks in the form of questionable configuration and design choices with the Asus ROG G10CE but I do think it is a solid system with great performance. I look forward to upgrading to make it even better.
Mobile Submission: False
I would recommend this to a friend!
Share this review:
+1point
1of 1voted this as helpful.
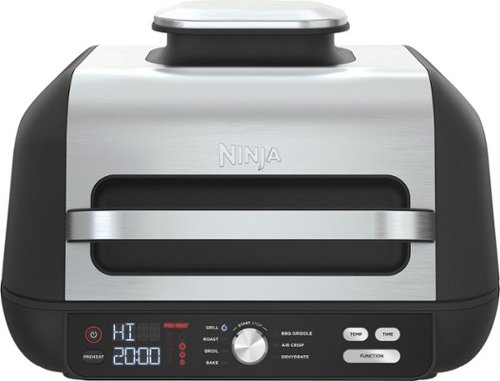
The Ninja Foodi XL Pro Grill & Griddle is the grill & griddle that sears, sizzles, and air fry crisps. With the 500F independently powered grill grate, you get direct, edge-to-edge high heat for steakhouse grilling, griddle searing, and more.
Customer Rating
5
Great Multifunction Grill
on November 23, 2021
Posted by: PG460
from Pennsylvania
I have always considered Ninja products to be first rate when it comes to their innovative and high quality kitchen appliances. I became a fan when the Ninja Foodi was released. It changed the way I cook and has become a constant in my kitchen. Over the years I’ve added additional Ninja products to my cooking arsenal. The Ninja Foodi XL Pro Indoor 7-in-1 Grill & Griddle has quickly become a welcome addition.
In the box you find the 1760 watt grill, the powered grill grate, the flat top bbq griddle plate, the crisper basket, the splatter shield, owners guide, and the quick start guide. The grill and all accessories have a substantial and high quality feel and appearance. The stainless steel grill really looks great and would look at home in the finest of kitchens. The control panel is sleek, simple, and very intuitive to use. You’ll find several operating buttons including the power button, start/stop, temp, time, function, and preheat buttons. The central knob is where you select the grills cooking function by turning it to grill, roast, broil, bbq griddle, air crisp, bake, and dehydrate. I was excited to eventually try all these options but for my first use I wanted to try grilling. I popped in the pro powered grill grate and installed the splatter shield. The grill grate is very nicely made with some serious non stick coating. It incorporates a built in grease catch area at the front of the grate. The grate itself snap into the grill. To remove it after cooking there is a release button located at the left rear corner of the grill.
I opted for boneless chicken breast for my first test. To reduce smoke Ninja recommends a high temp cooking oil such as canola, coconut, avocado, vegetable, or grapeseed oil. I used canola to coat my chicken breasts and then seasoned them. I was able to easily fit four large breasts with room to spare. I cooked on high and set the grill for 20 minutes but planned on checking the temperature around the 15 minute point. This version of the Foodi grill has no included temperature probe so you’ll have to use your own thermometer. As grilling progressed I was thrilled to see that there was no smoke or steam produced from the grilling process. When done the chicken had great grill marks and was crispy and golden on the outside while juicy and moist on the inside. As far as I was concerned perfection on my first attempt. I was very excited to be able to accomplish great grilling results indoor in the middle of winter. About the only thing that slightly bothered me was that the the grill grate is angled so the grease runs forward into the grease catch area. The surface is so angled and so non stick that the chicken breasts kept sliding forward into the grease catch. Over the next few days I grilled pork chops, steaks, burgers, and veggies. All with excellent results. I also did french fries and chicken tenders in the 4 quart crisper basket. This accessory accommodates a large quantity of food, up to two pounds of fries easily fit. I’m a fan of air frying and the Foodi grill worked great. I also did breakfast on the bbq griddle. Eggs, pancakes, and bacon all came out great. I would also point out that cleanup of all accessories was a breeze.
The Ninja Foodi XL Pro Indoor 7-in-1 Grill & Griddle truly offers a multitude of cooking options. I’ve only scratched the surface and yet I was already thrilled with the cooking possibilities. Another great Ninja addition to my kitchen.
Mobile Submission: False
I would recommend this to a friend!
Share this review:
+1point
1of 1voted this as helpful.

Dive into a new dimension of immersion with the Razer Kraken V3 HyperSense—a PC gaming headset powered by haptic technology. From rumbling explosions to whizzing bullets, with the ability to feel what you hear, the time has come to embrace true multi-sensory gaming.

Posted by: PG460
from Pennsylvania
I have owned many Razer products over the years including mice, keyboards, and headsets. These products helped give me a competitive edge while gaming. I currently have two gaming systems in my home but only one headset that I move back and forth depending on where I want to game. Needing to add another headset I was excited to get the Razer Kraken V3 HyperSense wired 7.1 surround sound gaming headset.
In the box you’ll find the headset, the detachable HyperClear Cardioid Mic, and a manual. I was immediately impressed with the build quality of the headset. The steel reinforced frame feels really well made. The Razer Kraken V3 looks very similar to my other Razer headset which makes sense since it is the Kraken 7.1 V2. Improved here however is a noticeable addition of padding on the headband. After attaching the mic I was eager to slip them on. The thick padding on the head band and the memory foam ear pads make them feel extremely comfortable. I also noticed a mic on/off button and a volume control knob on the left ear cup. On the opposite ear cup you also find a button to control the intensity of the Razer HyperSense. All of these on headset controls will come in handy to easily make adjustments while in game. I was now eager to try them out. Upon plugging the cable into a USB port I was somewhat disappointed by the stiffness of the cable. Hopefully it will relax over time. The Razer Synapse 3 software installed automatically when connected to my pc. Probably because I had the prior version already installed. During the installation you can opt to install additional software modules or you can install them later within the Synapse app. I was happy to see Alexa included. Upon launching Synapse it prompts you to sign up for an account or you can sign in if you already have one. Within the app you find a multitude of settings on various tabs for sound, mixer, enhancement, mic, and lighting.
As I joined a game the real disappointment started. First off you’ll quickly notice the Razer HyperSense effect which provides haptic vibration feedback from the ear cups based on the noises during gameplay. I found this feature to be incredibly annoying and distracting. I’m betting you will too. Next I noticed while listening to my mic that I had a few millisecond delay and my voice sounded off, somehow unnatural. I’m assuming due to some processing of the audio signal. As I continue gaming I found the sound muddy with somewhat of an annoying echo. I also found the surround sound to be oddly non-immersive. It just wasn’t seamless as you moved through an environment. The sound instead seemed to drop out periodically.
Razer states in the included paperwork that “sound is just as important as sight when you’re in game”. I could not agree more. Being able to clearly hear audio cues in game gives you an incredible edge against other players. But so far the Razer Kraken V3 wasn’t giving me an edge. Instead I was experiencing multiple distractions to my gameplay. After adjusting settings within Synapse 3 I found that turning off HyperSense and THX Spatial audio helped correct some of these distractions. But, I’m baffled why I would need to turn off 2 features in order to improve audio? Overall I’m not a fan of this product.
Mobile Submission: False
No, I would not recommend this to a friend.
Share this review:
+2points
2of 2voted this as helpful.
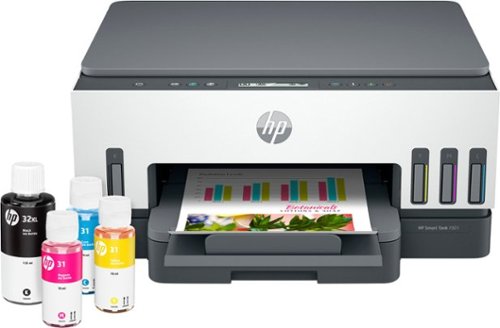
The HP Smart Tank 7001 supertank printer makes printing seamless from start to finish for the whole family with a high-capacity refillable ink tank and wireless connectivity. Create outstanding-quality color documents at a low cost with up to two years of Original HP Ink included in the box.
Customer Rating
5
No More Ink Cartridges
on November 7, 2021
Posted by: PG460
from Pennsylvania
I have used HP printers exclusively for over 20 years. I’ve used other brands at work but always felt that the competition was somehow lacking in comparison. Most recently I’ve been using an HP laser printer. Great product for printing text but it’s not a color printer. Needing color printing capabilities I was excited to try the HP Smart Tank 7001 Wireless All-In-One Inkjet Printer.
Unboxing was a breeze. Within you’ll find the printer, power cord, manuals, a black print head, a tricolor print head, and 4 bottles of ink including a black ink, a yellow ink, a cyan ink, and a magenta ink. The black ink bottle is 135ml while the color inks are 70ml. With all this ink, you could actually hear the ink bottles sloshing around in the box. Enough ink to print up to 6,000 black and 8,000 color pages. With average printing it’s enough to last two years. Now that’s impressive! The printer itself is a white and slate color with a square minimal modern design. I like it. I was somewhat disappointed by the quality of the scanner lid which seems surprisingly thin and unsubstantial.
After removing the packing material I was eager to setup the Smart Tank 7001. The manual simply directs you to download their app at the provided link. You can also scan a QR code to quickly navigate to the software. After app installation you are prompted to connect the printer to WiFi. With the press of a button on the printer and the entry of your WiFi password the printer was connected. What a breeze. The HP Smart Tank 7001 supports dual band wifi 2.5ghz and 5ghz. The app next prompts to setup an account. If you’re an HP user already you can just login. Afterwards the app directs you to fill the ink reservoirs. One would want to be careful during this process so as not to accidentally spill the ink. The ink bottles are all nicely sealed in shrink wrapped plastic. You need to remove an inner seal under the bottle’s cap then you’re ready to fill. To fill the reservoirs you simply insert the ink bottle’s spill proof cap onto the reservoir fill cap and gravity does the rest. You repeat with each color until each bottle is empty. The app next walks you through install the black and tricolor print heads. At this point you’re directed to load paper. The paper tray holds up to 250 pages while the output tray holds up to 100 pages. The printer then printed a print alignment page which you then scan to complete the alignment process. After alignment, the setup was complete and you’re ready to print. At this point you’re prompted to send the software link to other devices in your home. I easily installed it to two desktop computers and had them print ready in a matter of minutes. I compliment HP on a great setup experience in simple step by step app. No need to be intimidated.
Specification wise the HP Smart Tank 7001 is fantastic and supports print, scan, and copy with borderless printing capabilities. Print speed is 15 ppm for black and 9 ppm for color printing. The HP Smart Tank 7001 also supports duplex printing. Up to 1200 x 1200 rendered dpi Black printing and up to 4800 x 1200 optimized dpi color when printing from a computer and 1200 input dpi. Scan resolution is up to 1200 x 1200 dpi and copy resolution is up to 600 dpi. While you can setup the Smart Tank using USB 2.0, I particularly love the wireless printing capabilities of this printer which include Apple AirPrint; Mopria certified; HP Print Service Plugin (Android printing); HP Smart app; Wi-Fi Direct Printing. With these you can easily print from your phone or tablet while in the yard, while lounging on your sofa, or from across the country. When printing documents for work the black print quality was fantastic. Color photos on photo paper came out looking very high quality. Scanning was fast and results were great. Copies were very nice.
The HP Smart Tank 7001 is a solid performing, full featured, and economical all in one printer. No more cartridges! Highly recommended.
Mobile Submission: False
I would recommend this to a friend!
Share this review:
+5points
6of 7voted this as helpful.
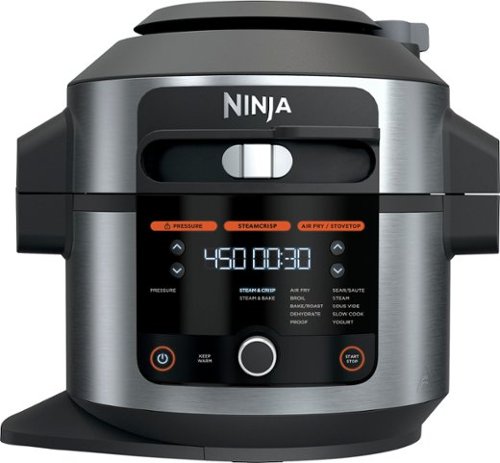
Meet the Ninja Foodi 14-in-1 6.5qt. Pressure Cooker Steam Fryer with SmartLid. The pressure cooker that steams and crisps. SmartLid slider unlocks pressure cooking, air frying, and Steamcrisping - all under one SmartLid. SteamCrisp Technology steams and crisps at the same time for faster, juicier, crispier results*. 14 one-touch programs unlock even more versatility. (*Vs. Ninja Foodi OL501 in dry mode only)
Posted by: PG460
from Pennsylvania
I’ve been a big fan of Ninja products for several years. They are consistently innovative high quality small appliances that outperform the competition. The original Ninja Foodi brilliantly reimagined the pressure cooker and the air fryer by combining them into a single appliance. I was hooked by how versatile and multifunctional the Foodi was for preparing a multitude of meals. So versatile that I have used mine more that any other small appliance. At times almost daily because it consistently delivers perfect results whether pressure cooking, baking, or air frying. From wings to pot roast, from burgers to fries, from cheesecake to corn on the cob everything was yummy. One small inconvenience with the original Foodi was what to do with the pressure cooker lid when you weren’t using it. Ninja clearly recognized this issue and has now reimagined the new Foodi with a single multipurpose lid they call the SmartLid. No more switching of lids and no need to store an extra lid. When I got the new Ninja Foodi 14-in-1, 6.5-QT Pressure Cooker Steam Fryer with SmartLid I was of course eager to explore it’s improvements.
In the box you find the 1460 watt Foodi, the 6.5 cooking pot, the cook & crisp plate, a reversible rack, a recipe booklet, and a quick start guide. The Foodi itself has a new improved look. Gone is an abundance of plastic which is replaced now with a sleek stainless steel exterior and updated more sophisticated control panel. The SmartLid is a welcome addition with 3 positions depending on your cooking mode. One for pressure cooking, one for SteamCrisp, and one for Air Fry/Stovetop. I was intrigued by the new addition of this SteamCrisp mode. Ninja say it steams and crisps at the same time and cooks faster with crispy and juicy results. I had to try it. Ninja’s recipe booklet suggests SteamCrisp for chicken wings so I thought I’d try it. I had made wings in the older Foodi many times and had used a two step method starting with pressure cook and then finishing the wings with AirCrisp. I wondered how SteamCrisp would compare. Ninja suggests 20 minutes from fresh or frozen wings. I was skeptical and I was wrong. Sure enough, 20 minutes later I had restaurant quality crisp and juicy wings now in a single step process.
The Foodi truly is a super versatile appliance with 14 programmable cooking modes including Pressure Cook, Steam & Crisp, Steam & Bake, Air Fry, Broil, Bake/Roast, Dehydrate, Sear/Sauté, Steam, Sous Vide, Slow Cook, Yogurt, Keep Warm, Proof. The meal possibilities are endless while simplifying and speeding up cook time. You really can cook every meal in the Foodi if you wanted to. The Foodi makes a wonderful gift too. Highly recommended.
Mobile Submission: False
I would recommend this to a friend!
Share this review:
0points
0of 0voted this as helpful.

The Ninja DualBrew Grounds & Pods Coffee Maker delivers Classic, Rich, and Over Ice brews from your favorite coffee grounds or coffee pods. Customize your brew with 9 grounds sizes from cup to carafe and 4 pod sizes from 6 to 12 oz.
Customer Rating
5
Great Coffee, Innovative, Flexible Design
on October 21, 2021
Posted by: PG460
from Pennsylvania
I’ve been a big fan of Ninja products for several years so I was very excited to try the Ninja Dual Brew 12-Cup Coffee Maker, Single-Serve, K-Cup Coffee Pod, and Drip coffee maker. Ninja consistently designs innovative products and the Dual Brew quickly proved to be no exception. I have seen other coffee makers that offer k-cup and drip brewing but those machines have separate brewing stations, one for pods and one for drip. This makes for a larger footprint in order to accommodate both brewing stations. Not so with Ninja. The Dual Brew ingeniously incorporates both k-cup and drip brewing capabilities into a single brew station. This is accomplished by way of Ninja’s pod adapter that simply drops into the drip filter area when you want to brew via a pod and is removable when you want a carafe of drip coffee. Think of the Ninja Dual Brew as the Transformer of coffee makers. What fun! The unit is relatively tall so Ninja even though of incorporating a flip down platform for single serve brewing which elevates your mug to prevent splashing.
In the box you find the coffee maker, manuals, some paper filters, and the carafe. The Dual brew is a stylish and well made coffee maker. The manual is detailed and concise. After a quick read and topping off the reservoir with water I was ready to try the Dual Brew. I immediately appreciated the size of the 60 ounce water reservoir. I have been a home k-cup coffee drinker for many years because of its simple convenience to easily switch between various roasts and flavors. So I figured I’d start my Dual Brew with a k-cup. One simply powers the unit on and pop a pod into the k-cup adapter. With the twist of a knob you select your brew size of 6, 8,10, or 12 ounces. You can also can chose between 3 brew styles of classic, rich, and over ice. After selecting a 12 once classic brew I hit the start brew button. I’ve owned many k-cup machines and they are generally slow. I was promptly impressed with the brew speed of the Dual Brew. It’s fast and brewed a great tasting cup of coffee. The triple needle design of the Dual Brew results in a fuller flavor brew since it fully saturates the coffee grounds within the k-cup. Also contributing to flavor is the high temp brew where temp is adjusted according to your coffee style. I was next excited to try the drip coffee function. While I enjoy a k-cup the Dual Brew offers flexibility when I know I’m going to have multiple cups or I have company and we are sharing a carafe of coffee. You simply remove the k-cup adapter and pop in a coffee filter. The Dual Brew includes a Ninja Smart scoop for your ground coffee. It conveniently is stored on the side of the Dual Brew. Once you fill your filter with grounds and slide the lid closed the brewing options switch from pod to drip. Here you can now select your the size of your desired drip brew from 9 ground brew sizes (Small Cup, Cup, XL Cup, Travel Mug, XL Travel Mug, ¼ Carafe, ½ Carafe, ¾ Carafe, or Full Carafe). I just love this size flexibility. I made a full carafe and the brew time was fast and the taste was fabulous. The adjustable warming plate keeps the coffee warm for up to 4 hours.
Ninja has done it again by reinventing the dual brew pod and drip coffee maker that offers the impressive flexibility of a multitude of brew sizes. Buy it, you’ll love it.
Mobile Submission: False
I would recommend this to a friend!
Share this review:
+1point
1of 1voted this as helpful.
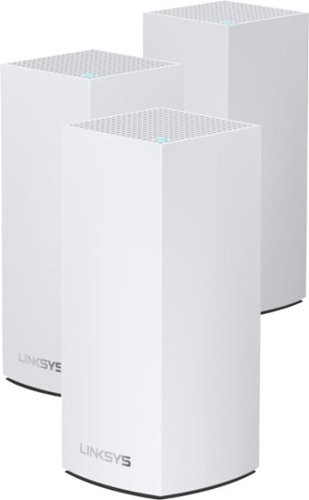
Linksys Atlas Pro 6 with Velop Intelligent Mesh is a dual-band router that delivers next-level streaming and gaming to more than 30 devices per node. Access to 160 MHz unleashes the true power of Wi-Fi 6 technology—these are the least congested channels available on the 5GHz band and offer incredibly fast connectivity. Dynamic Frequency Selection (DFS) provides access to more channels, reducing interference from neighboring networks. Velop Intelligent Mesh technology offers whole home coverage that’s easily expandable by adding additional nodes. With easy setup, advanced security and parental controls, Linksys Atlas Pro 6 is an essential upgrade to any home.
Customer Rating
5
Impressive Wifi Speeds & Coverage
on August 24, 2021
Posted by: PG460
from Pennsylvania
I purchased my first Linksys router the WRT54G almost 20 years ago. Ever since that iconic device I’ve been hooked on the quality and design of Linksys networking products. I have strayed a few times to try other brands only to be ultimately disappointed and I quickly returned to Linksys. In 2016 I was introduced to the first Linksys mesh network solution the Velop. Hooked yet again I’m now excited to try my third Linksys mesh product. It seems that Linksys has dropped the Velop name as this system is called the Linksys Atlas Pro 6 Dual-Band Mesh WiFi AX5400. The Atlas looks identical to Velop and this version comes with 3 nodes. For those unfamiliar with mesh networking these 3 nodes are placed throughout your house and operate like a single device while providing expanded wifi coverage in your home.
In the box you’ll find the 3 Atlas nodes, 3 power adapters, and a setup guide. The setup guide simply directs you to download the Linksys app where you do the entire setup. Once installed you simply select add a device. Along the way you are prompted to setup a Linksys user name and password. You can then proceed with the installation of your first node. You can use any of the 3 nodes as your primary node. You simply connect the node to your internet modem and power it on. The app detects the node and you are prompted to name your Atlas network. If you have a bunch of devices I would suggest using the same name and password of your current network. This saves you the trouble of adding each device to a newly named network. The setup of the first node did take about 15 minutes from start to finish. Once complete you can then proceed with adding the next node. You should pick a location only a few rooms away from the first node. Upon installing the node the app notifies you if your selected location is ideal. You simply repeat this process to add the third node. Upon completion I did notice that a firmware update was available so I installed it as well. The app walks you through the setup process with ease and once setup is complete it serves as your access to all your Atlas Pro 6 settings.
Specifications wise the Atlas Pro 6 Dual-Band Mesh WiFi AX5400 is mighty impressive. First of all this is an wireless AX or WiFi 6 router which is over 4 times faster than wireless AC and is capable of gigabit wifi speeds to 30 devices per node. The Atlas Pro 6 also supports 160 MHz wifi capabilities. The 160 MHz channels are the least crowded for wifi performance and can offer incredibly high wifi speeds up to 1733 Mbps. Keep in mind you need internet service that supports these internet speeds and a device that supports 160 MHz in order to see these speeds realized. I have 1000 Mbps internet service and a laptop that supports 160 MHz wifi and I got about 840 Mbps with the Atlas Pro 6. I was thrilled. The Atlas also supports Dynamic Frequency Selection DFS which helps reduce interference from other networks in your neighborhood. If you’re in a neighborhood like mine I can see nearly a dozen networks near my home all of which can negatively impact the performance of my own network. DFS should help substantially. The Atlas Pro also provides wifi coverage up to an incredible 8,100 square feet. While my home is more in the ballpark of 2,000 square feet this expanded coverage is great for rock solid coverage for my outdoor wireless security cameras and my other wireless devices while enjoying my outdoor entertainment areas. For wired connections the Atlas Pro 6 also has 3 gigabit lan ports and 1 gigabit wan ports per node.
Ultimately I was very pleased with the Linksys Atlas Pro 6 AX5400 and it is certainly an improvement over my prior Velop system.
Mobile Submission: False
I would recommend this to a friend!
Share this review:
0points
0of 0voted this as helpful.
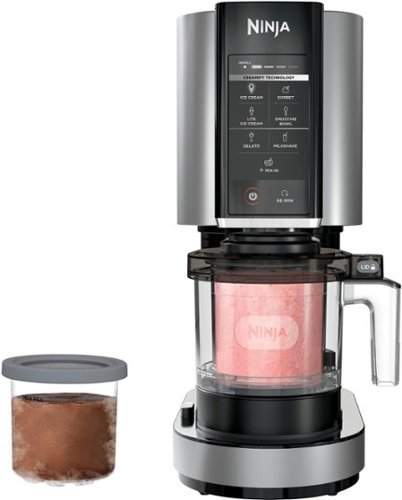
The Ninja CREAMi transforms frozen solid bases into ice cream, sorbets, milkshakes, and more at the touch of a button. From healthy to indulgent, the Ninja CREAMi can create frozen treats as unique as you are!
Customer Rating
5
Brilliantly Reimagined Ice Cream Maker
on July 18, 2021
Posted by: PG460
from Pennsylvania
I have been a fan of Ninja products for many years. I have particularly enjoyed the Ninja Foodi which I use regularly. The Foodi was a innovative product which ingeniously paired a pressure cooker with an air fryer. When I heard that Ninja was releasing an ice cream maker called the Creami I eagerly anticipated it’s arrival. I was not disappointed. Ninja has yet again brilliantly reimagined another appliance, this time the ice cream maker, with amazing results.
In the box you find the Creami, 3 Creami pints & 3 lids, the outer bowl & lid, the Creamerizer paddle, a quick start guide, and a recipe booklet. I was pleased that 3 pint containers were included. The Creami is fairly imposing with dimensions at 15.92 inches tall by 12.07 inches deep by 6.52 inches wide. The quality of all the components is very impressive. Looking through the recipe book and it’s mouthwatering offerings had me debating what to try first. The Creami isn’t just an ice cream maker. It also makes lite ice creams, sorbets, milkshakes, smoothie bowls, and gelato. So many options and so many recipes. Just keep in mind you can’t just mix ingredients and instantly have a frozen dessert. That’s where Ninja has reimagined the making of ice cream treats. With the Creami you mix a frozen treat base, pour it into the Creami pint, and freeze it for 24 hours. You then insert the frozen pint into the Creami and it processes the frozen base by breaking it down with its Creamerizer paddle and its powerful 800 watt motor turning it into a creamy dessert. What a great idea. With 3 Creami pints you can create and freeze 3 different bases so they’re ready to go at any time. You can of course purchase additional pints too. To give you even more recipe options you can even add a multitude of ingredients using the Mix In mode. Here you can add candies, fruits, cookies and mix them into an already Creamerized base Yummy!
I opted to start with ice cream and sorbet for my first Creami treats. I made a trip to the grocery store for an assortment of ingredients and canned fruits. I mixed my bases according to the recipes and popped it in the freezer. The recipes suggest that you can use fresh pineapple, oranges, bananas, and berries for a sorbet base. Or you can use canned fruits in syrup or juice. You just pop the frozen Creami pint into the outer bowl and insert the Creamerizer paddle into the lid. Close the lid and raise it into position. You then select the one touch button for the frozen treat you’re making. The Creami is loud as it does it’s thing. Surprisingly loud. The Creamerizer paddle lowers through the frozen base, cutting through and mixing the base and then it raises back to its starting position. It takes about 90 seconds from start to finish. I made a strawberry ice cream and an apricot sorbet. I frankly could not believe the amazing end results. The ice cream was rich and creamy and perfectly mixed. The sorbet was incredible. Particularly considering my base was simply a can of apricots in syrup and yet the flavor and consistency was remarkably delicious. I was utterly sold on another Ninja appliance. I immediately started planning my next recipes. So far I’ve tried mango, peach, pear, and orange sorbets with consistently impressive results. I have also made chocolate ice cream with chocolate chips, Oreo vanilla, and cinnamon bun. Oh my! I can’t wait to explore more recipes and creations of my own. The flavor possibilities are endless. The milk shakes are great too. I look forward to trying a gelato and the smoothie bowl option.
Ninja has done it again. Highly recommended.
Mobile Submission: False
I would recommend this to a friend!
Share this review:
+4points
4of 4voted this as helpful.

The Alienware m15 Ryzen Edition R5 gaming laptop is our first laptop powered with AMD Ryzen™ processors and NVIDIA® GeForce RTX™ 30-series graphics.To keep performance prioritized and temperatures under control our Alienware Cryo-tech™ cooling technology helps and is designed to keep gameplay and confidence high. Each gaming experience on the m15 is intended to wow players visually, built around a 15” screen, with refresh rates spanning 165Hz, 240Hz, and 360Hz this new generation of m15s are focused on delivering an uncompromised visual experience. Even the visual ID ha staken a step forward and introduces newly evolved Legend industrial design.
Customer Rating
5
Alienware Ryzen Edition Nvidia RTX3070 Powerhouse
on July 13, 2021
Posted by: PG460
from Pennsylvania
I spent a lot of my younger years as a pretty dedicated gamer and now somehow I ended up being a businessman. I work hard now but I never lost my love of gaming. In fact I still game almost daily to relax and unwind from work. Lately I have been traveling for work and while on the road I’ve missed my gaming escape. I tote along a laptop for business anyway so why not make it a gaming laptop. Even better why not make it a Dell Alienware M15 AMD Ryzen 7 5800H Edition R5 gaming laptop.
Unboxing was a simple affair. The box comes wrapped in a plain brown paper wrapping as if some guilty pleasure lies within, and one certainly does. Removing it brought a smile to my face with my first glimpse of the Alienware alien logo. Inside the box you find the laptop and a hefty power adaptor. I do like that the large adaptor is at least thin so as to slip in a laptop bag more easily. Removing the laptop from its plastic protective envelope reveals a sharp looking laptop in a gray metallic color that Alienware calls Dark Side of the Moon. I like the sleek sophisticated look. The monitor is a 15.6" QHD (2560 x 1440) 240Hz 2ms display. ComfortView Plus and Nvidia G-Sync are supported. Dell defines ComfortView Plus as an always-on, built-in low blue light screen that optimizes eye comfort by reducing potentially harmful blue light emissions while delivering excellent color accuracy. The laptop measure in at 14.2 inches wide by 10.73 inches deep. At nearly an inch thick and weighing in at 5.34 lbs there are thinner and lighter gaming laptops but there are also thicker and heavier ones. With the power brick it weighs in at a total of about 7.8 lbs. I don’t really mind these dimensions or weight. I’m more concerned about what’s inside. Specification wise this M15 R5 is loaded. It packs the AMD Ryzen 7 5800H processor, 16gb ram, 512 gb NVMe SSD, and a 8 gb Nvidia GeForce RTX3070. It’s been a long time since Alienware has paired a Nvidia gpu with a Ryzen cpu and it’s a scorching combination. Wireless capabilities include Killer Wi-Fi 6 AX1650 802.11ax, 2x2 Wireless LAN, and Bluetooth 5.2. Port wise you get 2 SuperSpeed USB 3.2 Gen 1 Type A ports, 1 SuperSpeed USB 3.2 Gen 2 Type C port, 1 SuperSpeed USB 3.2 Gen 1 Type A port, a HDMI 2.1 Output, a 2.5 Gbps RJ-45 Ethernet port, and a headphone jack. The one USB 3.2 port also supports PowerShare which offers charging of USB devices while the laptop is off. The USB C port also supports USB C to display port so you can use an external display if desired.
It was time to power the M15 on. Light effects come to life which include the keyboard, the Alienware logo power button, the Alienware logo on the back of display, and the Tron halo light around the rear edge of the laptop. All are customizable in the Alienware control panel. The keyboard has four zones which one can customize for effects but this model does not have individual key customization. Regardless, I think these add a perfect amount of lighting effects for a gaming laptop. You of course can turn all lighting effects off in you so chose to in say a more subdued or professional environment. Windows setup was pretty typical. Of note is that the M15 R5 has a webcam so it supports Windows Hello Face which signs you into Windows using facial recognition which is nearly instantaneous upon booting up.
I was ready to start gaming but first there were a few preliminary steps. I updated Windows, installed the latest Nvidia drivers, and ran the Alienware update. I even installed Office so I was ready to use the M15 R5 not only for gaming but for work too. After installing Steam I was particularly eager to play a game that supported ray tracing since this is the first RTX gpu that I’ve owned. I opted for Wolfenstein Youngblood which I really love playing. The fun was promptly delayed as I immediately experienced a crash upon launch. I tried several other game titles with similar issues. I note this in the event that others have a similar issue. I ultimately fixed the issue by installing the AMD Radeon graphics and Ryzen chipset drivers. After this update the system functioned flawlessly. During setup of Wolfenstein video options I of course opted for the maxed out settings on uber or ultra to see how the RTX3070 would perform. Having played Wolfenstein Youngblood for many hours I was immediately impressed with the impact of the ray tracing effects which brought a whole new level of realism to an already amazing looking game. At QHD 2560 x 1440 2k resolution the game is stunning. With a 240Hz refresh rate on a 2ms display with G-Sync gameplay was perfectly fluid with no motion stuttering or screen tearing. With maxed settings I was getting 156 frames per second. I was thrilled. I fired up another favorite Wolfenstein ll and here on maxed settings I got nearly 170 frames per second. On Cyberpunk 2077 I got around 60 FPS at 1080p with ray tracing on. Game was very playable and looked amazing. Fan speeds really crank up and this baby gets hot but fan noise is tolerable. I play with headphones on anyway so this is of no concern to me.
I was anxious to take a look inside the case in regard to upgradeability. Most of the bottom plate screws are captive only 2 are removable. I did have to fuss more than I liked getting it open. Inside I note the 6-cell, 86 Wh "smart" lithium-ion battery. There a 2 ram slots. This M15 R5 comes with 16gb of RAM with two 8gb sticks installed. You can upgrade to 32gb max. On the SSD front I was happy to learn that there are two NVMe slots. This Alienware comes with one 512gb NVMe SSD installed but it is a smaller 30mm drive. If you want to upgrade this drive to an 80mm SSD you need to move the 30mm stand-off to the 80mm position. No problem but I was very disappointed to learn that the second SSD slot comes with no stand-off mount included. What? You can of course order one from Dell but I think this is a big oversight. I have read that Dell intends to include this mount moving forward. I sure hope they offer free mounts to those who did not get one included.
Overall I am extremely pleased with the Dell Alienware M15 AMD Ryzen 7 5800H Edition R5 gaming laptop.
Mobile Submission: False
I would recommend this to a friend!
Share this review:
0points
0of 0voted this as helpful.
PG460's Review Comments
PG460 has not submitted comments on any reviews.
PG460's Questions
PG460 has not submitted any questions.
PG460's Answers
PG460 has not submitted any answers.