PG460's stats
- Review count122
- Helpfulness votes539
- First reviewJanuary 24, 2014
- Last reviewMarch 17, 2024
- Featured reviews0
- Average rating4.6
Reviews comments
- Review comment count0
- Helpfulness votes0
- First review commentNone
- Last review commentNone
- Featured review comments0
Questions
- Question count0
- Helpfulness votes0
- First questionNone
- Last questionNone
- Featured questions0
Answers
- Answer count0
- Helpfulness votes0
- First answerNone
- Last answerNone
- Featured answers0
- Best answers0

The Ninja Blast Portable Blender brings high-speed Ninja blending power on the go with a cordless, hand-held design. The 18-oz. vessel is perfect for smoothies, protein shakes, and frozen drinks. Blast through frozen ingredients with Ninja’s BlastBlade Assembly. Ninja Blast is rechargeable via USB-C. One-handed, easy-open sip lid and carrying handle make drinking on the go easier than ever.
Customer Rating

5
Ninja Out-Blends The Competition
on August 31, 2023
Posted by: PG460
I own numerous Ninja products and I love their ingenious creations which outshine similar products from their competitors. The Ninja Blast is a portable blender and is a product I hoped Ninja would develop. I’m a fan of smoothies and protein shakes so a small single serve blender is so much easier to use and clean than a full size blender. Plus the lithium ion rechargeable battery and wireless operation are great when you’re on the go. Just take it along with your ingredients ready to freshly blend at work or on the road. Plus you can drink right out of the blender with it’s easy to use sip spout. In the box you get the Blast, a usb C charging cable, a quick-start guide, and an instruction manual. Not included is a power adapter but just use your phone adapter. To use, you just add your ingredients in the suggested order from bottom to top. Liquid first to the minimum liquid line, then fresh fruit, leafy green next, then dry ingredients, lastly is ice or frozen ingredients. You then just press the power button until the LED turns on, and then you press the start/stop button and the Ninja Blast will blend for 30 seconds. I was eager to try it out so I charged it fully for 2 hours as suggested and then grabbed some ingredients I had on hand to improvise a smoothie/protein shake of my own creation. I used almond milk, a 5 ounce yogurt, 2 tablespoons of protein powder, and then frozen strawberries and a few ice cubes. 30 seconds later I had a thoroughly blended, delicious and healthy shake. It’s really that simple and cleanup is a breeze. I’ve tried similar products from other manufacturers and the Ninja Blast out-blends the competition with this high quality product.
I would recommend this to a friend!
Share this review:
0points
0of 0voted this as helpful.
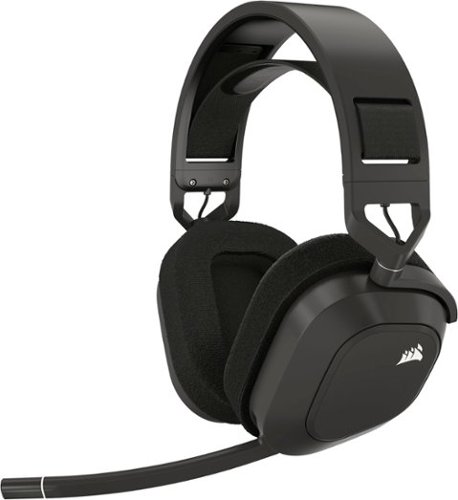
Enhance your audio with the CORSAIR HS80 MAX multiplatform gaming headset. Enjoy true audio immersion via high-fidelity 2.4GHz wireless, and activate Dolby Atmos on PC to place yourself in the middle of the game with detailed, three-dimensional sound cues. The HS80 MAX includes Bluetooth support to connect to a myriad of devices. A high-performing omni-directional microphone boasts exceptional dynamic range, so you can have a clear, commanding presence on the battlefield. Listen up to 65 hours on a single charge in cushioned comfort thanks to plush memory foam ear pads and a stress-free floating headband. Sonarworks SoundID Technology personalizes your headset’s sound to match your unique hearing profile, so you can forge your own legacy with the HS80 MAX.

Posted by: PG460
Many gamers underestimate the importance of great audio for gaming performance. I know because I play with guys every day that are oblivious to the audio cues in game that I hear and they don’t. A great pair of headphones is crucial to pick up the slightest sound of an approaching opponent. If you’re playing with speakers you’re missing out. I’ve been using the same headset for years and they’ve treated me well. They are however starting to show signs of wear and tear so I’ve been looking for a replacement. I’ve owned many high quality Corsair gaming accessories over the years so I was happy to try the Corsair HS80 Max Wireless Gaming Headset for PC, PS5, PS4.
Unboxing you’ll find the headset, the wireless transmitter, a usb charging cable, and a warranty card. You’ll also find some info on Dolby Atmos prompting you to download a free copy from the Miscrosoft Store since the HS80 supports Atmos. I’m familiar with Atmos for movies and music so the idea of Atmos for gaming was exciting, at least briefly exciting, more on that later. The headphones themselves are nicely designed with a quality feel and weight to them. But not too heavy. Trying them on I found them to be really comfortable with memory foam ear pads. There’s a touch of RGB lighting on the logo on each earpiece. You can change the color within the iCue app. The wireless transmitter looks very much like a usb flash drive so much so that it went missing for a few days when I accidentally took it to work thinking it was my work drive. Once connected there were multiple firmware updates available.
One thing missing from the box is any kind of setup manual or direction on where to find it online. So flying blind, I simply used the charging cable to connect to my pc initially and inserted the wireless transmitter into a usb port. I have other Corsair gaming accessories so I had their iCue software installed. Both the HS80 and the transmitter showed up in iCue but I had no sound from the headset. I was able to easily pair via bluetooth. Only after contacting support did I learn that to connect to the wireless transmitter you do a short press on the power button.
After finally getting connected, I was excited to try the HS80 in game and particularly excited about the Dolby Atmos support. This excitement didn’t last long. I just didn’t like the sound quality of this headset which sounded oddly muffled and murky as if almost under water. Particularly unpleasant was the execution of the surround sound which instead of being seamless as you move through a games sound field, the sound dropped out as it moved from one ear to the other. I found this incredibly distracting and it definitely negatively impacted my gaming. I tried every setting in iCue and in the Dolby Atmos app without significant improvement. So ultimately the HS80 Max looks great, feels great, but sounds less than great. Disappointing.
No, I would not recommend this to a friend.
Share this review:
-2points
0of 2voted this as helpful.
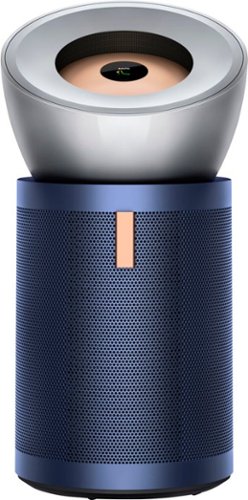
The Dyson Purifier Big+Quiet Formaldehyde is our biggest purifier yet, engineered from the ground up, to evenly purify large spaces.¹ Cone aerodynamics creates a condensed jet of air to project purified air over 32 feet. Quietly. An advanced 360 HEPA H13 grade filter captures allergens and 99.97% of fine particles⁴. Removes gases and odors.² Destroys formaldehyde, permanently.³
Customer Rating
5
Noticeably Cleaner Air Quality
on August 19, 2023
Posted by: PG460
Air quality in my home is important to me since I have family members with breathing issues and allergies. I’ve never purchased an air purifier before because most are limited in terms of their range of effectiveness. This was particularly a concern for me because my home has an open floor plan. So the Dyson Purifier Big + Quiet Formaldehyde BP03 interested me mainly because it is a Dyson and also because it was designed for larger spaces up to 1,000 square feet. Upon arrival, the box was surprisingly large and heavy. This thing is big at nearly 33 inches tall by 17 inches wide and weighs in at a little over 26 pounds. Thankfully it’s on wheels so you can easily move it around. In the box the BP03 comes in two pieces and is accompanied only by the remote and some paperwork. The two parts snap together and then it’s just a matter of powering it on and getting the Dyson app. You just add a device. Here the Big + Quiet connects first via bluetooth and then you’re prompted to connect to your wifi network. Now you can control the unit with the app or with the remote. The advantage of the app is you can see room temperature, air quality, and humidity and filter levels. These are also visible on the lcd screen on the unit itself. You can also control it via your favorite voice assistant whether it be Alexa, Siri, or Google. Due to the size of the BP03 I found room placement a bit tricky. Dyson suggest that it should be in a corner of a room and about 3.5 feet from the wall and with the conic amplifier facing the length of the longest wall or facing diagonally across the room. The Big + Quiet comes with the HEPA and activated carbon filters installed. The HEPA filter is rated to last up to 5 years and the activated carbon filter solid should last up to 2 years. The BP03 will prompt you when it’s time to change either. I like how the Big + Quiet circulates the air as it cleans it. You can adjust the airflow speed and air direction from 0° to 50° and like the name says it is quiet. I like that the unit doesn’t just clean the air, it also monitors air quality so you know when it’s working. It also lets you know what exactly is negatively impacting your air quality whether it be particulate matter, VOCs, carbon dioxide, oxidizing gases, or formaldehyde. After only one day of use I could even tell that my home smelled noticeably better and even cleaner. I am also confident that it has helped with family members allergies. Highly recommended.
I would recommend this to a friend!
Share this review:
0points
0of 0voted this as helpful.
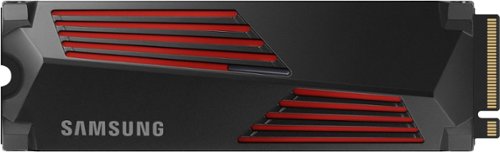
Designed for tech enthusiasts, hardcore gamers and heavy-workload professionals who want blazing fast speed. The integrated heatsink disperses heat to maintain speed, power, efficiency and thermal control, preventing downtime overheating on consoles and PCs. For console gaming, compatible only with PlayStation 5. Sequential read/write speeds up to 7,450/6,900 MB/s
Customer Rating
5
Great Performance Upgrade For Gaming
on July 25, 2023
Posted by: PG460
I’ve used Samsung SSD products for years. From SATA SSDs to NVMe, they have been my go to brand for hard drive upgrades due to their reliability, quality, and ultimately their superior performance. With the arrival of the new Samsung 990 Pro 2TB Internal SSD PCIe Gen 4x4 NVMe with heatsink I was excited to try it. I recently got a new gaming computer and planned on upgrading the NVMe because while the included drive is fast, the Samsung is faster.
In the box you find the SSD and a booklet. The 990 Pro is a cool design with a great looking heatsink. To prepare for the physical installation I jumped on the Samsung website and downloaded their data migration software and Samsung Magician which is their full featured SSD management and configuration software. Both apps are conveniently available in a single download. Once the software was installed I was ready to install the drive. My pc came with 2 NVMe slots so I planned on cloning my existing primary drive and using the 990 Pro as my new boot drive and the original drive as my data secondary drive. This installation is a breeze so don’t be intimidated if you’ve never done this before. Power down your pc and unplug it. Locate your NVMe slot and slip the drive into place. Secure the drive with a mounting screw. Your SSD doesn’t come with one and annoyingly most pcs don’t even include one for the second slot. You may have to purchase one. Sometimes the post is also not included. I’d have to say that securing these tiny screws is the most difficult part of the whole installation. Once in, you power on your pc, clone your drive using the Samsung data migration software, and change your boot order in BIOS to the 990 Pro and you’re done. The whole process may have taken 15 minutes with the data cloning taking under 3 minutes.
Once installed, a performance improvement was apparent immediately upon my first boot because boot speeds were noticeably reduced. The Samsung Magician software is the nicest SSD management software I’ve seen, with many features including a benchmark. Here you can adjust the RGB LED color. The addition of RGB is minimal and somewhat disappointing with only a small slit illuminating. Upon benchmarking the 990 Pro, I got 7,133 MB/sec read and 6,778 MB/sec write speeds while my old drive benchmarked at 5,000/4,000 read/write. Impressive! My next stop was to play my favorite games. Gaming performance is all about milliseconds and I could quickly sense a significantly more fluid gaming experience compared to my old drive and that made me noticeably more competitive. That’s what it’s all about! This quickly proved to be a great upgrade. Highly recommended.
I would recommend this to a friend!
Share this review:
0points
0of 0voted this as helpful.
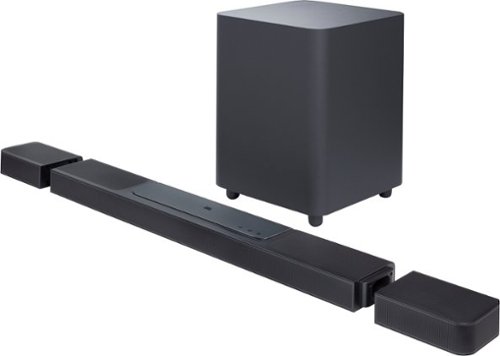
The ultimate 3D surround experience that will blow you away. You’ve never heard anything like the JBL BAR 1300X—in your living room or anywhere else. More than just a great soundbar, it’s a full sound system. It features MultiBeam and six up-firing drivers—four in the bar and two in the detachable battery-powered surround speakers—that deliver massive Dolby Atmos and DTS:X 3D surround sound, centering you in your music, movies, and games. 1170W of total output power and thrilling bass from a 12” subwoofer is more than enough to make the room shake. Though, you’ll never miss a word with due to our PureVoice technology, which makes sure the dialogue is clear even when other sounds are at their loudest. When you want to enjoy your favorite tunes choose streaming via either AirPlay, Alexa Multiroom Music (MRM), or Chromecast built-in that give you over 300 music streaming options. But that’s not all. Your choices are as unlimited as you are because you can also pair the soundbar to your Bluetooth device. You can even take one of the detachable speakers (or both for powerful stereo sound) out to your kitchen or patio and enjoy listening to your favorite music or podcast there.
Customer Rating
5
Innovative Soundbar With Exceptional Sound
on July 9, 2023
Posted by: PG460
I’ve owned soundbars for my home theater setup for years. My latest one was very nice but I was looking forward to an upgrade with the JBL BAR 1300X 11.1.4 channel soundbar with detachable surround speakers. Witnessing the UPS driver struggling with the box was a good indicator of the hefty goodness inside. Unboxing you’ll find the soundbar, 12 inch wireless subwoofer, 2 battery powered wireless rear surround speakers, 2 power cables, an HDMI cable, remote control and batteries, speaker wall mounts and hardware, soundbar end caps, and a quick start guide. The majority of the weight in the box is the substantial nearly 19x15x15 inch subwoofer which alone weighs in at nearly 35 pounds. The soundbar itself weighs in at almost 10 pounds. Simply unboxing the BAR 1300X was my first indication that this soundbar is an incredibly ingenious design from JBL which beautifully solves the rear speaker issue with detachable and truly wireless satellites. They are even rated to last a remarkable 10 hours on a charge. My prior soundbar had rear speakers but they were wired to a powered rear transmitter box. A far less than elegant surround solution. The rear speakers can also be used detached as stereo bluetooth speakers. The overall look of the product is very nice and quality seems exceptional. I love this JBL design and couldn’t wait to try it.
Proceeding to setup, I initially referenced and then quickly discarded the quick start guide when I found it to be fairly useless. I instead visited the JBL website to find a PDF of the owners manual. Here you’ll find great instructions for connecting the BAR 1300X to your tv and how to set it up. I wall mounted mine. It’s great that mounts are included but I opted for another mounting solution. Wiring in my case was simple. I only connected the HDMI cable from eARC HDMI port on the soundbar to eARC port on my tv. You will also find 3 additional HDMI ports on the rear which support 4K pass through at 60hz. There is also an ethernet port, and optical port, and 1 usb port. Next I attached the detachable rear speakers to the soundbar and placed the subwoofer in my room and plugged it in. The rear speaker snap on magnetically and the connection is strong. They are not going anywhere. When removed from the soundbar JBL includes grill caps for the ends of the soundbar. Great touch, but I wish they also included another set for the rear speakers so all elements look finished when in use. The hefty subwoofer could be imposing in smaller rooms. The sub and satellites connected automatically to the soundbar. In the manual you are directed to get the JBL One app which easily guides you through setup. You simply add the soundbar to your wifi network and it was promptly detected within the app. There was a prompt for a firmware update which took about 20 minutes to update. Next I proceeded to calibrating the BAR 1300X. Here you remove the rear speakers and place them to the left and right behind your tv viewing position. The soundbar and rear speakers then play a series of test tones to calibrate the Dolby Atmos sound field. That was pretty much it for setup.
Specifications wise the JBL Bar 1300X is impressive with 1170W power output driving 5 tweeters, 6 midrange, and 4 woofers. Surround sound modes supported include True Dolby Atmos, DTS:X and MultiBeam surround sound. With the built in wifi you can utilize Apple AirPlay, Alexa Multi-Room Music and Chromecast and with a Google, Amazon, or Apple voice assistant you can easily stream music to the soundbar. The remote is fairly basic but includes source selection buttons for tv, bluetooth, and HDMI. There are sound effect buttons to adjust the Dolby Atmos or DTS:X effect level, the bass level, and the rear surround levels when the rear speakers are detached. A calibrate button is present along with a mute button. A play button controls the streaming music from the JBL app, Alexa, Chromecast, or AirPlay. And a “moment” button allows you to quickly play a playlist that you setup in the JBL One app with music service from Amazon Music, Calm Radio, iHeartRadio, Napster, Qobuz, Tidal, and TuneIn. Sadly missing are Apple Music and YouTube Music.
I was so far thoroughly impressed with specs, appearance, and build quality so I moved on to seeing how the JBL BAR 1300X performed. I opted for a 4K bluray of John Wick 4 as my source. I removed the rear speakers from the soundbar and put them in position behind my viewing position. What an experience. I truly thought my old soundbar sounded good but there was simply no comparison with how fully immersed in the Dolby Atmos 3 dimensional sound field I was with the BAR 1300X. Amazing! The thundering bass from the sub was just right without sounding distracting or unnatural. The BAR 1300X truly elevated my home theater experience. It was so good that I literally had a grin on my face throughout the film. The JBL BAR 1300X 11.1.4-channel soundbar with detachable surround speakers is a remarkably innovative product and without a doubt it is the best sounding soundbar I’ve heard.
I would recommend this to a friend!
Share this review:
0points
0of 0voted this as helpful.

The Award-winning Hisense U8 Series Mini-LED TV just got even better. With Peak Brightness 1500 and more than double the local dimming zones as last year, along with Quantum Dot Color, Dolby Vision HDR, and Low Reflecton panel technology, the U8 delivers unmatched brightness, contrast and detail. And, with Dolby Atmos and an upgraded 50w 2.1.2 multi-channel audio system, the U8 creates an immersive cinema experience in your home. In additon, the U8 is compatible with the new Wifi 6E router protocol and includes a NEXTGEN TV ATSC 3.0 tuner making the U8 virtually future-proof. With the Google TV OS and Hands-Free Voice Control, searching for and playing all your favorite content is simple and seamless. Just say “Hey Google”. The U8 also got more upgrades for the gaming enthusiast including a 144Hz VRR panel, Dolby Vision Gaming and FreeSync Premium Pro for an enhanced gaming experience. And, be2er also just got bigger with the U8H now available in an 85” screen size.
Posted by: PG460
A few years ago I got a Hisense television for a bedroom. Hisense then was a budget friendly up and coming television manufacturer. I was still quite impressed with the TV even though it was relegated to a guest room. Now, upon getting the Hisense 75 inch 75U8K 4K Mini-LED Quantum ULED Google TV I can comfortably say that Hisense is no longer up and coming, it has definitely arrived. The 75U8K is amazing. So nice in fact that I have happily replaced my main TV, which just happens to be an OLED. I love my OLED but overall the Hisense is a better TV and now the OLED is a bedroom TV.
Unboxing this big of television seems daunting but it wasn’t bad. The 75U8K was nicely packaged to protect it behind layers of cardboard and styrofoam. In the box you get a manual, the legs, and a remote. I opted to wall mount mine. If you do as well, the VESA measurement is 600mm x 400mm and it weighs in at about 80 pounds. It sure felt heavier when hoisting it onto the wall. You’ll definitely need some help. Once mounted, you’ll want to remove the plastic film protecting the television. While the protection was appreciated, this proved to be unusually challenging. This thing was encased in plastic with not many easily accessible starting points. The set itself looks great with its bezel-less design.
Setup of the television was a breeze. This is my first Google TV and I loved the ease of setup. You simply add the 75U8K to your Google account and Google Home via a QR code. Then connect to wifi. There was an update that took a good bit of time to download and install but once complete you select your streaming app subscriptions including Netflix, Hulu, Prime Video, Apple TV+, Peacock, Disney+, ESPN+, and Tubi. So no need for a separate streaming box. The Google TV OS interface is really quite nice and perky in responsiveness. The remote is on the basic side but it does have convenient shortcut buttons to the most popular apps. Also included is Hands-Free Voice Control so playing requests is extremely easy. Google Assistant is built in as well for controlling your smart home devices. I connected Apple TV, a Dolby Atmos soundbar, and a 4K blu-ray player. For HDMI you’ll find 4 ports, 2 ports up to 4K@144Hz. For a soundbar you get eARC. There is also an optical port, 2 usb, ethernet, RF antenna, and headphone port.
Once my apps were up and running I was eager to try some content to see how the 75U8K looked and performed. I eagerly viewed a variety of content from YouTube 4K selections, Netflix shows in 4K, and 4K blu-ray films. Wow! The Mini LED 120hz display picture quality was mesmerizing with dark inky blacks comparable to OLED but with a brightness that just blew me away and at a 1500 nit peak brightness which definitely surpassed that of my OLED. HDR formats supported include Dolby Vision, HDR 10, HDR 10+, Hybrid Log-Gamma (HLG). Contrast was stunning no doubt benefiting from the 1,056 local dimming zones. Colors are also particularly rich and vivid due to Quantum Dot Wide Color Gamut technology. Between the brilliant color accuracy and the stunning HDR performance visuals just pop. Even commercials look amazing. I was thrilled with the TV and that’s just out of the box with the factory settings. There are a multitude of image settings in the menu to adjust to your liking.
Hisense has something exceptional here and it doesn’t stop at the display quality. Sound on the 75U8K is certainly the best I’ve hear on any TV with 2.1.2 multi-channel audio. There are actually 5 speakers onboard including rear overhead speakers and a subwoofer on the rear of the TV. Many will opt for a soundbar but you still have far above average sound if you chose not to. I don’t game on my TV but for those that do the 75U8K is ready for you with smooth gameplay from its 144hz game mode pro with 144hz variable refresh rate and FreeSync Premium Pro to minimize lag and image tearing. Plus it supports Dolby Vision for gaming at 4K 144hz.
I love this TV and I’m confident you will too. Highly recommended.
I would recommend this to a friend!
Share this review:
+3points
4of 5voted this as helpful.
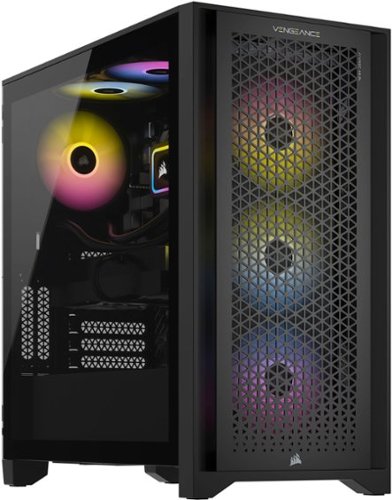
Step up your game with a CORSAIR VENGEANCE i7400 Series Gaming PC, powered by a 13th Gen Intel Core processor, NVIDIA GeForce RTX 30-Series graphics, and CORSAIR VENGEANCE DDR5 memory. Dynamic RGB lighting brilliantly illuminates the system, with powerful CORSAIR iCUE software to control lighting, fan and pump speeds, and more. The VENGEANCE i7400 Series is cooled by an H60x RGB ELITE liquid CPU cooler and six SP RGB ELITE fans with AirGuide technology for concentrated airflow. Equipped with a high-speed M.2 NVMe SSD, housed in a roomy CORSAIR 4000D AIRFLOW mid-tower case, and easily upgradeable thanks to a standard ATX form-factor, this is everything you need to game with a VENGEANCE.
Customer Rating
5
Love This Corsair Vengeance i7400
on May 15, 2023
Posted by: PG460
I have have been a gamer for about 24 years. At times it was a hobby and an obsession, but always a great source of entertainment. In the past I built many gaming systems but over the years I moved to the prebuilt option. I’ve owned many different brands but I’ve never had a Corsair computer. I have on the other hand owned many Corsair gaming accessories including keyboards, headsets, RAM, and several mouse variations. All of which were exceptional products which helped elevate my gaming to another level. I was therefore thrilled to try this Corsair Vengeance i7400. Spec wise this system looks amazing with an Intel Core i5-13600KF with 6 P-Cores, 8 E-Cores, 20 Threads, 5.10GHz TurboBoost, a Corsair iCUE H60x RGB ELITE liquid cpu cooler, an Asus Nvidia GeForce RTX 3070 SI Edition with 8GB of GDDR6, 32GB (2x16GB) Corsair Vengeance DDR5-5600MT/s RAM, and 1TB Corsair MP600 PCIe 4.0 NVMe SSD with heatsink. There is also an additional empty NVMe slot for added storage upgrade. Here again this system shames much of the competition that uses lower quality components, less RAM, and lower capacity SSDs that almost immediately demand an upgrade and further monetary investment. On case top front you have access to 1x USB 3.2 generation 1 Type-A port, 1x USB 3.2 generation 2 Type-C port, and a headphone/mic combo jack. Very handy. On the rear you have a PS/2, 4x USB 2.0, 2x USB 3.2 generation 2, 1x USB 3.2 gen 2x2 Type-C, 7.1 audio, 3x DisplayPort, 1x HDMI ports. You also get 2.5G ethernet port, Wi-Fi AC, and Bluetooth 5.1.
Unboxing was exciting as the anticipation of something great waiting within was high. In the box you’ll find the PC, a power cable, 2 wifi antennae, and some minimal paperwork. That’s it! And that alone was thrilling since missing was the insultingly crappy gaming keyboard and mouse that other manufacturers include without shame. Hallelujah! Just buy yourself a Corsair mouse and keyboard. You can’t go wrong and your gaming will be better off for it. I was in love with this system just laying my eyes on the i7400. So many manufacturers fail horribly in case design. Not so here. The Corsair 4000D AIRFLOW mid-tower case is a beauty in its modern sleek appearance and the build quality looks and feels impressive. This build is open and airy with no cables impeding airflow. I couldn’t wait to fire it up. As I removed my prior system from desk it looked dated and pathetic in comparison to this Corsair. I was simply going to use the same power cord until I noticed the included hefty Corsair power cord. Even here Corsair quality impressed me since their cord is what looks to be a 10 gauge heavy duty power cord. Nice attention to detail to efficiently power it’s 750W 80+ Gold fully modular power supply. Prior to powering on make sure you first remove the internal packing materials which support the video card during transport. The tempered glass side panel is well made and substantial so be careful when removing it. It has some weight to it. Once removed you’ll love the view of the black motherboard.
I fell more in love with this system turning it on for the first time as the H60x RGB ELITE liquid CPU cooler and the six SP RGB ELITE fans lit up. This case is a stunner! And it is extremely quiet. Color settings for the fans and cooler can be customized within the Corsair iCue software. The system is barely audible with the liquid cooling and particularly considering 6 fans are running. The Corsair Vengeance DDR5 memory is not RGB. Some may care. I do not. Moving onto setup the included Windows 11 Home edition was typical. I was at the desktop in no time and ready to install my favorite games. With the GeForce RTX 3070 I was confident that I was fine with any games I’m currently playing. On CypberPunk 2077, one of my most demanding games, the Corsair i7400 is capable of 147 fps at 1440p and even 85 fps at 4K resolutions. CrystalDiskMark benchmark results for the P600 SSD were an impressive 5013.47 MB/s read and 4045.05 MB/s write speeds. I always jump on my most often played games to judge real performance and here I could definitely sense a new level of responsiveness and fluidity which ultimately resulted in making my gameplay more competitive. I was tempted to brag to my opponents that I had a new rig but that’s my secret weapon. They don’t need to know why I’m owning them. Highly recommended.
I would recommend this to a friend!
Share this review:
+5points
5of 5voted this as helpful.

Achieve high-quality visuals on every play with this Panasonic Ultra HD Blu-ray player DP-UB154P-K. Deep color HDMI output and 4K upscaling delivers immersive enjoyment of your favorite movie titles, showing images at their very best. Featuring Dolby Atmos and HDR10+ compatibility, this Panasonic UHD Blu-ray player immerses you both in lifelike sound and images.

Posted by: PG460
The Panasonic 4K Ultra HD Blu-Ray Player DP-UB154P-K is my second 4K DVD player. My prior one is a few years old so I was excited to see how it measures up. In the box is just the player, a remote, and a manual. I placed the player in my master bedroom. Setup was a breeze as the on screen display takes your through each step. Simply select your language and perform the video connection test. Then accept the terms of use and you’re quickly up and running. There was a prompt to check for a firmware update which brought to light my first disappointment since there is no wifi on this unit. I have no ethernet in my master bedroom so I could not update without moving the player. I am a bit baffled by the lack of wifi but when considering that the DP-UB154P-K offers no streaming functionality I guess it makes more sense. Some may find the lack of streaming to be an issue since no YouTube, Netflix, etc. is available but I don’t really mind since I have dedicated streaming devices which no doubt would outperform any integrated solution.
I was ready to check out the player. I started with the menu. Things are pretty basic here but along with settings there are options to play video, photo, and music files via the usb port or from disc. The player supports all the following UHD Blu-ray, Blu-ray, DVD, CD, MKV, JPEG, FLAC, WAV, ALAC, DSD, AAC, MP3, AIFF, AVCHD. The DP-UB154P-K supports these 4K/HDR formats HDR10+, HDR10, and Hybrid Log-Gamma (HLG). Excellent! I have a Dolby Atmos sound bar so I was also very pleased that Dolby Atmos is supported.
I have the DP-UB154P-K connected to my LG OLED tv so I was expecting some stunning video and audio. I was not disappointed. Simply amazing. I was definitely impressed by the performance of the Panasonic DP-UB154P-K in terms of responsiveness. Certainly much better than my old player. The remote is fairly small and is overall quite nice in terms of functionality.
Ultimately you can spend a lot more on a 4K ultra HD blu-ray player but if you don’t mind the absence of streaming or wifi you can’t go wrong with this player. I certainly like it. Recommended.
I would recommend this to a friend!
Share this review:
0points
0of 0voted this as helpful.
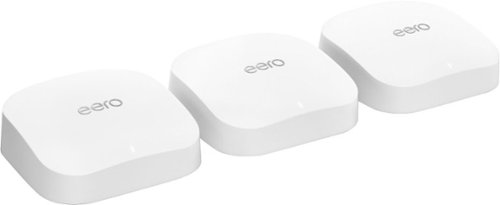
Experience the benefits of Wi-Fi 6E with the fastest system eero has ever created.* This eero Pro 6E system (3-pack) supports network speeds up to 2.3 Gbps (a gigabit wired and 1.6 Gbps wireless) and coverage up to 6,000 sq ft. Experience gigabit+ speeds for more of your wifi needs—from VR/AR, to 8K streaming to using the latest Wi-Fi 6E mobile devices.
Customer Rating
5
Future Proof Gigabit WiFi
on October 22, 2022
Posted by: PG460
I have used several mesh network setups over the last few years. The one I’ve been using has treated me well but it is a few years old so upgrading to the eero Pro 6E was intriguing since it supports 1.6 gigabits per second wifi connectivity and supports the 6GHz wifi band. Inside is a 1GHz dual-core processor, 1GB RAM, and 4GB flash storage. This eero also supports Zigbee so you can also use it as a smart home hub.
In the box you only find the 3 mesh nodes, usb c power adapters, and a setup card. The card simply instructs you to get the eero application to complete setup. A few seconds later I was ready to go after setting up an account. You can also use your Amazon account if you so chose. The app suggests shutting down your modem before connecting the first node via ethernet cable to modem. Then you just power on your first eero node and then your modem and then the app guides you through the setup. You have the option to name your network. If you have a bunch of devices it’s a huge timesaver to simply use your prior network name for eero. My first node was up and running in no time. The other 2 went just as smoothly as I placed them through my home. Total setup may have taken 20 minutes. I did get a firmware update notification once setup was complete. The eero nodes are sleek, fairly low profile and look unobtrusive. The eero Pro 6E with 3 nodes should provide coverage for 6,000 square feet. In my case this setup is more than adequate. One immediate disappointment during setup was that each node only has 2 ethernet ports, one 1 gbe port and and one 2.5 gbe port which is nice but other mesh systems I’ve used included more ports. You can alway add more with a switch but I’d prefer not having to resort to one.
The eero app is quite nice and user friendly. Here you can view all your connected devices and you can block devices if desired. You can also view connection speeds and see which nodes each of your devices are connected to. There are advanced networking setting too for port forwarding, DNS, DDNS, and DHCP & NAT. There is a parental control feature called Eero Plus but it is a monthly subscription service that costs $99 a year. When viewing each node in the app there is a great setting which allows you to adjust the brightness of each nodes status light which can be quite bright in a dark room.
After completing setup I was of course interested to check my WiFi speed. I currently have no wifi 6E devices but my devices are wifi 6. I have gigabit internet service so after a few speed tests I was thrilled to actually realize gigabit wifi for the first time in my home! Much better than my old setup. This was excellent but this was in the same room as the main node. As I moved to my second floor I was somewhat less impressed. When connecting to the third node I got about 300 gbs and I was not even that far away from the main node. Oddly worse than my old mesh setup. I’ve played with node placement without much improvement. Still quite fast however. With the eero Pro 6E I do feel future proofed as more 6E devices become available such the new iPad Pro which arrives next week. eero Pro 6E also supports over 100 connected devices so I’m covered as my network grows. Overall I’m quite pleased with the eero Pro 6E.
I would recommend this to a friend!

Share this review:
0points
0of 0voted this as helpful.
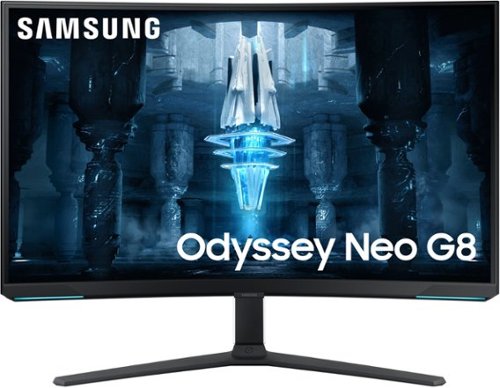
Quantum Matrix Technology, HDR 2000 and UHD resolution come together for a crystal clear picture. 240Hz refresh rate and 1ms GTG GTG response time support smoother game play. Matte display enables better gaming immersion.
Posted by: PG460
The Samsung Neo G8 32 inch gaming monitor is the worlds first 4K 240hz monitor but the amazing specifications don’t stop there. This is a Samsung Quantum Matrix mini LED matte display with 1,196 dimming zones. It sports a 1ms response rate, HDR2000, 1,000,000:1 contrast ratio, a peak brightness of 1000 nits, a 1000R curvature, and it supports FreeSync Premium Pro and is G-Sync compatible. Yikes that is some impressive technology.
In the box you get the monitor, manual, power adapter, display port cable, usb cable, and the installation guide. The monitor stand assembly involved tightening only a few screws and attaching the base. The included manual is very basic which I generally don’t mind with most products but in this case with a monitor with so many features I expected more. I was quickly struck by the amount of curvature on the Neo G8. The overall aesthetic is quite cool with a somewhat futuristic glossy white plastic exterior. Not sure I love it but I don’t hate it either. I was somewhat anxious about how much desk real estate the G8 would take. But upon getting it in position I was very relieved that the base design was angled in such a way that it took less space than my old monitor. The ergonomic stand adjusts the height easily. You can also tilt to use in portrait mode. The stand is somewhat disappointing in that the monitor wobbles with the slightest touch or movement.
This is my first 4K monitor so I was excited to try it. Upon start up I noticed that colors were super vivid and crispness of text was amazing. First thing I needed was 4K wallpaper. I selected a high contract image and wow are the black levels on this monitor amazing. I’d say very close to that on my OLED tv. Windows 11 had automatically adjusted the scale of icons and text to 150% to compensate for the high resolution. Anything lower was just too tiny for my old eyes. I’m using an RTX 3080 so I jumped into Nvidia Control Panel to turn on G-Sync. To navigate the monitor menu you use a 5 button menu system on the front bottom of the G8. I despise these monitor buttons and wish Samsung had utilized a more creative solution. There is a multitude of settings in the menu system. I started by turning the refresh rate to 240hz and I turned on the Infinity Core lighting which is oddly off by default. Here you can also select a few different lighting effects. The Infinity Core RGB lighting is on the lower left and right of the monitor and on the rear in the center where the monitor stand attaches. The lighting is pretty underwhelming in the sense that it’s just not quite bright enough and as a result not really all that noticeable. The rear lighting does at least provide a somewhat cool ambiance.
Jumping into a game I was ready to be amazed and I’d have to say the Neo G8 absolutely did not disappoint. I was blown away. Image quality of games was simply stunning in terms of contrast and crispness. Colors popped. My games were suddenly a new experience. Also immediately noticeable was a much more fluid gaming experience compared to my old monitor with zero distractions from ghosting or screen tearing. My old monitor was a widescreen so I was a bit apprehensive about using a curved monitor. At 1000R curvature the curve on the G8 is pretty intense. I would say that I did find that the curve really did add to the sense of immersion while playing. Overall the Neo G8 was hands down the best gaming monitor I’ve ever used.
I would recommend this to a friend!
Share this review:
0points
0of 0voted this as helpful.
PG460's Review Comments
PG460 has not submitted comments on any reviews.
PG460's Questions
PG460 has not submitted any questions.
PG460's Answers
PG460 has not submitted any answers.