MarilynB's stats
- Review count63
- Helpfulness votes470
- First reviewMarch 5, 2013
- Last reviewApril 12, 2024
- Featured reviews0
- Average rating4.7
Reviews comments
- Review comment count0
- Helpfulness votes0
- First review commentNone
- Last review commentNone
- Featured review comments0
Questions
- Question count0
- Helpfulness votes0
- First questionNone
- Last questionNone
- Featured questions0
- Answer count26
- Helpfulness votes96
- First answerJune 20, 2014
- Last answerAugust 1, 2021
- Featured answers0
- Best answers6
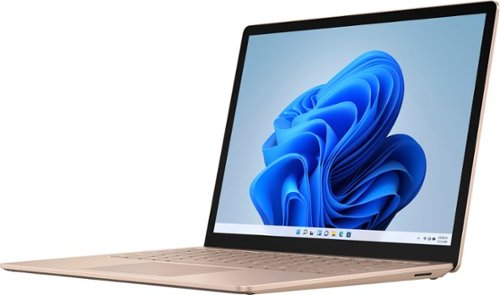
Stand out on HD video calls backed by Studio Mics. Capture ideas on the vibrant PixelSense touchscreen. Surround yourself with immersive, theater-like Dolby Atmos audio⁶. Do it all with a perfect balance of sleek, ultra-thin design, and more speed, now up to 70% faster – with significantly longer battery life than before¹. Two sizes. Two keyboard finishes. Plus, choice of 11th Gen Intel Core or exclusive AMD Ryzen Microsoft Surface Edition processors².
Posted by: MarilynB
from Texas
Unpacking: What's in the box: Laptop, power cord, quick start guide. Well packaged, safe from bumps.
First impression:
On first impression, the laptop is very sleek and light-weight at 2.8 pounds and measuring just 12.1 x 8.8 x 0.6 inches. I got the Sandstone color and it looks great. The touch-pad is a big 4.5 x 3 inches. The keyboard is regular-sized and easy to type on. It doesn’t have the compressed keyboard that you sometimes find on smaller laptops. That’s a big plus for me. The feel of the computer on the wrist while typing is comfortable. My only complaint upon first impression is that there are not enough ports. Only a USB-A, USB-C, and a headphone jack are available. At least one more USB-A port would be a big improvement. Also, there is no SD card reader port, which can be easily remedied by using a card reader. Both are minor complaints because work-around remedies are cheap and easy by using either adapters or a USB hub/splitter.
On first impression, the laptop is very sleek and light-weight at 2.8 pounds and measuring just 12.1 x 8.8 x 0.6 inches. I got the Sandstone color and it looks great. The touch-pad is a big 4.5 x 3 inches. The keyboard is regular-sized and easy to type on. It doesn’t have the compressed keyboard that you sometimes find on smaller laptops. That’s a big plus for me. The feel of the computer on the wrist while typing is comfortable. My only complaint upon first impression is that there are not enough ports. Only a USB-A, USB-C, and a headphone jack are available. At least one more USB-A port would be a big improvement. Also, there is no SD card reader port, which can be easily remedied by using a card reader. Both are minor complaints because work-around remedies are cheap and easy by using either adapters or a USB hub/splitter.
Testing the advertised standouts:
• Dolby Atmos® Audio: The theater-like Dolby Atmos audio performed well as long as I didn’t use Firefox. While streaming a movie, the sound would stop after just a few seconds in Firefox. I was using Sling to stream a movie so I got out of the movie and then resumed it and the sound came back on for just a few seconds, then went mute again. After trying this several times, I switched to another browser: MS Edge and it worked fine. Since I prefer Firefox, I wasn’t happy about this issue. However, after doing some research, it appears that this is a known Firefox issue and not a MS Surface issue. There are some patches available that are supposed to fix this, but I didn’t try them yet. Using MS Edge, I watched movies and listened to music on the laptop and thought the sound quality was excellent. When listening to quality music, I noticed the balance of the bass tones and was pleased with the sound. Later, I tested with Internet Explorer and Chrome and the audio was fine.
• Dolby Atmos® Audio: The theater-like Dolby Atmos audio performed well as long as I didn’t use Firefox. While streaming a movie, the sound would stop after just a few seconds in Firefox. I was using Sling to stream a movie so I got out of the movie and then resumed it and the sound came back on for just a few seconds, then went mute again. After trying this several times, I switched to another browser: MS Edge and it worked fine. Since I prefer Firefox, I wasn’t happy about this issue. However, after doing some research, it appears that this is a known Firefox issue and not a MS Surface issue. There are some patches available that are supposed to fix this, but I didn’t try them yet. Using MS Edge, I watched movies and listened to music on the laptop and thought the sound quality was excellent. When listening to quality music, I noticed the balance of the bass tones and was pleased with the sound. Later, I tested with Internet Explorer and Chrome and the audio was fine.
• Sleek, ultra-thin design: I loved the weight and sleek design. I have to agree with this stand out! This is a huge deal for me. I love to travel and this will be a wonderful change for my carry-on bag!
• More speed, 70% faster: The speed seemed fine to me, but I don’t really have the ability to test this because I don’t have the other devices with which to compare the speed.
• Significantly longer battery life: Although advertised at 19 hours, the battery life lasted 13 hours the first day and 15 hours the next day. It all depends on what you are doing on it. The 15 hr day included watching 2 movies, listening to music, working on documents and spreadsheets, browsing the Internet, and getting on social media. The 13 hour day was about the same (including streaming two movies) except I spent more time during the evening on the laptop. Both days, I started with a fully charged battery and kept the laptop on constantly and didn’t let it go into sleep mode or hibernation. I kept the screen bright. I would say that this laptop would definitely stay charged during a full 9 hour office day with constant use. Still an impressive amount of time!
Other features:
• The 3:2 display aspect ratio is excellent for office work, making more of my spreadsheets and documents visible. The size of the display was still large enough to also enjoy the movies and videos I watched.
• The 3:2 display aspect ratio is excellent for office work, making more of my spreadsheets and documents visible. The size of the display was still large enough to also enjoy the movies and videos I watched.
• Magnetic Surface Connector for charging: I love this connector. First of all, because it is magnetic, it is so easy to connect. Secondly, the 90 degree angle of the cord makes me feel that the cord will last for a very long time because it won’t be getting bent constantly. Although, I will probably just charge the laptop at night and use the battery during the day, I did keep it plugged in the first day. The cord came unattached once when I was moving the laptop from my lap to a table and not noticing that the cord was getting caught on something, so you’ll need to watch that. I really like that the cord came unattached instead of it getting bent and pulled on. That should make it last much longer. I may never need to replace it at all.
• The touch screen worked great and responded quickly. There was no lag time at all that I noticed. I was pleased with the response.
• Web cam – I didn’t attend any meetings or use Skype or Zoom during my testing of this laptop, but I did switch the web cam on and found the image quality to be very good.
Bottom line: If you are looking for a laptop requiring a lot of storage for image files and numerous ports for peripherals, this probably isn’t the one for you, but if you want a laptop for basic office work (spreadsheets, documents, etc.) or Internet browsing, and social media use, this laptop definitely fits the bill. Its powerhouse battery, sleek design, and light weight make it ideal for most users. The 512GB hard drive and 8mb memory should be plenty large enough to handle your needs. You can easily put it in your backpack and carry it around with you; then take it out at a coffee house, office, meeting room, airport, plane, living room, etc. and feel assured that you will have enough battery to last for a long time.
Mobile Submission: False
I would recommend this to a friend!


Share this review:
+8points
8of 8voted this as helpful.

A digital photo frame in a contemporary design, the Lenovo Smart Frame is customized to blend seamlessly into your home's interior. It's your household's entry point to your favorite memories, re-lived directly from your cloud collection. The Lenovo Smart Frame can also transform into live wall art that's customizable to your taste and surroundings, letting you choose from world-famous pieces to display on a brilliant screen. Whether mounted on a wall, placed on an easel or perched on a shelf, the display looks gorgeous from any angle. Easy to install, set up and navigate, the Lenovo Smart Frame delights each and every time you catch a glimpse.
Customer Rating

4
Excellent size/photo quality. Needs improvements
on April 15, 2021
Posted by: MarilynB
from Texas
The Lenovo 21.5 inch Smart Frame arrived very securely packed with form-fitting foam. In the box there was the display, a metal frame, a wall-mounting bracket, some hardware for mounting the bracket, a power cord, and a quick-start manual. Other manuals and guides are available on-line.
Some things I liked about it
• Large display – 21.5 inches. The largest I’ve ever seen offered. Most max out at about 10 inches.
• Resolution 1920 x 1080 pixels for a good HD experience.
• Anti-glare. It views well at wide angles.
• Sleep mode – so it doesn’t keep running all night (Be aware that it works along with a light sensor, so if you have lights on in the room, it will still keep running after your turn off time, unless it is on “pause.”)
• Choice of orientation – Landscape or Portrait
• Wall or Desktop installation – I chose Desktop and put a small anti-slip pad under it to keep it from slipping. I put bumper guards on the back where it leans against the wall.
• At about 8 lbs, it is not as heavy as I would have expected. If you want to mount this on your wall, you should not be concerned about it falling as long as you use the proper anchors and screws.
• Voice Control with Google Assistant or Alexa
• You can change to a new “channel” or change to the next/previous photo using hand gestures or using the plus, minus, or star buttons on the frame.
More info: Lenovo Smart Frame has 3 pre-made “channels.” The first channel is “Selected Photos.” This lets you show slideshows from albums that you have made on Google Photos. The next channel is “Art Gallery”. There are several pre-selected works of art in portrait or landscape orientation that you can run in a slideshow. The third channel is “Recommendation” where it will randomly choose photos that you have in your Google Photos account. You can also create up to 3 custom channels by saving albums as “created channels.” You can only save 1 album per channel. I tried to save 4 albums as a channel, but it wouldn’t let me choose more than one. Lastly, If you mark a photo as a favorite, it will put it in a “favorites” album, making it easy to view your favorite photos in one album.
Some things I didn’t like about it:
• Only works with Google Photos which has a limited sort feature (as well as another important limitation, listed below.) You cannot sort photos by file name, only by oldest, newest, or recently added. You can custom sort using a drag and drop method. A USB port or MicroSD slot on the Lenovo Smart Frame would be great! You could make folders instead of albums and put your photos in order by file name. This would also eliminate the issue that Google Photos plans to limit free usage beginning June 1, 2021.
• Google Photos will only let 100 photos per album load to the Smart Frame, so if your album has more photos, you won’t see any after the first 100. So you will need to make multiple albums if you are showing more than 100 photos. If you could use a USB drive or MicroSD card instead of Google Photos, this problem would also be eliminated.
• You can show up to 5 albums, but the albums will be shown in random order. Lenovo really needs to fix this! This problem is not with Google Photos. This could be fixed in an app update.
• It cuts off part of the image on most non-cell phone photos. Lenovo shows cell phone photos completely because they match Lenovo’s 16:9 ratio, but my Nikon has 3:2 ratio so Lenovo crops off 15.7% of my photos. I made copies of them and edited all of the copies to the 16:9 ratio so that I could choose where to crop them myself. If you don’t want to crop any of your photos, you can also edit them to place a border on either side (for Landscape) or top/bottom (for Portrait) to make it that 16:9 ratio. (See sample image.)
• Won’t play video even though I have the video in Google Photos and it plays there.
• Need shorter increments for changing to the next photo. The shortest is 10 seconds.
• Only 1 choice for Transition between photos. A right to left wipe that is distracting and annoying.
• No color choice for display “mat”. The area around the display screen is white.
• Trying out the hand gestures to change pictures, it worked most of the time, but would occasionally change to the next channel instead, “Art Gallery”. I worked around this by removing all of the other channels from the active channels. You can easily put them back as active by pressing the “plus” button next to the channel.
I know I have a lot of negative things written about the Smart Frame, but I am working around most of the limitations so I think it will be fine. Many people would not have an issue with 100 photos or less per album or with random albums showing. If you are one of those people, there are no other major concerns with using this frame. If you aren’t, you may try still want this frame because the quality of the photos and the size of the frame are huge benefits.
In the photos below, the black borders were added by me in a photo editing program before I uploaded them the Google Photos. I had to crop over 300 photos for this one slide show and add black borders to 10 or so of the other photos. Only my cell phone photos didn't have to have work done on them.
Mobile Submission: False
I would recommend this to a friend!


Share this review:
+3points
4of 5voted this as helpful.
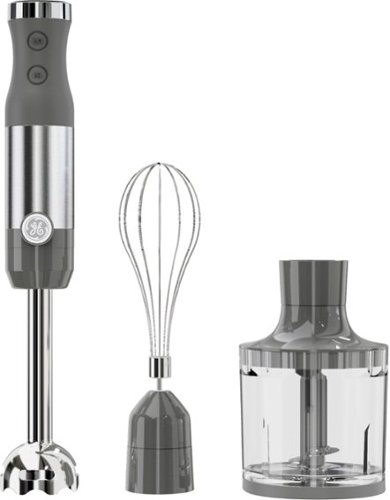
Now that quality you've come to love from GE is available right on your countertop, thanks to GE Appliances blenders, available in both Standard and Immersion designs. Our immersion blenders are ideal for one-handed operation, and available whisk and chopping attachments make whipping up family meals a cinch. You can even take it with you to help make kitchen magic on the go. GE Appliances standard blenders are the perfect addition to any kitchen and have the power to blend through tough ingredients to make delicious shakes, sauces and purées. The available personal blending cups are perfect for your morning smoothie and help make clean-up a snap. Make your blending experience a snap with help from GE Appliances, a brand you trust.
Customer Rating

5
Great multi-task appliance!
on January 22, 2021
Posted by: MarilynB
from Texas
This immersion blender came well packaged. The inner box had two formed cardboard pieces to keep all of the attachments in place. The box contained an Owner’s Manual, the main body of the blender, 3 attachments (whisk, chopper with a lid, and blending attachment.) The whisk has a motor body housing that it attaches to before attaching that to main body. The inner box was inside another heavy-duty cardboard box.
Main body: The length and grip are both well-designed for ease and comfort. The cord length is ample for maneuverability. Even for using with soup on the range, it will reach from the nearest and even the second nearest wall plug in my kitchen. The buttons are well-placed for ease of use. You have to keep your finger on the “low” or “high” button to use the blender. To turn off the blender, you just remove your finger from the button. You can also “pulse” the blender by pressing and releasing the button quickly.
Attachments: Blending Attachment (I call this “Emulsifier”), Chopper, and Whisk.
The first thing I made with the Immersion Blender was meringue for a lemon pie. Using the whisk attachment, it easily whipped the egg whites and sugar into a wonderfully peaked meringue. I used a plastic mixing bowl for this.
Next, I tested it on some homemade salsa, using the chopper attachment to cut up the onions, jalapeños, and tomatoes. You have to be careful not to chop too long, so I used a pulsing method to chop. By quickly removing my finger from the button, I could easily gauge the size of the chopped ingredients in the transparent chopping bowl. This method worked great.
Next, I tested it on a creamy squash soup using the emulsifier attachment. The attachment worked very well. The cooked squash was well mixed with the other ingredients. I put the emulsifier directly into the pan on the stove that I was cooking in for this.
Lastly, I gave it multi-task test making a dog food treat from a recipe that I got in my dog’s monthly treat box. First, I crumbled up some hard “dog treats” using the chopper attachment. Then I put the chopped treats into a glass mixing bowl, added a banana, 6 oz of plain yogurt, and 2 T of sweet potato (a dog treat in a squeeze tube.) I used the emulsifier for that. It came out well mixed. I was able to spoon it into her rubber toy and freeze it for later.
Deciding whether to pulse the buttons or hold them in was easy. I started everything with pulsing and soon figured out which ones needed to be changed to continuous. For the salsa, pulsing the button worked best because I could stop the attachment before it became too mushy or watery. For the dog treats and the meringue, holding in the button worked best.
Changing the attachments was very easy. Just attach to the main body and turn until it clicks into place. To unattach, just turn the attachment the opposite way.
Power: Two speeds (low and high) make this immersion blender an improvement over my previous one. I used the high speed for whisking and some of the chopping. I used the low speed for some of the chopping and for emulsifying the soup and potatoes, although the high speed worked fine on those too.
Changing speeds is easy because you just remove your finger from the button and place it on the other one. The blender will stop when you remove your finger from either of the buttons.
Changing speeds is easy because you just remove your finger from the button and place it on the other one. The blender will stop when you remove your finger from either of the buttons.
Cleaning: For cleaning, I prefer to just rinse the attachments before anything gets dried on. Then I usually hand-wash them and let them dry on a drying mat, but they are safe to clean in the dishwasher. When I use the dishwasher, I prefer the top rack. Not all pieces are dishwasher safe. The manual will go into specifics, but here is the basic info:
Sponge or damp cloth – do not use in dishwasher or submerge in water: Main motor body, the gear box that the whisk attaches too, and the cover for the chopper.
Dishwasher safe: Whisk (after detaching from the gear box), the chopper bowl (top rack), the chopper blade (in the cutlery basket – being careful of the blade)
Wash in hot, soapy water: The blender shaft (emulsifier shaft) – be careful of the blades.
Summary: I really love this appliance. This combines 3 appliances into one, and they all do a very good job. Storage is easier because the combination of pieces take up less room than the 3 separate appliances would. Also, because they are all combined into 1 appliance with 3 attachments, it’s just a matter of clicking the attachment on and then off and replacing it with another, so using more than one appliance during meal prep is faster and less complicated, along with fewer appliances taking up room in your prep space. With only one cord and one main body, there is less to deal with.
Mobile Submission: False
I would recommend this to a friend!
Share this review:
+1point
1of 1voted this as helpful.
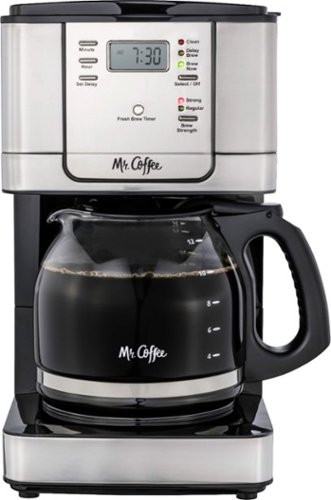
The Mr. Coffee 12-Cup Programmable Coffee Maker with Strong Brew Selector lets you brew a bolder cup of coffee. The coffee maker also includes Brew Later and Grab-a-Cup Auto Pause features.
Customer Rating
4
Coffee made in this is delicious.
on September 19, 2020
Posted by: MarilynB
from Texas
I have used this Mr Coffee coffee maker several times now and have been very pleased with the results.
It came with a glass carafe that can make up to 12 cups and 1 water filter disk and holder. You need to buy your own coffee filters.
Several features that I like about it are:
1. It beeps when your coffee has finished brewing.
2. The Auto-Pause feature. If you’re in a hurry to try that first cup, you can remove the carafe during the brewing process and pour a cup. The brewing pauses while the carafe is not in place. When you return the carafe to the coffee maker, the brewing continues.
3. It has a 2-hour “stay warm” feature, but for safety, it automatically shuts off after 2 hrs.
4. It has a fresh brew timer that automatically starts as soon as a brew is complete. It lets you know how long ago that last pot of coffee was made.
5. I like that you can open the section for pouring water separately. It keeps any splashed water out of your coffee grounds.
6. Regular or Strong Brew options
7. The carafe has a hinged lid which makes it so much easier to use. I had one that had to be removed each time and it was a tight fit and I had to struggle with it every day. Not having a hinged lid would be a deal-breaker for me after putting up with that other carafe for so long!
8. You can make the whole pot or just 4 cups of coffee without compromising on taste.
9. Speed – It brews quickly, which is amazing since I always use the “Stronger Brew” feature.
10. Filter placement. At first I wasn’t happy about the filter placement. It sits over the coffee grounds and under the water spout. I thought moving this every time was going to be a hassle, but since it sits so easily in place, it only takes a second. But the main thing I like about it is that it lets me set the month that I bought the filter and it reminds me to replace it. Other coffee makers hide the filter, and once installed, I never thought about them again, making them pretty useless after a while. I will definitely remember to replace my filter in this coffee maker. Of course, you have the option of not using the filter at all.
11. Cleaning mode: There is a button on the machine for cleaning calcified mineral deposits. For decalcifying, you can use 20 oz of vinegar or buy the Mr Coffee “Cleaner” and follow the directions in the manual. The main thing I like about this is that it has a setting which brews part of your cleaning solution then pauses for a specified time before continuing to brew the remaining solution. Afterwards, you just brew 2 pots of fresh water to rinse out the solution from inside your coffee maker.
Cons: My cons are minimal.
1. It doesn’t come with a stainless steel permanent filter. But this can actually be a plus because I was able to choose the one I wanted to buy.
2. The top lifts up instead of swinging out. Because it lifts up, I have to move it from under my kitchen cabinet every time I use it. If it swung out, I would be able to add the water and coffee grounds without moving the coffee maker.
3. I wish it would tell me when it is time to run the Decalcifying mode. I’ve had machines that do this. The manual says if you have soft water (we have a water softener), you should run it every 80 pots. For hard water, every 40 pots.
I first tried it out brewing with a paper filter and 8 cups of water. The next time, I used a paper filter with 4 cups of water. Then I began using the stainless filter that I had purchased. Lastly, I set the timer so that the coffee maker would brew a pot and be waiting for me when I woke up. All results were very good. I used the “strong brew” feature for all tests. I could not tell any difference in the taste between brewing 4 cups to 12 cups. All brews tasted good. When I switched to the stainless filter, the coffee taste was even better so I will continue to use that filter instead of paper filters.
My overall suggestions for using this coffee maker.
1. Place it where you don’t have to move it to fill it every time.
2. Use a permanent filter so that you don’t filter out the oils. This will give you the best flavor.
3. The best flavor come from strong brew so if I wanted a weaker cup of coffee, I would use a little less coffee instead of using “regular brew”.
I would recommend this coffee maker, but I think it really should come with a permanent filter to deserve 5 stars. My other 2 cons are just related to inconvenience but the filter makes a difference in the coffee flavor, so I think that is an important feature missing from this coffee maker.
Mobile Submission: False
I would recommend this to a friend!
Share this review:
+3points
3of 3voted this as helpful.
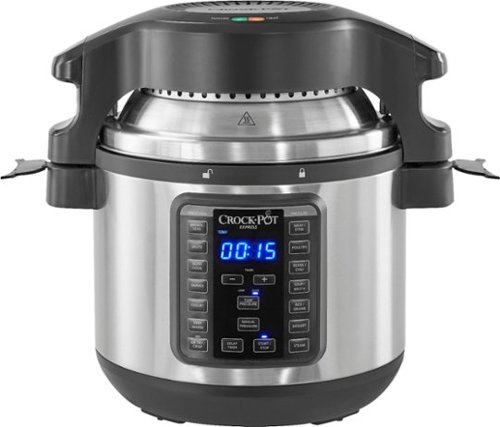
Serve nutritious and easy home-cooked meals at a fraction of the time that conventional cooking requires. Enjoy all the same benefits you love about Express Crock—one-touch settings for quick pressure-cooked meals—now with a Crisping Lid that adds a delectable crisp to chicken, ribs, and more!
Customer Rating
5
So many cookers in one appliance
on September 19, 2020
Posted by: MarilynB
from Texas
This Crock-Pot Express Crock cooker is amazing. It continues to impress me every time I use it. I honestly never thought I would use it so much. I assumed it would come out of the cabinet a few times a year to be used as a slow cooker and even less as a pressure cooker, but every time I use it, I am blown away! It comes with a pressure cooker lid, a crisping lid, a wire rack, and another wire reversible rack which lets you position your upper tier either high or low, depending on which way you place the rack.
To try it out, I first made one of the recipes in the included recipe book, Chicken Parmesan with Garlic Butter Noodles. The end result was delicious. I love how I can use the same pot and cook the various parts by just changing the settings. For example, in this recipe, I added the butter and garlic in the brown/sear mode, then I added the water and spaghetti to the pot. Using the reversible rack and the beans/chili setting, I placed a souffle’ dish containing the chicken and various other ingredients on top of the rack and cooked everything in the pressure cooker mode (for just 8 minutes!) Lastly, I used the crisping lid for 10 minutes to finish it off. Everything in one pot, but I used 3 different cooking methods.
The only problem I had was that the crisping lid would not fit over the souffle’ dish because my souffle’ dish was too tall. I fixed that by removing the dish, turning the reversible rack over to the low position, and then replacing the dish, which let me put the crisping lid on. So I would suggest if you need to use both lids for a recipe, you should try them both beforehand (or using a shorter souffle’ dish!)
Next I made the Fried Cauliflower Florets using just the crisping lid. This turned out so good. Even if you are not a huge fan of cauliflower, I would recommend this recipe. So easy too. Cook 10 minutes, stir, then repeat that twice more.
The next thing I tried was the slow cooker mode. I made one of our go-to recipes for this. I cooked a pot roast with onions, carrots, and potatoes. It was very good, as usual.
Things I love about this cooker.
1. It is tall instead of wide. I had a slow cooker before that was oval and took up way too much room in the cabinet. This one fits in just a slightly larger space than our old Crock Pot. I store it with two racks inside, the crisping lid on the cooker, and the pressure lid over that.
2. So many different cooking buttons. If you have the crisping lid on, it goes directly into the air fryer mode, but you can also choose many other cooking modes. When not using the pressure cooker lid in the sealed position, it has buttons for brown/sear, saute’, simmer, slow cook, yogurt, and keep warm. When using the pressure cooker lid in the sealed position, it has buttons for meat/stew, poultry, beans/chili, soup/broth, rice/grains, dessert, and steam (yes, it also functions as a steamer.) You can also use the manual mode while using the pressure cooker lid so you can set your own specifics.
3. The delay timer lets you set it to start cooking at a specified time so that everything will be ready when you want it to be.
Suggestions if you buy this cooker:
1. I like having a glass lid for the slow cooker. You can use the pressure cooker lid and just keep the pressure part unsealed, but I wanted a glass lid for some of the modes, such as slow cooker, simmer, and keep warm. Luckily, we had 2 or 3 glass skillet lids that fit perfectly. They looked like they were made to fit, so you may already have the perfect sized lid.
2. I didn’t really like using the hand-made foil lifting method because the foil gets hot, so I bought a silicone lifter. It didn’t arrive in time for my first test, so I can verify that the foil lifter works fine if you don’t want to buy a silicone one.
3. I was concerned about scratching the bottom of the cooker with the reversible rack. The other rack comes with silicone feet, but the reversible rack does not, so I bought a flat silicone mat to sit in the bottom of the pot. I couldn’t find a round one that was large enough, so I bought a 9 x 12 mat and cut it to fit exactly. It turns out that my salad plates are the exact diameter of the inside bottom of the cooking pot, so I used that as a template, drew a circle with a pen and cut it to fit. Now I can put my reversible rack down in the bottom without worrying about scratching it.
4. If you want more recipes, you can find several on the Crock-Pot web site. Also, I noticed that most of the recipes call for the Crisping Lid to be used for the last 10 minutes of cooking, so you could probably improve some of your own pressure cooking recipes by adding the Crisping Lid at the end. I love the way it browns the top, bakes in the glazes, crisps the edges, etc.
I really enjoyed using this cooker and I would recommend it highly!
Mobile Submission: False
I would recommend this to a friend!
Share this review:
0points
0of 0voted this as helpful.
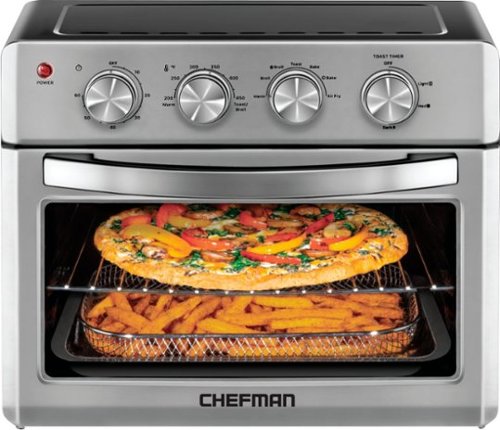
Say goodbye to clutter and hello to this multi-functional Toaster Oven Air fryer! Enjoy a variety of delicious dishes with ease and convenience using the Chefman Toast-Air™ Convection Oven + Air Fryer. No more heating up your kitchen with a full-size oven - get the same results as a traditional convection oven with the convenience of countertop cooking for faster and more evenly cooked food. This countertop convection oven is a useful tool in any busy kitchen with variable temperature controls and cooking functions to air fry, bake, broil, convection bake, toast, and warm, as well as a temperature range from 200-450° F to set at the desired temperature. 7 preset options make any kitchen task easy, while the interior cooking light allows you to easily monitor cooking process. The extra-large 25-liter interior (12.5 x 11.75 inches) can fit up to 6 slices of toast and most baking pans. With the highly efficient rapid air technology and high-speed convection system, you can get even, crispy fried texture using little to no oil. The rack positioning is designed for maximum space and even air flow – if using multiple racks, rotate them halfway through for best results. The air fryer function is perfect for cooking once-frozen leftover foods and making them taste fresh again. Feeling some toast? This counter oven features an option to select the desired level of toast, from light to dark. With a 60-minute countdown timer and ready signal bell, you always know when your food is ready; the unit automatically shuts off when the door is opened for added safety. Air fry basket, flat wire rack, broil pan, and crumb tray are easily removable and dishwasher safe for convenience and quick clean up; non-stick interior and stainless-steel exterior wipe down easily. With the cookbook included, it’s even easier to conquer any cooking need with this toaster-oven air fryer and enjoy the benefits!
Customer Rating
4
I love the meals I've made in this oven/air fryer
on October 9, 2019
Posted by: MarilynB
from Texas
Simplicity and ease are words best describe this wonderful appliance.
I have been using a smaller air fryer for over a year and it was so limiting in size and the task of removing food without getting burned was always an inconvenience. No more! This air fryer/oven is a great size. I can cook almost any meal that we want to have in this but it is not so large that it takes up too much of my counter space.
Out of the package, you will find the air fryer/oven with a drip/crumb tray in place that is wrapped in a protective bubble wrap. I removed the bubble wrap and easily replaced the tray at the bottom of the air fryer/oven. In addition, there was a broiling/baking pan, a wire rack, and an air fryer basket. The pan can have multiple uses such as filling it with water and using the bake feature to steam your food (thus acting as a steamer) or you can use it to cook in directly, or you can place it under the air fryer to catch any drips. (I know the drip tray does that too, but this seems like an even better way to catch drips.) I love that the basket has feet on the bottom of it so that you can put it directly into the pan yet still allow the air to circulate all around the basket. Also, in the box, there are a manual, a recipe book and a handle that you can use to remove the broiling/baking pan or the wire rack.
The air fryer/oven also has a light that comes on when the appliance is turned on and in use so you can see the progress of your cooking through the glass window in the door. (My old air fryer required that I open it up and remove the bottom in order to see the progress of my cooking. This is so much easier!)
The door has a stay-cool handle for opening and closing. Above the handle are the 4 knobs for operating the air fryer/oven. The knobs are for (1) setting the length of time for cooking (2) setting the temperature (3) choosing the function of cooking such as toast, bake, convection bake, broil, convection broil, warm, or air fryer, and (4) if toasting, the last knob is for setting the darkness preference of your toast.
Some limitations or “nice to know” features:
* The first knob (setting the time) needs to first be turned past 20 before setting your time if you intend to set it below 20 minutes. Otherwise the bell sound that occurs at the end of your time won’t sound.
* The air fryer/oven is not digital, but there is a mark every 5 minutes between 0 and 60 on the time knob. For the temperature knob, there is a mark every 25 degrees between 200 and 450 degrees. There is also a place for “warm” and for “toast or broil”. I don’t perceive the absence of digital numbers as a negative feature, though.
* There is a sign on the top of the air fryer/oven that says “hot surface”. I haven’t noticed any excessive heat there while in use, but it is good to know just in case. (You could put your non-plastic butter dish on it to warm your butter before a meal!)
* In the manual, it states you need to use metal, ovenproof glass, or ceramic bakeware without glass lids.
* You need to keep your cooking container at least 1 ½ inches away from the upper heating elements.
* Keep the oven at least 2 inches away from the wall and from other objects and do not use on heat-sensitive surfaces.
* I would recommend not placing your food directly on the broiler pan even though the recipe may say to do so. I tried this and the pan became discolored – almost as though the enamel coating on the pan had been eaten away. I contacted Chefman and they sent me a new pan, but it reacted the same way. I will be placing a piece of foil on the pan or using the basket instead of letting my food come in contact with it – just to be on the safe side.
The first thing I cooked in the air fryer/oven was a frozen personal pizza. I had been using my smaller air fryer for this so it was easy to compare the results. I used the air fryer setting and decided to place it in the air fryer basket instead of on the wire rack because I had added a lot of veggies to the top that were precariously balanced and didn’t want them to fall on to the drip tray on the bottom. If they fell in the basket, it would be easier to replace them on to the pizza. I misted the top of the pizza with a mister filled with olive oil to keep the veggies from drying out. I placed the basket in the broiler/baking pan and placed it low in the oven so that I could easily watch it cook. (I pre-warmed the oven for about 2 minutes while cutting up the veggies.) I turned the temperature to 350 degrees. I don’t remember how long I cooked it because I just looked through the oven door every now and then and removed it when it was done, but it was less than 10 minutes. The pizza was far superior to when I used to cook it in my old air fryer. The toppings were not dry, but the crust was crispy on the edges. It was delicious.
The next food I tried was from the recipe book that came with the air fryer/oven. I cooked the salmon and lemon asparagus using the convection broil setting. The recipe was easy, healthy, and scrumptious! I changed the amount that I cooked since there were just 2 people sharing this meal. However, after cleaning the broiler pan after I cooked my food, it was white where the food had touched it and would not clean off. It was rough as though the enamel had been affected. I will be either using the basket over the broiler pan, or I’ll place some foil in the pan next time. This recipe being cooked is shown in the photo that I'm including with this review.
The toast setting worked out great too, but unless I want to toast something that has a topping, I will probably continue to use my toaster since it is faster and holds 4 slices.
The warm feature is something that I will probably not use very often, since I don’t usually cook enough to have leftovers, but it would be very useful since most food warmed up in the microwave never seems anywhere near as good as the original. Filling the broiling pan with a cup of water before warming meat will help keep the meat from drying out. In this case, I recommend using the air basket for your meat and placing it on the wire rack with the broiling pan containing the water below it.
Steaming vegetables: The included recipe book says that you can also steam vegetables in the air fryer/oven using the “Bake” function by adding 3 cups of water to the broiling pan, pre-heating the oven at 350 degrees for 10 minutes to allow the air fryer/oven to build up steam while you cut your vegetables, then bake for 15 minutes. I had been using a steamer in the microwave and while it takes less time, the results were not as good for some varieties of vegetables since the vegetables were always sitting in the water at the bottom of the steamer. I tried this bake/steam method and the vegetables came out perfect! The downside to this is that with 3 cups in the pan, you can’t really carry the pan without spilling the water. You can fill it after you put the pan in the oven, but then not enough of it evaporates to remove the pan and carry it to the sink to dump the water after you’re through steaming. The only way to solve this is to either add less water (which should work fine since not much of it evaporates) or spoon a lot of the water out of the pan before attempting to carry it.
Other than my concern about the broiler pan, the only other feature I would love to see is to have a switch to turn on the light after the door is opened. The light stays on while the oven is on and the door is closed, but turns off when you open the door.
Mobile Submission: False
I would recommend this to a friend!
Share this review:
+3points
4of 5voted this as helpful.
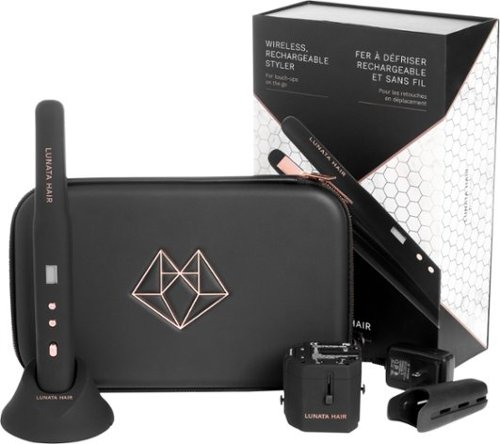
Keep your hair fabulously chic during travel with this Lunata Beauty cordless styling iron jet setter kit. The 1-inch iron has rose gold floating titanium plates to smooth your locks, and the included world adapter with two USB ports supports outlets in most countries. This Lunata Beauty cordless styling iron jet setter kit includes a charging dock and cable to recharge the 3300 mAh Samsung LiIon battery.
Customer Rating
5
Digital temp-Dual Voltage-Rechargeable. Perfect!
on October 6, 2019
Posted by: MarilynB
from Texas
I wanted a dual voltage flat iron because I travel a lot. Being rechargeable and thus not having to worry about a cord during use is a bonus feature.
In the box you will find the flat iron and its various components in an elegant case. The case has perfectly sized molded indentions covered in what appears to be a microfiber material to hold the various pieces: Flat Iron with Titanium plates and a silicone heat-resistant slide-on protector, Charging Stand, Power Cord, and Universal Adapter.
Adapter: The flat iron comes with a universal plug adapter for use in other countries. The input voltage is 110-240VAC, 50/60Hz. The max power is 110V-660W/230V-1380W. It comes with 2 fuses. One is a spare. The spare fuse has its own slot in the adapter so you won’t lose it. According to the manual, the adapter can also be used for other devices/appliances such as cell phones, digital cameras, MP3 players, small travel hair dryers, etc. There is a sample list in section 5.2 of the manual, along with precautionary instructions telling you to make sure your device can be used with an adapter.
One feature I love is the digital temperature display so that you can get the exact temperature you need for your hair. A little bit of Internet searching will help you determine what that is. The temperature range is 200 to 430 degrees. It can be used on natural or color-treated hair, but not on synthetic hair.
To use: Charge it first. It will not work unless it has at least a 50% charge. Mine arrived with enough charge to try it out, but I went ahead and charged it completely before using on my hair the first time. To charge the flat iron, make sure the power is off, then either place the power cord into the bottom of the charging stand and then place the flat iron into the charging stand, or you can just plug the power cord directly into the flat iron. Remove the silicone sleeve on the top before heating it up. Use the power switch to turn it on and use the plus and minus buttons to select your temperature. It can take up to 2.5 minutes to heat up to the hottest setting. Unlock the locking switch on the bottom of the flat iron so that you can open it. Completely charged, you will be able to use the flat iron for about 40 to 45 minutes on the highest heat setting. After use, lock it back in a closed position. For travel or for placing in a purse or bag, replace the silicone sleeve over the top to protect other items. I keep that on when not in use since it is a handy place to store it so it won’t get lost. To clean, when it is cool use a damp cloth and then wipe dry.
I tried 340 degrees for my first attempt and I was able to produce crimps and curls with the flat iron as I was testing different methods of use. Then I re-straightened that same hair to remove the crimps so I can attest that it works well. I ended up putting a volumizer product in my hair and then used the flat iron by pulling the hair straight up starting near the root to help give it volume, then curving the ends slightly under and toward my jaw-line to produce the style I wanted. It worked well and the end result was what I wanted.
I was very impressed with the overall ease of use. My favorite feature is the digital preciseness of the temperature. I have never had a digital temperature on a flat iron and my other flat irons seemed to be either too cool or too hot, so I love this feature.
Mobile Submission: False
I would recommend this to a friend!
Share this review:
0points
0of 0voted this as helpful.
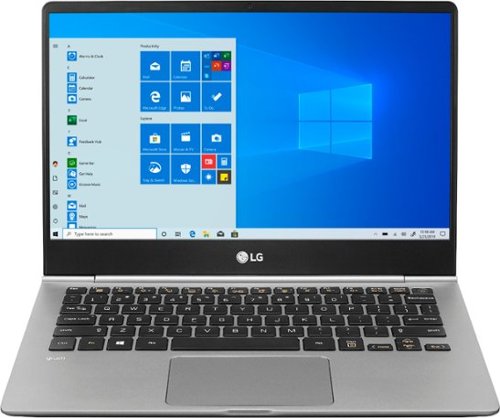
View photos, watch videos and get work done on this LG gram 13.5-inch laptop. The Full HD resolution provides stunning visuals, while the IPS panel lets you see contents. This LG gram 13.5-inch laptop has an Intel Core i5 processor for powering through intensive tasks, and the 256GB SSD offers fast load times.
Customer Rating
5
A lot of hardware packed into this laptop
on July 16, 2019
Posted by: MarilynB
from Texas
The LG gram laptop is a powerhouse for its size and I have been very pleased with my experience so far. First of all, the battery is excellent and it was only down to about 50% in 4 hours with heavy use. It claims to go much longer than 8 hours, but I suspect it would last at least 10 to 12 hours under normal to heavy use which is still very impressive.
The laptop is quiet and I could not hear it running at all. The screen resolution is excellent and the sound quality was fine, but not impressive so I wouldn’t recommend this laptop for music listening purposes. For its small size (13.3”) the keyboard was amply large enough for comfortable typing and had a typical feel to it when pressing the keys, so I was pleased about that. Another one of my favorite features of this laptop was the weight. It was surprising light at only 2.12 lbs and weight has been a major complaint of mine when traveling with laptops.
There is no CD/DVD drive but it does have a Type-C port. I don’t see why I would need a CD/DVD drive, but if I did I could buy an external drive that connects with a Type-C interface on the laptop for about $25. Other ports beside the Type-C port are a full-sized HDMI port, a microSD card port, and two full-sized USB ports.
It has a smallish hard drive at 256GB and that should be plenty for most people but definitely not for storing your lifetime supply of digital photos. However, that’s what cloud storage and backup drives are for! In fact, since it has a port for microSD cards, you could easily keep a 400GB storage card in the port to greatly increase your storage space.
Another way to increase storage space would be to delete most of the bloatware that come installed on the laptop. With an excessive 31GB of installed software, I will definitely be deleting the excess.
Overall, I would recommend this laptop as an excellent choice among the smaller laptops available.
Mobile Submission: False
I would recommend this to a friend!
Share this review:
+1point
1of 1voted this as helpful.
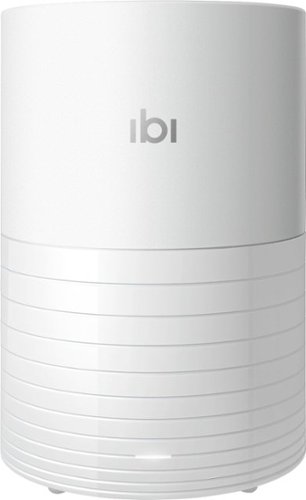
Meet ibi™, the smart photo manager that collects all of your favorite photos and videos from your phone, computer, USB drives and popular cloud and social media accounts in one place at home. ibi lets you privately share individual photos or entire albums from vacations, birthday parties, weddings and more with only those you choose.
Customer Rating

2
OK, but needs a lot of work
on May 3, 2019
Posted by: MarilynB
from Texas
I plugged in the ibi Photo Manager and installed the app on my smart phone as well as my laptop. First it asked me if I wanted to backup the photos from my phone. It did that rather quickly but only from my “Camera” album folder. I had arranged my phone photos in various albums and it ignored all of the other albums. So in order to get this working, I had to create a “Temp” folder on my phone and copied all of my “Camera” photos to my “Temp” folder. Then I copied every other photo on my phone from their respective albums into my “Camera” folder so that ibi could find them and back them up. Then I deleted my “Camera” folder and renamed my “Temp” folder to “Camera”. If ibi could have foreseen that since smart phones let you create album folders, people might use that feature, then maybe ibi would let you backup those folders too. Now the only problem is that those photos will not show up in folders on ibi unless I go in and make tons of albums. Also, when I take new photos on my phone, I will have to make sure they are backed up before I moved them to any of my categorized album folders.
Next I set it to start downloading my laptop photos. I was able to make it download photos from specific albums (vacations, family, friends, etc.) so that I wouldn’t waste time on miscellaneous images that I didn’t need backed up. It took about 3 days and nights to complete that task because there were 113,400 files at 650 GB.
It created a Drive Z which I could access from my laptop and looking at that drive, it had one folder for my smart phone photos and all of my folders that I had asked it to download from my laptop. To ensure that all of the photos had been downloaded, I clicked on Properties for each folder and compared it to the Properties of the corresponding folder on my laptop. All of the folders were the same except for two. Since some of the folders had over 20k photos in them, I opened those folders and started comparing subfolders. It didn’t take long to figure out which ones to recopy. One folder was missing 10 photos and one was missing 47 photos. So out of 113,400 that is pretty good, but not good enough.
Next I added the ibi app to my Roku because while exploring the app, I had clicked on “Do More” and had read that I could cast any of the photos or albums to my Roku device. I opened the photos in Roku and found that I could view all of the photos (including shared photos), just the shared photos, just my own photos, videos, or albums. I could also search for a photo by name. I thought it would be nice to see my vacation photos on Roku without have to cast them from my tablet or phone, so I decided to try the Albums feature.
I hadn’t created an album yet so I decided to create one with photos from a 2018 vacation. First I clicked on “Create Album” but it wouldn’t let me select photos to put in the album, so I went back to “Photos” and selected a few and was able to click on “Create an Album” from that point. However, searching for photos to include in the album when I had 113,400 photos to choose from was daunting, so I decided to try another method. I went to Files and Folders on the ibi app on my laptop and browsed to the folder containing the files I wanted to use and was able to either select them one by one or press Ctrl-A to select them all and add them to the album. However, once added, I was not able to sort the album. The default sort appears to be by date and I needed them to be sorted by name since I had added numbered prefixes (001, 002, 003, etc.) to each photo in order to get them in the order I wanted them. The only way to fix this would be to use a bulk attribute changer and change the date and times so that they would be in date order (albeit with edited dates and times) and thereby would show up in the correct order for a slideshow in an album. If showing your photos in date order works for you, then this should not be an issue.
After creating an album, I tried adding someone to my inner circle and sharing some photos and having that person share photos with me. It was not very user friendly, but I figured it out after some trial and error. I was able to share photos using links via email without too much trouble but when I invited someone to join the Inner Circle and shared photos with them, they thought the process on their end was difficult and frustrating. Once you receive shared photos, if you click on the “Photos” tab at the top of the page, it lets you show either your own photos or all photos. If you choose All Photos, they are sorted by date, so the shared photos are all mixed in with yours. So I will probably keep it set on only my own photos. Clicking on the tab showing and icon with two head brings you to your “inner circle” and you can see only the shared photos there. Why this wasn’t put in with the “Photos” tab makes no sense to me. It seems like the “photos” tab should have “My photos only”, “Shared photos only”, or “All” instead of having to switch to another tab to get that shared photos only option. Until I found the Inner Circle tab, I thought I wouldn’t be able to even see the shared photos separately. By the way, clicking on the “Shared” button from the main menu showed that nothing had been shared to me although I had 6 shared folders showing up in my Inner Circle. (See attached photo after sharing was complete.)
Summary: I definitely won’t use this to make albums where I want to show the photos out of date order. (For example, I made title screens and date screens to put in-between my photo slides but since I made them after I returned from vacation, they all showed up at the end of the album.) However, it should be fine to make albums that need to be in chronological order. I would suggest making the albums as you go along. You can add all of the photos (like from a vacation) at once and then go into the album and delete ones that you don’t need in the album. In fact, if you have a program for changing attributes, you could add title screens to your album by first changing the date and time on the title screen files before backing them up so that they show up where you want them to in your slideshow.
The problem with the app is that it is too simple. It doesn’t realize that people may sort their phone photos into albums. Or that people may want to show their photos in a different order. It doesn’t give you any options for sorting and the search options are poor. When searching for a photo that was named “005 DSC_1082”, I typed that in and it only wanted to look at the characters before the space. So then I type just “005” and it treated “005” as just “5” so my results were enormous.
Automatic backup: I had to go into the app and refresh it in order for my phone backup to begin again. Nothing backed up automatically until I did that. Maybe I didn't give it time, though, so I'm not sure how often it checks.
They really need to work out the bugs in the app, otherwise, it is just a high-priced backup device with usable, but frustrating sharing capability, and not really usable slideshow viewing from created albums unless the predetermined sort order is OK. I will continue to try workarounds for some of the problems, but since I can already cast slideshows to my TV, I doubt that I will use that feature.
Mobile Submission: False
No, I would not recommend this to a friend.
Share this review:
+5points
5of 5voted this as helpful.

Delight in effortless connectivity for your mobile devices with this Belkin DuraTek Plus Lightning to USB-A cable. A double-braided nylon forms a flexible, durable cable jacket, while the 4-foot length provides convenience when charging. This Belkin DuraTek Plus Lightning to USB-A cable features an aluminum casing that protects the circuit board within the connector.
Posted by: MarilynB
from Texas
This Belkin 4 ft cord is fast and sturdy which are the 2 major features I look for in a charging cord. I plugged it into an iPhone and it charged it up very quickly since it supports 2.4A charging. (Make sure your plug will allow 2.4A charging as well.) The thickness of the cord told me immediately that it would support fast charging and it didn’t let me down in that respect.
It has a thick double-braided jacket along the length of the cord which is resistant to damage from day to day use. The rubber-like part that extends from the connector head to the cord (the connector piece) is extra long so you don’t get that problem that occurs from the cord bending too close to the connector heads; but it is flexible enough to bend up to 180 degrees. Belkin says that this material is called TPE (Thermoplastic elastomer) and it is environmentally-friendly. While bending the cord to see how well it does, I noticed that the bend occurred along this piece as it should instead of along the cord which could otherwise cause an early demise, so I was particularly happy about that feature. That connector piece will absorb most of the bend and keep the wires inside the cord intact. To me, that feature alone makes it worth much more than the cords that do not have a long enough connector piece. There are other features that help to reduce damage such as drain wiring and Aramid fibers in the interior of the cord as well as the double braided jacket along the length of the cord. The wire themselves are wrapped with insulated conductors which will greatly reduce wear and tear as well.
It comes with a leather strap attached to it that closes with a snap that keeps it neat and organized and since the strap is attached to the cord, it won’t get lost. I like the length of the cord since most of my devices are easily within 4 ft of my plugs. I was very glad to see this length offered since 6 ft cords are much too long and 3 ft cords are barely long enough.
Due to the enhanced features of this product, I believe it will last much longer than the cords I had been using and since it charges my phone and iPad so quickly, I won’t have to spend much down time.
Mobile Submission: False
I would recommend this to a friend!
Share this review:
0points
0of 0voted this as helpful.
MarilynB's Review Comments
MarilynB has not submitted comments on any reviews.
MarilynB's Questions
MarilynB has not submitted any questions.

Enjoy extended storage for your smartphone with this 512GB SanDisk SDDDC4-512G-A46 flash drive. The dual USB 3.1 Gen 1 connectors enable quick transfer of documents between devices, while the all-metal housing with a cover can swivel to provide protection to the connectors. This SanDisk flash drive can be attached to a key ring for portability during your out-of-office assignments.
Is this backwards compatible with usb 2? https://www.bestbuy.com/site/sandisk-ultra-dual-drive-luxe-512gb-usb-3-1-usb-type-c-flash-drive/6421488.p?skuId=6421488
The info on Best Buy's website say this: "USB 3.1 (Gen 1) interface. Ensures a fast connection. Backward-compatible with USB 3.0 and USB 2.0."
2 years, 9 months ago
by
MarilynB

Boost nutrition with this Nutri Ninja blender. Its FreshVac pump eliminates oxygen from beverages, enhancing their texture, flavor and color, and the Auto-iQ technology combines pulsing, blending and pausing patterns for dazzling results every time. This Nutri Ninja blender preserves freshness so you can store and enjoy smoothies up to eight hours.
Is this product compatible with the Ninja BL480D? I ask because I have cups for my old juicer, which is the BL480D, but someone stole the base.
No. This is an Immersion Blender, not a juicer per se. Even though it does emulsify, it works like this: Put your ingredients in a a container and put the blender down into the container to emulsify. You can also put it into a sauce pan on your stove. When I make my squash soup, for example, after I add the cooked butternut squash to the sauce pan along with the other ingredients, I can put this into the sauce pan and move it up and down and all around the pan to blend everything together. The only part of this that comes in a self-contained container is the chopper part. Yesterday, I put some yogurt, a banana, and some sweet potato into a bowl and used the blender attachment to blend those all together to make a treat for my dog. (Spoon the blended treat into a rubber dog toy that is meant for this purpose and freeze.) So I guess you could make smoothies with it if none of the food was too hard. For ice or frozen fruit, the blender attachment wouldn't work, but the chopper attachment might.
3 years, 3 months ago
by
MarilynB
Now that quality you've come to love from GE is available right on your countertop, thanks to GE Appliances blenders, available in both Standard and Immersion designs. Our immersion blenders are ideal for one-handed operation, and available whisk and chopping attachments make whipping up family meals a cinch. You can even take it with you to help make kitchen magic on the go. GE Appliances standard blenders are the perfect addition to any kitchen and have the power to blend through tough ingredients to make delicious shakes, sauces and purées. The available personal blending cups are perfect for your morning smoothie and help make clean-up a snap. Make your blending experience a snap with help from GE Appliances, a brand you trust.
Where is this made?
The box says Made in China. But I would recommend this appliance. I love mine.
3 years, 3 months ago
by
MarilynB
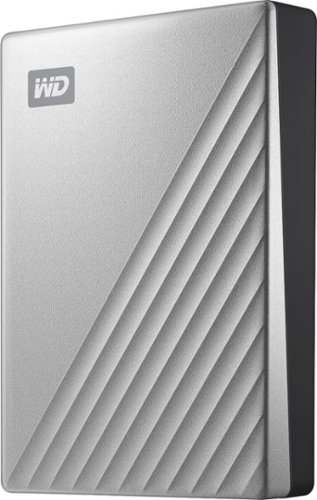
Move essential data across devices efficiently with this Western Digital My Passport Ultra External Portable Hard Drive. The drive uses USB 3.0 technology for quick read and write speeds, and the USB-C connector offers effortless plug-in options while boosting transfer rates. Abundant storage space for all types of media and applications. The backup software lets you automatically save works in progress at your preferred intervals. Password protection and 256-bit AES hardware-based encryption for added security.
Amazon lists this a a USB-C with a USB-A adapter, but BB does not list either though one of the pictures shows what looks like a USB-C port on the drive.
Mine came with a cord that has a USB-C type plug on both ends. It came with a USB-A adapter. You can take the adapter and plug it into either end of the cord and that end will plug into any of the USB ports on your laptop or desktop. The other end plugs into the USB-C port on the external hard drive itself.
5 years, 4 months ago
by
MarilynB
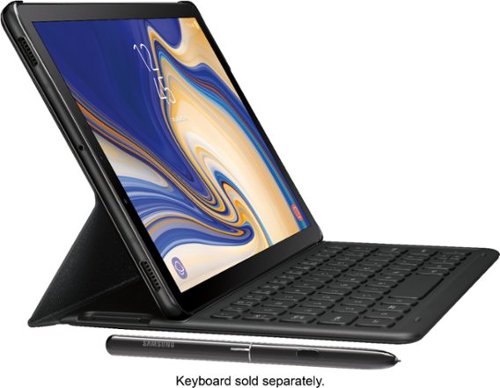
Explore, work and watch your favorite shows on a clear and stunningly brilliant screen. Transform your Galaxy Tab S4 into a PC experience with the taskbar you’re used to with the revolutionary DeX. Create a PowerPoint presentation and revise budgets in Excel at your favorite café. Then edit, sketch and capture inspiration with the included S Pen. And using far-field mics, you can even control your Tab S4 from a distance with Google Assistant. ¹ DeX can be activated via Samsung Galaxy Tab S4 keyboard cover (SKU: EJFT830UBEGUJ) sold separately.
Is the face recognition the only way to get on the tablet since the home button is no longer there?
There are 5 security set up options: Password, PIN, Face Recognition, Iris Scan, or both Face Recognition AND Iris Scan. I chose the PIN option.
5 years, 8 months ago
by
MarilynB
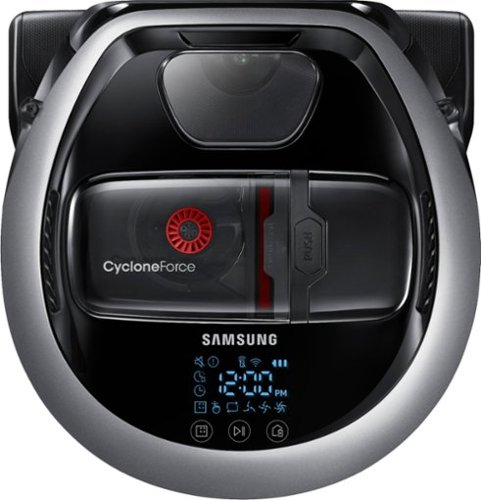
Clean your home with voice command or app-based programs by using this Samsung robot vacuum. Its digital camera and nine sensors let it find its way around, avoiding obstacles and mapping the most efficient path through your home. Wi-Fi connects this powerful Samsung robot vacuum to your smart home systems.
Do you have an instructional video I may watch?
I just wrote a lengthy review on this vacuum which explains how to use it. I don't know if you ever found your instruction video, but if you haven't purchased the vacuum yet, I can tell you that the instructions that come with the vacuum are not very long and are very easy to follow.
Basically, you charge the vacuum on its docking station when it arrives (first you have to turn on the on/off button on the bottom of the vacuum). Make sure you have things picked up in your home so that the vacuum won't roll over cords and things. You can download the app to your phone if you want, but it isn't required to use the vacuum. If you download the app, make sure your Bluetooth is on and then link to the vacuum. It also comes with a remote control and batteries for the remote. When the vacuum is charged, press the auto clean button. There are 3 locations where you can find this button (1) on the top of the vacuum, (2) on the remote control, (3) on the app. The vacuum will maneuver itself around and will return to the docking station when it has finished. You may need to empty the dust bin before it finishes vacuuming. If so, just press the pause button on the vacuum, the remote, or the app and remove the dust bin. Empty it and replace it and press the same button to start it back up again. I had to do that and I had vacuumed my house the day before with a regular vacuum, but this vacuum was able to get under my low tables so it picked up dirt that my other vacuum hadn't gotten.
Basically, you charge the vacuum on its docking station when it arrives (first you have to turn on the on/off button on the bottom of the vacuum). Make sure you have things picked up in your home so that the vacuum won't roll over cords and things. You can download the app to your phone if you want, but it isn't required to use the vacuum. If you download the app, make sure your Bluetooth is on and then link to the vacuum. It also comes with a remote control and batteries for the remote. When the vacuum is charged, press the auto clean button. There are 3 locations where you can find this button (1) on the top of the vacuum, (2) on the remote control, (3) on the app. The vacuum will maneuver itself around and will return to the docking station when it has finished. You may need to empty the dust bin before it finishes vacuuming. If so, just press the pause button on the vacuum, the remote, or the app and remove the dust bin. Empty it and replace it and press the same button to start it back up again. I had to do that and I had vacuumed my house the day before with a regular vacuum, but this vacuum was able to get under my low tables so it picked up dirt that my other vacuum hadn't gotten.
5 years, 11 months ago
by
MarilynB
Enjoy Ultra HD content in 4K resolution with this 75-inch LG smart TV. Its a7 intelligent processor delivers lifelike pictures, and its Nano Cell Display technology lets you enjoy a vivid display with reduced reflectivity from any viewing angle. Turn this LG smart TV into a hub for your connected devices via its ThinQ AI feature and Google Assistant.
What are the dimensions of this tv above listed? Also how big of a tv stand/cabinet would I need for it to sit on? Ty
Information from the Spec sheet:
75SK8070PUA (74.5" DIAGONAL) DIMENSIONS/WEIGHTS/UPC
Without Stand (WxHxD) 66.2" x 38.3" x 2.6"
With Stand (WxHxD) 66.2" x 41.1" x 13.8"
Shipping (WxHxD) 72.4" x 45.9" x 9.1"
Without Stand Weight 85.9 lbs
With Stand Weight 91.3 lbs
Shipping Weight 114.6 lbs
UPC 719192621077
We have ours temporarily sitting on a long coffee table which is long but narrow (about the size of a sofa table but not as tall) and it looks great. Since the coffee table matches the other furniture in the room and since we weren't using it as a coffee table anyway, we may just keep the TV there. I think as long as your TV stand is longer than the TV, it should be fine. Just look for one that is at least 66.2 inches long and can support at least 91.3 pounds of weight. I included 3 examples of ones sold at Best Buy that meet the specs.
Products from my answer

Insignia™ - TV Stand for Most Flat-Panel TVs Up to 75" - Mocha
 (73)
(73)

BDI - Braden Home Theater Cabinet for Most Flat-Panel TVs Up to 75" - Cherry
(3)5 years, 11 months ago
by
MarilynB
Power up your laptop with this Insignia 90W Universal Laptop Charger. The overvoltage, short-circuit and overheating protection reduces the risk of damage to your devices while several included tips enable compatibility with most laptops. This Insignia 90W Universal Laptop Charger has a super-long 10 foot cord to allow convenient placement of your laptop while powering up.
i n eed a charger for my Toshiba C55-a laptop
It will power up a Toshiba C-55, but the end of the cord that fits in the computer port is so loose that it easily falls out at the slightest movement. We had to put a rubber band around the laptop, just above the F keys and use a twist tie to tightly attach the cord to the rubber band. It works, but only until we get a better power adapter.
6 years, 3 months ago
by
MarilynB
Samsung 28.2 Cu. Ft. 4-Door French Door Refrigerator: The Twin Cooling Plus System inside this Samsung refrigerator maintains optimal conditions in both the refrigerator and freezer compartments, so you can easily keep your groceries fresh. If stored containers accidentally leak, the 5 spill-proof, tempered-glass shelves make it easy to wipe away the spills. And you can access filtered ice and water right through the door, so you always have beverages on hand for guests.
Does the Door display monitor the internal temp of the frig. Once the temp.is set, will the display show the variation in temp when the frig. doors are opened. How accurate is the thermostat? What notification is given if the frig. temp rises too high?
I can only answer one of your questions. The door display shows the temperature inside the main refrigerator and the freezer. I do not know the accuracy and I don't know if there is any notification if the temperature rises too high.
6 years, 4 months ago
by
MarilynB

Automatically go from hundreds of mystery folders to a visual view in the photo and video Organizer. See your best photos thanks to auto-curation. Effortlessly extract candid photos from your raw footage. Make photos and videos look amazing with automated photo editing and video creation options. And create and share beautiful printed artwork, new dynamic slideshows, photo and video collages, animated GIFs*, and full-length movies. Being creative is even easier with the Elements bundle.
Does Adobe Photoshop 2018 work with Windows 7?
According to the description the PC version works with Windows 7, 8, or 10:
PC Requirements
Specs: Details:
PC Video 1280x800 display resolution
PC System Memory 4 gigabytes
PC Additional Requirements 10GB of available hard-disk space; Microsoft DirectX 9 or 10 compatible sound and display driver Windows Media Player; DVD-ROM drive
PC Processor Type AMD|Intel
PC Operating System Windows 10|Windows 7|Windows 8
PC Processor Speed 2 gigahertz
6 years, 5 months ago
by
MarilynB