ReviewedByPhil's stats
- Review count135
- Helpfulness votes1,231
- First reviewJanuary 6, 2016
- Last reviewApril 23, 2024
- Featured reviews0
- Average rating4.6
Reviews comments
- Review comment count0
- Helpfulness votes0
- First review commentNone
- Last review commentNone
- Featured review comments0
Questions
- Question count0
- Helpfulness votes0
- First questionNone
- Last questionNone
- Featured questions0
- Answer count7
- Helpfulness votes7
- First answerJanuary 18, 2017
- Last answerSeptember 1, 2021
- Featured answers0
- Best answers1

Experience action-packed gaming in real-life quality with the 23.8-inch diagonal monitor that’s built to deliver the most colorful picture.
Customer Rating

5
Bright, vivid colors, tear-free, fast refresh
on September 22, 2020
Posted by: ReviewedByPhil
from Easton, PA
The HP X24ih is my second IPS display, and I’ve been using it in a dual-monitor setup with my HP Omen gaming tower. The first thing I noticed with this display is that it is much brighter at 350 nits versus the 250 nit display I’ve been using. This makes the contrast sharper with deeper, truer blacks and brighter whites. The default brightness at 90% is pretty intense, so I set this monitor to a more comfortable 75% brightness. I was happy to find that the monitor had no visible dead pixels or sub-pixels upon arrival. It has relatively little IPS glow, though it is still noticeable mostly at the corners and edges of the screen in a pitch dark room. The viewing angles are decent and color accuracy tends to hold up at to near parallel viewing, provided there’s color on the screen, since I found that true blacks tends to take on a yellowish brown hue at 45°angles or greater.
The stand that the monitor comes with is adjustable in height about 4.25 inches so the max height from the desktop to the top of the screen is 19 inches while the minimum height is 14.75 inches. The screen is also tilt-able about 30° and rotates 90° clockwise to portrait mode. It cannot rotate to portrait orientation in the counter-clockwise direction nor swivel side-to-side on the stand. The stand is easily removed with a quick release button and the monitor is compatible with VESA mounts (100 x 100 mm). The monitor and stand when assembled weighs 13.5 lbs.
The monitor’s on-screen display menu is easy and straightforward to navigate, and I thought the ability to re-assign three of them for shortcut access was useful. The OSD also keeps track of the “backlight hours” of the display so you can track its lifespan, which is rated to 30K hours. That information might also be important if you’re thinking of picking one up secondhand or selling the monitor later on. You can also toggle standard game overlays like a crosshair and FPS counter which you can customize by choosing the color and position on the screen. There are nine color profiles to choose from, including one that has fully customizable RGB. I did appreciate the inclusion of a Low Blue Light mode, for folks who are in front of the screen a significant portion of the day and need to protect their eyes from blue light fatigue, but note that it will apply a yellowish cast to the entire screen that takes a few minutes to adjust to. However, I think ‘Native’ mode gives you the most realistic color reproduction. Since the monitor’s 8-bit implementation is 6-bit+FRC, you get nearly 99% of the sRGB color space for really accurate colors that is essential for creative work like photo or video editing and digital art.
The bezels at the top and sides are super thin at 1/16 inch but there is a gap from the outer edge to the viewable portion of the display that is about 1/4 inch wide, so multi-monitor setups won’t be completely seamless. I’m using this monitor with an NVDIA video card, so I had to connect via a display port cable since the G-Sync option did not appear when connected with the included HDMI cable. After enabling G-sync (with a compatibility warning) in the NVIDIA control panel, I was able to take advantage of the monitor’s adaptive-sync capability, turned on by default in the OSD, for tear-free performance during gaming sessions. With AMD GPUs you would be able to use FreeSync over either cable type. Since the monitor has a fast response time, I found there was relatively little motion blur, although increasing the overdrive (response time levels) introduced noticeable corona artifacts. I also clocked the input lag at an average of 28ms slower than my other IPS display; however, I don’t play competitively nor tend to play games where it made a huge difference.
I especially liked that this screen has a headphone output port next to the two video inputs, so I can connect my headphones directly to the monitor, rather than my gaming tower, which sits farther away on my desk. One thing to note is that if you use the “Sleep Timer” the power LED will flash orange while in sleep mode until the “On Time” is triggered. If the monitor is in a bedroom, you may want to set the power LED to ‘off’ to avoid this blinking light at night. Also, if the “On Time” and the “Sleep Time” are set to the same value, the monitor will only ever go to sleep and will not turn back on unless one of the four menu keys is pressed; if you press the power key during sleep mode, the monitor shuts off, requiring a second press to turn it back on.
Overall, I’ve really been enjoying the display and although the colors and brightness are slightly different than my existing monitor, with a bit of calibration, I was able to get them fairly close, so I could use them in a dual-monitor setup without there being a huge disparity between them. I found this monitor to be more than adequate for both the gaming and the creative work that I do.
Mobile Submission: False
I would recommend this to a friend!


Share this review:
+33points
39of 45voted this as helpful.

Without sound, they’re just sunglasses. Thoughtfully refined and strikingly elegant, Bose Frames Soprano style feature large lenses, delicately sloped browline and an elegant update to the cat eye, providing a dash of retro glamor with modern sheen. Bose Open Ear Audio technology produces clear, lifelike sound, leaving you free to engage with the world around you while discreetly listening to music. Bose Frames also feature an advanced mic system that lets you make crystal clear calls, scratch-and-shatter-resistant polarized lenses and a rechargeable battery that plays for up to 5.5 hours. All this housed in a lightweight frame crafted from ultramodern materials for a luxurious look and feel.
Customer Rating
5
Great sound, nice shades, could be wider
on September 10, 2020
Posted by: ReviewedByPhil
from Easton, PA
For the most part, these sunglasses from Bose look just like any other pair of fashion sunglasses. The only difference is the oversized arms which contain the battery and electronics for the integrated speakers. The speakers are super slim and rather than sit on your ears or in them, like traditional earphones, sit in front of them and direct the sound toward and into your ear from a distance of about an inch and a half. It comes with a hard-shell carrying case, charging cable, and micro-suede cleaning cloth.
Comfort-wise I would rate it about 7 out of 10 due to its weight, fixed width, and relative lack of outward spring in the arms. They are a bit heavier than normal sunglasses at just under 2 oz, which makes sense given the electronics packed into the frame. The frames only come in one size with an overall width of 145mm at its widest point, but since the arms are extra thick due to the components inside, the inner width spans only 135mm which is a bit tight for me since I have a wide face. While balanced, this puts a lot of pressure on the sides of my head right where the speakers sit, and is fairly uncomfortable when wearing the glasses for more than a couple hours.
The sunglasses charge via a proprietary magnetic pogo pin connector cable which can be plugged into any powered USB port. The length of the cable is 22 inches, and I like that you don’t have to fiddle with plugging a connector into a tiny port. An LED on the inside of the right arm flashes to let you know that the unit is charging, and it takes about 1 hour to fully charge and can last more than 5 hours of use, depending on your usage and listening volume.
After powering on the sunglasses, it announces the remaining battery life and automatically connects to a previously paired device, if available. Connecting them to an audio source is as simple as selecting the sunglasses in your phone’s Bluetooth menu. However, if you want to be able to customize some of the settings for the glasses, you’ll need to install and use the Bose Music app. You’ll also need to create an account to access the app. In the app you can change settings like the glasses “name” as it appears in the Bluetooth menus of searching devices, enable/disable voice prompts, change the language, and toggle on/off some of the different methods to power the device off. There are three ways to shut the speakers in the sunglasses off: you can simply long press the power button, flip the glasses upside down for 2 seconds, or have it power off after 10 minutes if the motion sensors haven’t detected any movement. The latter two features can be toggled off.
I also like the touch controls for volume and activating a voice assistant (like Google or Siri). To increase volume, slide your finger forward along the side of the right arm and backward to decrease the volume. The volume change increments are 25% each from mute to max volume. In the app you can use the volume slider for finer increment adjustment, however, you can’t tap on the volume slider to jump to a specific volume level; you actually have to touch and hold the current volume level and drag the slider up or down. It also doesn’t change the volume until you let go of the slider, so unfortunately you can’t really gauge the loudness while adjusting the slider. I do like that the app also tells you the percentage remaining battery life of the glasses, though it doesn’t estimate how much run time that equates to. The voice assistant feature works well too, just double-tap the right temple to activate your phone’s voice assistant. However, it’s also easy to activate it by mistake when adjusting the glasses.
Some functions require clicking the physical power button, like play/pause, track skipping, and call pickup. Call quality using the glasses is great, and to the person on the other end, it sounds just as if you were speaking directly into a phone. This is thanks to the dual beamforming built-in mics that are able to hone in on your voice and eliminate background noise for clear, focused sound pickup.
Audio quality from the speakers is very good given the compact form-factor. The balance is pleasantly bright and highlights mid-ranges so that instrumentation is distinct and voices come through clean and clear. At higher volumes, the trebles tend to sound a bit thin and crunchy with a little too much sibilance for my tastes. While there isn’t a ton of bass, it was present and there was more than I was expecting from such tiny drivers. I found that the audio performance was best for me between 50-80% of max volume. They also work great for listening to audio when watching video; the Bluetooth 5.1 protocol used offers little noticeable input lag, so the audio syncs perfectly to the video you're watching.
As sunglasses, they also perform as expected. They adequately darken your environment with polarized lenses, though there was a bit of a rainbowing effect when looking at my smartphone’s screen at off angles, however, when viewing it straight on, it’s not as noticeable. I also like that the lenses are removable and can be swapped with a different color, like mirrored rose gold, or replaced if they get scratched, so you don’t have to buy the whole frame again if only the lenses are damaged.
All in all, I think these are pretty cool sunglasses and a very nice sounding wireless headset. The Soprano combines the features of Bluetooth earphones with stylish frames for folks who want to enjoy their music with a clean look without having to shove things in their ears. This also allows the wearer to have greater situational awareness of their surroundings with relative minimal sound bleeding.
Mobile Submission: False
I would recommend this to a friend!


Share this review:
+22points
22of 22voted this as helpful.
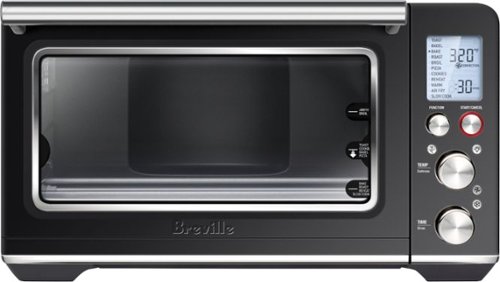
The Smart Oven Air Fryer powered by our Element iQ system delivers maximum performance and versatility. Smart algorithms replicate the ideal cooking environment for air fry and 10 additional cooking techniques. Higher temperatures and super convection speeds up cooking time with great crispness.
Customer Rating
5
Heats up quickly, browns and crisps food evenly
on September 9, 2020
Posted by: ReviewedByPhil
from Easton, PA
The Breville Smart Oven Air is the first countertop oven that I’ve tried that also includes a dedicated air frying mode. While I already own both an air fryer and a rotisserie/convection toaster oven, my hope was that the Breville Air would replace both if it performed as well as, or better, than either.
Out of the box, I noticed that the Breville Air is more compact than my current toaster oven by at least an inch and a half for all outer dimensions, however, the interior was just as roomy, allowing me to fit in a 13.25” x 9.5” baking pan, 5 Qt Dutch oven, or 12” cast iron chef pan. This is great because it gives me a little more counter space to work with, however, this space-savings comes at the expense of a rotisserie function. While I love making homemade rotisserie whole chicken, I’ve found that I can get just as delicious results from a basket air fryer as long as I flip it over halfway through cooking.
With the Breville Air, I was able to achieve similar results using the ‘Roast’ function with convection on the included roasting rack and pan. Just select the time and temperature using the dials and pop your food in after the oven beeps to indicate preheating has completed, which usually takes about 8-10 minutes. Note though that the timer will start counting down immediately after preheating has finished, whether or not you’re around to put the food in the oven right away. You can, however, adjust the cook time up or down at any point during preheating or cooking. When the timer runs out, the oven will automatically shut off the heating elements. I cooked a 5 lb chicken for 1 hr and 15 minutes without turning or flipping, and the chicken came out evenly browned on all sides with crisp skin thanks to the even circulation of hot air from the convection function; there weren’t any hot zones that caused any one area to brown more quickly.
It also does great with frozen fried foods such as tater tots and French fries. Using the included mesh basket tray in air fry mode, I got perfectly crisp on the outside, tender on the inside results. I like that you can toggle between frozen and fresh, so that the oven will adjust to the optimal settings to cook the food. While the capacity of the basket isn’t huge (2-3 cups), since you have to place items to be air fried in a single layer without crowding them, I did like that I didn’t have to open the oven to stir/shake the basket halfway through, like you would in a traditional air fryer. I also thought it was clever to use magnets built into the door so that the wire rack and basket rack “auto-eject” about 3 inches when used in the middle position and the door is opened. Just note that when closing the oven door, the racks may jump out about a quarter inch when the magnets get close to them.
The thing that makes this oven “smart” is the Element IQ System that adjusts power to the top and bottom quartz heating elements to deliver precision heating and optimal temperature where it’s needed for the mode that you’re using. But it’s not “smart” in the sense that it’s WiFi/internet or even Bluetooth connected, so don’t expect to be able to control this appliance from your smartphone or AI voice assistant. It also doesn't detect the done-ness of your food or adjust time or temp. The sensors just help it maintain a consistent temperature throughout cooking. The 'super convection' function is what gets you the extra dry and crispy fried texture and is used in air fry mode, but if you prefer a softer crunch, you can always use ‘bake’ mode with regular convection selected. The only drawback to the mesh basket is that cleaning can be harder if food sticks to it or drips onto the crumb tray below, like mozzarella sticks that melt out of their breading or sticky, glazed bbq buffalo wings, so I'd recommend using the roasting tray for those.
There’s a keep ‘warm’ mode that allows you to hold your cooked foods at a safe temperature of 160°F to prevent bacterial growth and a ‘reheat’ mode that will warm up foods slowly without browning or drying them out. Other than that, I think the other features like broil, bake, toast are pretty standard for a convection oven, though note that the broil mode lets you push the temperature a bit higher to 500°F on the ‘Hi’ setting (400°F and 300°F for the ‘Med’ and ‘Lo’ settings respectively). All modes have a range of time and temperature selections except for toast and bagel where you select darkness level and quantity instead.
I did find that turning the time adjustment knob for longer cook times can be tedious, since for times under 1 hour, the increments are 1 minute, and after 1 hour the increments are 5 minutes, but it takes a while and a lot of turning, for example, to get to 8 hours if you’re using 'Slow Cook' mode. Also, the temperature knob has inconsistent increments, usually 10° F but sometimes 5°F at inexplicable intervals. Both knobs suffer from the same sensitivity problem where sometimes if you turn the dial to increase or decrease the time or temp, at the end when you stop turning, the setting my jump back one step, for example, when increasing the temp to 350°F, if you stop when that number appears on the screen, it sometimes goes back to 340°F when you let go of the knob.
You do have to wipe down the inside with a soft, damp sponge after every use if you really want to keep it clean (after it has cooled down, of course), but I like that the crumb tray is easily removed and cleaned. The manual indicates all the included accessories should be hand-washed though. Other than that, I appreciate that the LCD panel is nice and bright so it’s easy to read, even at night. It also changes color from blue to orange so you know when the heating elements are on or if it’s just in standby. All in all, I think the Breville Smart Oven Air cooks my food with great results and better evenness and temperature control than my previous small appliances. It preheats quickly, is versatile, and lets me avoid using the big oven when I don’t need the extra space. Best of all, it combines the functionality of two appliances that I have without sacrificing counter space or performance, so now I have more room on my countertop and only one thing to clean.
Mobile Submission: False
I would recommend this to a friend!


Share this review:
+8points
8of 8voted this as helpful.
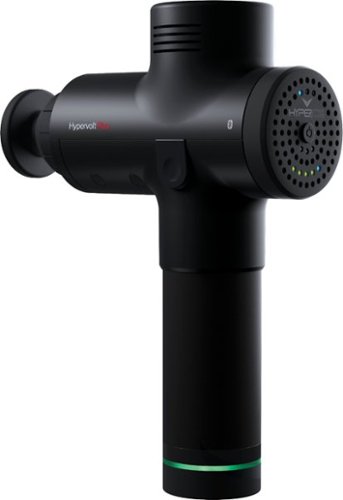
30% more powerful than the Hypervolt, the Hypervolt Plus (Bluetooth) is the most powerful and most advanced percussion massage device in the world. Featuring Quiet Glide technology and Bluetooth enablement, use the Hyperice app to guide your Hypervolt through Routines designed for specific muscle groups and body parts. Seriously strong, aesthetically sleek, and entirely luxurious: the best of the best.
Customer Rating
5
Effective, heavy duty, and quiet
on August 20, 2020
Posted by: ReviewedByPhil
from Easton, PA
The Hypervolt Plus with Bluetooth is my first percussive massager, though I’ve wanted to try one out for a while now. The device itself is very durably constructed with a solid, heavy body and soft-touch silicone on nearly every surface. It comes pre-assembled with the flat head attachment and includes four others: fork, bullet, cushion, and ball, each meant for different applications suited for different parts of your body. To change the heads, simply pull straight out (fairly hard) on the attachment until it pops out and push the desired head in. The unit runs off a rechargeable Li-ion battery that’s contained within the removable handle, and a full-charge gets you about 3 hours of cumulative use. The charger is a laptop-style power adapter with a barrel style plug that plugs into the base of the handle where you’ll also find the power switch.
The device’s operation is pretty simple. Set the power switch to on, press the ‘speed button’ to set low, medium, or high speed, and place the vibrating head on whichever muscle or muscle group you want to use it on. But my main concern was the lack of instructions in the box on how to safely and effectively use the device for pre-workout, post-work, or pain remediation. There’s very little in the way of printed directions in the included manual, though there are a handful of video clips from Hyperice online demonstrating usage. The alternative is to download and use the smartphone app that guides you with video clips on how to use the device on different parts of your body. However, currently you must have an iOS device (like an iPhone) in order to use the Hyperice app. The app is not, as of this writing, found in the Google Play store for any Android devices. Hopefully that will be developed and released soon, so I can use my own phone to learn about and control the Hypevolt, rather than borrowing an iPhone to do so.
The app pairs with the Hypervolt via Bluetooth and requires you to create an account. Once in the app, you’ll provide some details about your regular activities, like sports and fitness (including ‘office work’) in order to get some recommendations on use. You can also sync to Strava or Apple Health and turn on reminders to use the Hypervolt. In addition to being the largest resource of use instructions, the app expands the feature-set of the Hypervolt. For example, in the app you can select a routine for a specific purpose, like hip-mobility or target certain areas of the body. These routines run for a predefined amount of time and may have multiple sections that require you to change the heads in between.
One criticism I had with the routines is that they start automatically after only 5 seconds and don’t indicate at the start of each section which head to use. Only prior to or by pausing the routine after it has begun can you check the routine overview to determine which heads to use and the correct body position for each section. You can elect to have the intensity of the massager change automatically or control it manually, which you’ll have to set each time you choose a routine. I do wish that the app was a little smarter and would learn your manual preferences overtime so that the “automatic” feature would be more accurate and useful the more you use the device.
As for effectiveness, the percussion massage it delivers is pretty satisfying and afterwards I do feel much more relaxed. The vibrations are deep and intensify which each increase in speed level and the more physical pressure you apply. There is even a meter of white lights (three levels) to indicate how much force you are applying, though you’ll need a line of sight to see them on the back of the device and it’s not useful if, for example, you are working on your traps. You do have to be careful to avoid bony areas as it may hurt when the massage head strikes a hard spot, and since the unit weighs about 2lbs 10 oz, some folks may experience fatigue from holding the device over longer sessions. However, after using the Hypervolt on my “problem areas,” like my forearms, ankles, and around my shoulder blades, I can feel a difference as some of the soreness, tension, and tightness has been released. The machine itself is also pretty quiet while in use and you could comfortably have a conversation over the noise of the motor.
Mobile Submission: False
I would recommend this to a friend!


Share this review:
+3points
3of 3voted this as helpful.
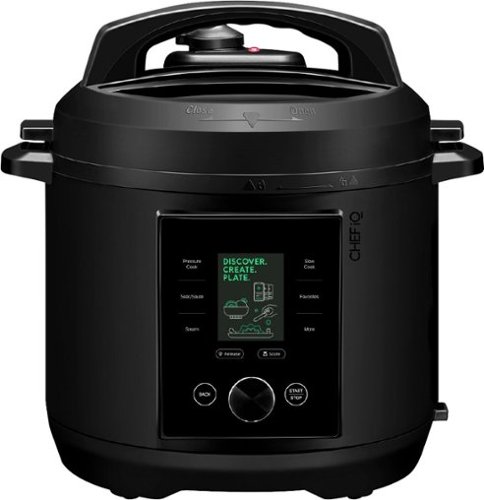
At CHEF iQ, we’re bringing innovation, technology, and science into the kitchen to revolutionize the home cooking experience. The Smart Cooker includes a built-in scale, automatic pressure release, 300+ built-in cooking presets, and more. The CHEF iQ ecosystem seamlessly combines the hardware of the Smart Cooker and the software of the CHEF iQ App to provide you with a premium culinary experience you simply cannot get anywhere else. Plus, it’s the only kitchen appliance that keeps getting smarter just sitting on your countertop with wireless firmware updates. Explore hundreds of exclusive Guided Cooking recipes in the app, then follow along with the step-by-step video instructions and send precise cooking parameters to your Smart Cooker at the push of a button. With Guided Cooking, you can create elevated meals right from your phone. Create custom cooking presets, tailored exactly to your liking and saved directly on your Smart Cooker for one-touch cooking. With four integrated smart sensors in the Smart Cooker, you can learn to cook by weight – no measuring cups or spoons are ever needed. Use your Smart Cooker as a standalone kitchen scale while the CHEF iQ displays the precise weight of your ingredients in real-time. For added safety, we designed an innovative 3-method auto pressure release system built into the Smart Cooker so steam can release on its own when cooking is complete, making it safer than the competitor, while ensuring food comes out flawlessly cooked every time. The high-tech full color digital LCD display and capacitive touch control respond to a light touch for added ease of use. The Smart Cooker operates at a powerful 120V and 1000 Watts for more efficient cooking and is equipped with ETL safety certified for United States and Canadian distribution, FCC certification, FDA approval, and BPA-free accessories. Use of the CHEF iQ App and Smart Cooker outside of the US & Canada is not recommended or encouraged.
Customer Rating
5
Fast, convenient, versatile and easy to use
on July 29, 2020
Posted by: ReviewedByPhil
from Easton, PA
The ChefIQ Smart Cooker 7 isn’t my first electric pressure cooker, but it is the first one I’ve used that has smart features like internet connected WiFi, touch controls, and a color display panel. While at first glance it looks a lot like other e-pressure cookers on the market, I found the design quite stylish with its matte black metal exterior and glossy piano black glass control panel. It’s an aesthetic that demands to be left out on the counter and seen, afterall, in order to have it be “always on” and connected to the internet – you have to leave it plugged in. To that end, this device doesn’t have a power button by design; plug it in and it simply turns on. The only way to turn it off completely would be to unplug it, though after a period of inactivity it does enter a lower power sleep mode.
It comes with a nice starter pack of accessories like silicone finger mitts, stainless steel steam rack and basket, plastic ladle, and plastic rice scoop. The inner pot has a non-stick ceramic coating inside and out so it’s super easy to clean and PFOA-free, though it’s not exactly scratch-proof, so you do have to take care not to use metal utensils in it. That said, I would have preferred a silicone steam rack and basket over the metal ones that come with the unit because it would have further reduced the risk of marring the non-stick surface.
In terms on functionality, it has the normal features you would expect from today’s pressure cookers including delay start up to 24 hrs, high/low pressure settings, pressure cooking time in 1 minute increments up to 4 hrs, and various modes like slow cook (up to 24 hrs), steam, keep warm, and sear/sauté. Modes are switched by tapping the illuminated options on the outer touch-sensitive glass, while menu selections on the color display are made by turning the rotary dial left or right and giving it a push to make a selection. I do appreciate that the rotary dial when setting the cook time adjusts its increments depending on how fast you turn the dial, e.g. if you turn it slowly the increments are 1 minute, but turn it quickly and the time will jump by 10 or 15 minutes at a time, allowing you to reach a longer time setting without having to scroll endlessly.
A couple of cool innovations I found unique on this unit are the built-in scale, to help you measure ingredients right into the pot by weight (in whole ounces or grams) and one-touch pressure valve release from the LCD, so you don’t have to worry about burning your hand with hot steam exiting the release valve. You can also pre-set your cooking program to perform an “auto-release” at the end of the cooking time with a quick release, pulsed released which lets some steam out in increments over time, or natural release, where the pot will stay under pressure until it naturally cools on its own. It’ll sound an audible alarm before it does the auto-release giving you a 10 second warning, so can ensure you’re clear of the steam valve when it releases.
One of the biggest differences with this smart cooker versus its non-IOT counterparts is the ability to connect it to the internet and control the device remotely from the ChefIQ app. In fact, a smartphone is required for the initial setup. If you don’t have a smartphone with which to install the app, you simply cannot get past the welcome screen on the pressure cooker’s LCD. However, after initial setup you don’t need your phone for use and can choose settings from the control panel manually. That said, pairing with the cooker over Bluetooth, creating an account with ChefIQ, and connecting the device to my home WiFi was simple and straight-forward, taking only a few minutes. Once connected, the app complements the cooker by letting you search and select recipes from the ChefIQ library which then communicates with the cooker directly while taking you through the recipe step-by-step and automatically sending the smart cooker the correct settings so all you have to do is add ingredients to the pot, close the lid, and hit start. You can even create a custom "food profile" in the app by pre-selecting the settings and save it directly to the pressure cooker, so you can access it without having to pull out your phone. However, note that there's no way to delete individual favorites once downloaded to the machine, and you'd have to factory reset the unit which wipes all the downloaded favorites as well as the WiFi settings from the pressure cooker.
Each recipe in ChefIQ’s library is accompanied with video instructions, broken into clips for each step of the recipe providing a visual guide and nearly foolproof instructions for even the least experienced of chefs. While it’s a really cool feature, the library of recipes currently is not super large, and a number of searches returned no results, for example, lamb tagine, beef shank, and pork ribs, despite pork ribs being one of the pre-sets in the machine’s pressure cook menu!
Performance-wise the Smart Cooker worked flawlessly and as expected, allowing me to whip up tender, juicy braised meats, hearty stews, “hard boiled” eggs, and steamed veggies in a fraction of the time it would have taken on a stovetop. Keep in mind that depending on the temperature and quantity of the ingredients you put in the pot, the pre-heat time prior to cooking under pressure could be anywhere from 5 to 20 minutes. The sear/sauté function is great for browning meats and caramelizing onions right in the pot, reducing the number of dishes I need to wash at the end of making a meal.
I also love the ferment setting for this pressure cooker which is similar to the “yogurt” setting found on other e-pressure cookers. Simply start with a gallon of fresh milk and heat in the pot on the sear/sauté setting to 180°F, stir in ¼ cup of plain yogurt as your starter culture, then set the machine on “ferment” which is locked in at 110°F for 8 hours. When the mode is done, you’ve got a pot full of delicious creamy homemade yogurt that you can strain, flavor, and add custom mix-ins as you like.
Overall, the Smart Cooker is a worthy addition to my kitchen appliance arsenal. While I do wish the app's recipe library was broader, I'm sure it will grow over time, and I'd love to see a user submitted section where you can craft and save your own favorite recipes in the future. The pressure cooker itself cooks food rapidly, lets me cook everything in one pot, reducing cleanup, and the app can help simplify the cooking process. From discovering new recipes to step-by-step prep and automatically sending the correct settings to the appliance, cooking in it couldn’t be easier.
Mobile Submission: False
I would recommend this to a friend!


Share this review:
0points
0of 0voted this as helpful.
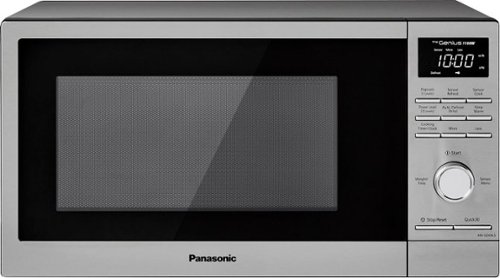
Cook foods quickly with this 1100W Panasonic microwave. The tactile buttons, LED display and dial knob offer simple operation, while the 1.3-cu.ft. interior space is easy to clean. This Panasonic microwave features 10 auto cook menus to help quickly prepare common recipes, and the turbo defrost function thaws frozen foods fast.
Customer Rating

4
Heats food fast but has learning curve
on July 10, 2020
Posted by: ReviewedByPhil
from Easton, PA
This microwave is a tad larger and more powerful than the one it is replacing at 1100 Watts versus 900 Watts. So it did take a little getting used to which power level and the amount of time to use for different foods. The dial used to select the cooking time also had a learning curve as the increments change depending how much time is already on the clock. For example, under 1 minute the increments are 5 seconds, from 1-5 minutes it’s 10 seconds, from 5-10 minutes it’s 30 seconds and after that the increment is 1 minute up to 90 minutes, max. This makes selecting the cooking time a bit imprecise and also makes setting the clock a bit cumbersome if the power goes out because you have to scroll through every minute, though thankfully it’s only a 12-hour display. You can also use the “add 30 seconds” button to select the time or add more time during heating.
I was most interested in the one-touch reheating and cooking function as it eschews the need to manually select a power level and time for your food; instead it uses sensors to track the moisture and humidity of your food to determine when it’s hot enough to be considered reheated or cooked. However, this also means that it won’t work with very dry foods like bread or pastries, and the manual recommends against this mode for raw/uncooked foods, beverages (like tea), and frozen foods. I tried this mode on a variety of foods including leftover cooked vegetables, mashed potatoes, and steak pulled straight from the fridge. The unit runs for an un-predetermined amount of time, as it’ll only stop once the sensors detect enough steam/moisture, however, it will count down the last 30 seconds before it’s done. Using this setting, the potatoes and vegetables came out great, piping hot and ready to serve in just a few minutes. The steak on the other hand, came out well-done rather than the originally cooked done-ness of medium. You are able to select, however, to increase or decrease the cooking time when using the sensor by 10 or by 20%. You do have to make this change each time though, as it won’t remember for next time that you prefer to reheat at 20% less time. The only thing with that mode is since you don’t know how long the reheating cycle will take, you just have to wait around until the unit beeps or starts the end of cycle countdown.
The one-touch cook button allows you to select by number from 10 different pre-set common food types like frozen pizza, rice, and pasta. The "sensor cook" numeric key is printed on the sticker on the inside edge of the door for quick reference, but the manual provides both the key and further instruction on how to utilize each setting. Again, you won’t know how long the cook time will be in advance, but you can adjust the time by the same 10 or 20% up or down. There’s also an auto-defrost button that only requires that you enter the food weight, up to 6.6 lbs or 3 kg (the units are only able to be set/changed when the microwave is plugged in). You do have to convert ounces to the decimal portion of a pound though when entering the weight. The auto-defrost worked fine for a 1 lb block of frozen ground beef that I was defrosting for chili, but depending on the thickness, it may not defrost throughout all at once, so I had to remove the outer defrosted meat from the block and let it rest to thaw completely after running the defrost cycle. Other foods you may have to turn/flip part way through, based on the weight of the food, and the microwave will pause and beep once to alert you when it’s time to do so.
The multi-stage cooking options are interesting as it lets you set up to three different stages for cooking, including a delayed start, cooking for different periods of time at different power levels, keep warm, and resting time, so for example, if you want to heat something on high for 3 minutes, rest for 5 minutes, and then heat again at 50% power for another minute you can choose all those settings upfront before hitting start, and it will run those settings back-to-back.
Overall, the microwave performed to my expectations in efficiently heating my food evenly. After using it a bunch we got better at selecting the amount of time and power needed to reheat/cook our food without overcooking it. It’s also fairly easy to clean the interior, though we always use a microwave safe cover over food to prevent splatter. It has a couple of cool features like the multi-stage cooking and sensor modes, but the one thing I would have liked better would be if the dial for selecting time and weight was a numeric keypad instead, and maybe some backlighting for the controls because they can be hard to read even in normal lighting but is near impossible with the lights off.
Mobile Submission: False
I would recommend this to a friend!


Share this review:
+8points
9of 10voted this as helpful.
The MR9600 dual-band router with Wi-Fi 6 delivers maximum performance, coverage, and blistering speeds, so you can stream HD video, games, and binge like crazy. Powered by the Linksys Intelligent Mesh™ technology and 6 Gbps of speed, it's 4x faster than Wi-Fi 5 routers, eliminates dead zones, and isolates your network to eliminate interference. Increase the size of your network easily: this future-ready router expands Wi-Fi by adding any Linksys mesh compatible products. The MR9600 is so easy to set up with Linksys App, you'll be streaming 8K video in a matter of minutes.
Customer Rating
5
Great coverage, fast speeds, easy setup
on July 7, 2020
Posted by: ReviewedByPhil
from Easton, PA
This Linksys MR9600 router is replacing my current Wi-Fi setup at home which consists of a mesh network using a dual-band 802.11ac primary router on the 3rd floor and an access point, two floors down. With the Linksys MR9600 installed in the exact same location as my old router (parent node), the higher bandwidth was pretty noticeable no matter where we were in the house. When running speed tests, the max Wi-Fi download speed on the MR9600 was consistently 20-25% faster than my old router (~250Mbps vs ~300Mbps) although upload speeds were similar at around 16-17Mbps; the speed advantage dropped off at long distances from the router, but keep in mind my original setup had an additional node to work with.
I was equally impressed with the range of the Wi-Fi signal, as I could still pick up a signal at the end of my yard, about 75 feet from the house, without another node/repeater, though, as mentioned the up/down speeds were much less. Setup took only a few minutes, but I was a bit surprised to find that you needed to download and install a smartphone app to set the router up, as users without a smartphone, tablet, or internet access would be unable to set up the router. Unfortunately, you won’t be able to set it up simply by connecting a computer to it via an Ethernet connection. You’ll also need to create or login to a Linksys account to use the app and complete the setup.
After this is done though, the app is easy to use and fairly user-friendly. The app lets you enable guest access, implement parental controls like URL blocking and scheduling or pausing internet access to specific devices. You can also select up to 3 devices to prioritize traffic to, for the best connection speeds -- for work, streaming, or gaming (any other connected devices will share the remainder of the bandwidth). You can even customize a few advanced setup options like enabling Dynamic Frequency Selection (DFS), port forwarding, activate WPS, and enable MAC address filtering. While you cannot manually select the channels for each network frequency, you can use the “channel finder” feature in the app to switch to a different channel to reduce interference and improve performance.
Once the router is up and running, you can enter the router’s default IP address into a browser on a connected device, to access its settings remotely using the recovery key printed on the bottom of the unit instead of logging in. Here is where you can also set up your 2.4 GHz and 5 GHz networks with different names if you want them split up. I didn’t have any troubling switching my devices over to the new router; I just named it the same as my old router with the same password and all my devices, around 25 total, were able to connect to it. Those that could only handle 2.4 GHz automatically selected that network while those capable of 5 GHz defaulted to that signal when in range.
If you enable Linksys Smart Home in your Alexa skills, you can perform some actions using voice commands too, like pausing internet access on a specific device, area of the house, or custom routines, like during meal times (and you can designate only specific voice profiles to issue these commands). The router also has two USB 3.0 ports to connect Network Attached Storage (NAS) devices to stream files and media from which allows me to access files on a backup drive across the network from any device.
Since the coverage for my house (~1800 sq ft) using just this router is so good, I haven’t yet set up any child nodes to create a mesh network, but I’m glad that option is available if I want to do this in the future. Overall, I think this router performs well, is quick and easy to setup out-of-the-box, and provides plenty of bandwidth for most users with multiple devices in our current data hungry era of smart gadgets and streaming data.
Mobile Submission: False
I would recommend this to a friend!


Share this review:
+3points
5of 7voted this as helpful.
Simplify personal grooming with this Panasonic ARC 5 electric shaver. The ultra-fast motor and five-blade system make short work of facial hair by providing up to 70,000 cross-cuts per minute,. This Panasonic ARC 5 electric shaver has a built-in pop-up trimmer that makes it easy to sculpt mustaches, beards and sideburns.
Customer Rating
5
Smooth shave, decent battery life, travels well
on June 19, 2020
Posted by: ReviewedByPhil
from Easton, PA
I’m switching to this electric Panasonic Arc5 razor after having used another brand’s wet/dry electric razor for the past 13 years. The Arc5 razor is lightweight, and the matte black plastic doesn’t look or feel very premium, however, a silver/chrome model is also available and the warranty is 2 years. This razor performs very nicely and gives me a close shave both when using dry and wet with shaving cream. I very rarely have to make more than one pass over the same patch of skin, though I find that when shaving dry it’s easier to pull the skin taught to raise the hairs since I don’t have to work over the shaving cream. The first time I used the razor I did experience a bit of razor burn and irritation, especially around the Adam’s apple; the manual suggests that it could take up to 30 days of regular use for your skin to acclimate to the new shaver. That, plus I haven’t clean shaven properly in weeks as growing out your beard has become quite trendy during the COVID-19 pandemic. That said, I did use the trimmers first to trim my facial hair down to stubble before shaving and was impressed with the efficiency and smoothness of the pop up trimmers; they didn’t catch, pull, or snag once, which my old electric razor used to do constantly. If you like the stubble or 5 o’clock shadow look, you could probably even stop there. The LCD is bright and easy to read, but it really only gives you information about the remaining battery life and whether or not it is set to the “cleaning” mode. The charging cable connector is uniquely shaped, so if you lose it or it breaks, you’ll need to get a model/series specific replacement cable. It lasts about 2 weeks on a full charge (1 hour) if your daily shave averages about 3 minutes. While the unit I have did not come with a charging base, there are contacts on back of the handle for automatic charging when the razor is placed into a charging base.
What I did find interesting about this razor is its beard density sensor which changes the motor speed based on the density/coarseness of the section of beard it is trimming. You can hear the motor sound change as it encounters thinner or thicker patches of hair, which works well on my uneven and patchy beard growth. The razor also has a cleaning cycle and comes with blade oil to maintain the blade sharpness and a brush to clean out any shavings. The top pops off easily for cleaning, and the foils and blades are simple to remove and replace when needed. The unit did come with a leatherette carry case and a plastic protective cap for travel. Overall, I really like this razor and think it performs nicely for my daily shaving needs.
Mobile Submission: False
I would recommend this to a friend!


Share this review:
0points
3of 6voted this as helpful.

Turn down the world's noise with the long-lasting noise cancellation performance of the WH-CH710N wireless headphones. Dual Noise Sensor technology automatically senses your environment to deliver an amazing sound experience. With up to 35 hours of battery life¹, quick charging, and access to your smartphone's voice assistant², the WH-CH710N are sure to be a must-have for your travels.
Customer Rating
4
Great sound, decent NC, so-so comfort
on May 28, 2020
Posted by: ReviewedByPhil
from Easton, PA
The WH-CH710N noise cancelling headphones are a bit of a mixed bag for me. The design of these headphones is understated to say the least, with its fairly plain looking, matte black lightweight plastic construction, and moderately padded earpads/headband. It comes with a short USB-C charging cable, 3.5mm AUX cable for wired connections but no protective case, which is a shame because these cans can’t be folded up compactly for travel or storage.
Each side of the headband extends up to 1.5” and the core is made of a flexible stainless steel over plastic which feels solid and durable. The earcups swivel about 120° to the sides and can be laid flat around your neck; they tilt about 30° to rest on the sides of your head too, so they’ll conform to most head shapes and sizes. Power and charging features, as well as an NFC touch area for one-touch pairing, are located on the left earcup while playback controls and the noise cancelling toggle are on the right. Both earcups have a pin hole mic for picking up ambient sound around you in order to provide directional stereo noise cancelling which is pretty neat.
Fit wise, I found the grip of the band to be a tad tight, making the ear cushions press somewhat hard against the skin and causing some heat build up from the leatherette material. That, coupled with the nearly non-existent padding on the underside of the headband left me fatigued from having them on after only a few hours and had me wishing that they were just a little more comfortable for longer listening sessions, because while they may not have a premium look at this price point, the sound quality is actually very good.
The sound produced from these is crisp and clear, delivered faithfully from the 30mm drivers housed in each earpiece. There is surprising depth and satisfying bass in the low ranges with bright trebles and rich, full mid-tones. The sound stage is open and wide while being placed far enough away that it doesn’t feel boxed in nor like you’re listening from afar. You can adjust the volume up and down using the controls right on the headphones and initiate play/pause and track skipping via the multi-function button between the volume keys.
To turn on Active Noise Cancellation (ANC), just press the toggle button on the right earcup to give yourself a more intimate listening experience. Noise Cancelling mode boosts sound levels and reduces external noises around you picked up by the dual microphones. It works best to mute sounds that are close to you but wasn’t always precise or perfect. It seems to focus mostly on mid to low range frequencies like road noise or a constant fan humming in the background, and it didn’t do that great with higher frequencies, like the sound of keyboard typing and chattering voices in the background. With NC active and no music playing, you will hear a bit of white noise, like a soft wooshing or light wind. You can also use the NC toggle button to activate Ambient Noise mode which allows the sound around you to play through the headphones while listening to your music. This mode uses the mics to pass through the sound to your ears rather than block them, providing you with greater awareness of your surroundings.
The headphones are capable of answering calls hands-free and activating a digital voice assistant, like Alexa or Siri, by long pressing the playback control button. Your voice is then picked up by the mics built-into the headphones, so you don’t have to pull out your phone. The battery, which can last up to 35 hours on Bluetooth with ANC enabled or up to 40 hours without, takes around 7 hours to fully charge. However, 10 minutes of charging gives you about an hour’s worth of play time due to the unit’s quick charging capability. Pairing over Bluetooth and NFC to my mobile phone was straightforward and easy, and I was able to connect and stream music from my phone without a problem. You do have the option to connect the unit to your device via the included cable to a headphone jack (and still use ANC provided there’s still some battery life), though you’ll lose the use of the on-board volume and playback controls. Listening without NC activated with the cable does not consume battery, so you can still use these if they are not charged.
Overall, I did enjoy the sound quality and listening experience from these headphones. They are lightweight, durable, and easy to use. The noise cancellation performance was adequate, with some exception, though the bland design leaves a bit to be desired. The chief area I would say that could be improved is the comfort if you plan on wearing it for longer periods of time. However, the earpads are replaceable, if they wear out, or if you get tired of the ones included out-of-the-box, you can swap them for more cushy ones, if you can find the right size.
Mobile Submission: False
I would recommend this to a friend!


Share this review:
+46points
59of 72voted this as helpful.

Keep each glass of wine as fresh as the first with this Coravin Model Three wine preservation system. Patented technology lets you pour wine without removing the cork, saving the rest for later. SmartClamps easily attach and detach to the bottle and works on corked bottles. This Coravin Model Three system uses ultra-pure argon gas for long-lasting preservation.
Customer Rating
5
Easy to use, keeps wine fresh
on May 22, 2020
Posted by: ReviewedByPhil
from Easton, PA
The Coravin Model 3 system is super simple to use and works way better than the hand pump type vacuum corks I've used in the past. All you have to do is load the cartridge, press the device onto the top of a corked bottle of wine, press the trigger, and pour. I love that you don’t have to remove the foil or cork from the bottle, which sometimes is a struggle if it’s stuck, brittle, or worse, if you don’t have a cork screw handy! Just make sure to remove the device after you’re done pouring, since even though the bottle is being filled with argon gas, the needle provides a pathway of air escape, and you could still unintentionally oxidize your wine if you leave it in. I found out the hard way that this also affects the cork’s ability to re-seal properly as the puncture hole takes longer to close up when you leave it in too long, which defeats the purpose. The first couple times I used it, I was unsure how much force I should use to push it onto the bottle, but it turns out the Smart Clamp that holds onto the bottleneck is spring loaded and automatically expands as you press down, so you can put it on the bottle and push the needle through the cork in one fluid motion.
This model comes with a screw top adapter so you can use the Coravin with screw top bottles too. The screw caps are rated to be pierced up to 50 times or about 10-12 bottles before they need to be replaced and save wines up to 3 months. Neither the natural corks we tried this on nor the Coravin screwcap leaked when turning the bottle over after removing the device. The only disappointing thing is that the Coravin cannot be used with rubber or synthetic corks because they won’t reseal after you remove the device. Another tip is to simply open and pour the last glass out of the bottle so that you’re not wasting argon gas. After all, if you’re finishing the bottle, there’s no need to use the gas for preservation and also the less wine that is in the bottle, the harder it will be for the argon to displace it and pour properly out of the Coravin. If storing the bottle long-term after use, it should be placed on its side so the wine hydrates the cork and keeps it expanded to prevent the needle hole from opening back up.
I will warn you that the first pour always seems to shoot out a bit too intensely as the gas forces the wine out of the pour spout, and it tends to hit the bottom of the glass hard and splash up a bit. You may also see a bit of cork debris in your wine too as small particles are able to pass through the needle, so I like to pour through a fine mesh strainer that I set on top of the glass. The second pour goes a bit more smoothly with little to no debris. I found that a quick press of the trigger doesn’t pour a whole lot of wine, but you don’t want to hold down the trigger too long and let a lot of gas into the bottle at once, otherwise the added pressure could cause the bottle to explode. Coravin provides a non-woven bottle bag to place around your wine bottle as you use the device just for this purpose, so I recommend that you use it if you’re worried about that. Another tip is when clearing out the device after pouring, do this over the sink because the burst of gas will propel droplets of wine out of the needle and spout and you don’t want to ruin your clothes with wine mist when you do this!
The base model 3 comes with 2 argon cartridges, which lasts up to 15 glasses or about 4 bottles each and replacement cartridges are a bit on the expensive side, though go down in price the more you buy in bulk. While the cartridges aren’t refillable or reusable, at least they can be recycled (check with your town to make sure they accept them). As an avid wine consumer, the Coravin 3 makes it easy for me to sample wine and have “just a glass” without feeling the pressure to finish a bottle or worrying about the wine spoiling if you want to save the rest. Even if it’s two of us having dinner, sometimes we just don’t finish the bottle, and it’s never as good the next day and certainly not palatable several days out if we just try to put the original cork back in or use a stopper. We did re-try our “open” but still sealed bottles after having used the Coravin on them over a week later and found that the taste and quality of the wine was nearly identical to when we tried the first glass. Since we make our own wine this will come in handy when we need to sample our wine at different times during the aging process to determine when it’s ready to enjoy and at its peak. While I don’t think it ever takes us months or years to finish any one bottle, it’s nice to have the option to come back to a bottle a little later and up to two years out.
Mobile Submission: False
I would recommend this to a friend!


Share this review:
0points
0of 0voted this as helpful.
ReviewedByPhil's Review Comments
ReviewedByPhil has not submitted comments on any reviews.
ReviewedByPhil's Questions
ReviewedByPhil has not submitted any questions.
ReviewedByPhil's Answers

The Nest Doorbell is the battery-powered video doorbell that works with any home. See what’s happening at your door from anywhere and get intelligent alerts about important activity, like when there’s a person, package, animal, or vehicle.* And because there are no wires, you can install it yourself. Nest Doorbell requires the Google Home app and a Google Account – it’s not compatible with the Nest app or the home.nest.com site.
My existing doorbell chime (electric) says "must install diode" on the back, and there is a 1N4001 diode installed in my existing doorbell button. Do I need to use the diode in my installation of the Nest Doorbell if I'm hard wiring it to my chime?


The compatibility checker said my electronic chime and transformer are compatible, but the video instructions for a wired installation of the Nest Doorbell (battery) doesn't make mention of installing a diode (or not), if one comes with the chime. At any rate, I performed the installation without it and adjusted the "length of ring" setting to 6 seconds, which is nearly long enough to play through the melody, though it loses power and cuts off at the end. Any longer setting results in the chime beginning to repeat before it gets cut off which I find less desirable.
2 years, 8 months ago
by
ReviewedByPhil
The Blueair Classic 280i air purifier brings clean, energizing air to spacious bedrooms, living rooms, or any rooms up to 279 sq. ft. A built-in air quality sensor makes it easy to confirm your air is virtually free of asthma and allergy triggers and indoor air pollutants such as mold, dust, pet dander, and pollen by scanning the air quality in real-time and adjusting fan speed to your current air quality. The Classic 280i delivers unmatched performance thanks to HEPASilent technology, which combines electrostatic and mechanical filtration technologies. This combination, pioneered by Blueair, delivers a high Clean Air Delivery Rate (CADR) with whisper-quiet operation (32- 56 dB), using 20-80 W of energy.
HOW MANY FET DOES TRHIS BLUEAIR COVER

Play to your full potential with this 23.8-inch ASUS TUF gaming monitor. The 1ms response time prevents blurring and lagging for quality visuals, while the FreeSync technology eliminates stuttering and tearing for seamless gameplay. This ASUS TUF gaming monitor has an anti-glare display that reduces reflections, and it features flicker-free technology that reduces eye strain for comfortable viewing.
Will this monitor support 144mhz for Xbox 1x over HDMI, is the HDMI ports 2.1?
The HDMI port on the monitor is HDMI v1.4, so on the Xbox One X it'll only allow you to output at 1080p @ 60fps and only goes to 75Hz.
4 years, 2 months ago
by
ReviewedByPhil
Record 4K UHD videos and capture high-quality stills with this Canon EOS M6 Mark II camera. The 32.5MP APS-C image sensor lets you take detailed, true-to-life photos, while the electronic shutter capable of speeds up to 1/16000 is ideal for taking professional-caliber action shots. This Canon EOS M6 Mark II camera comes equipped with an 15-45mm f/3.5-6.3 interchangeable zoom lens for wide-angle and short telephoto shots..
Does it have a self timer/self-timer delay or remote compatibility?
Yes, the self-timer can be set to 10 seconds, 2 seconds, or continuous, which takes 2 to 10 photos consecutively after a 10 second timer expires. You can use your smartphone as a Bluetooth remote control as a shutter trigger, or connect the phone via WiFi to the camera for remote monitoring (see what the camera sees on your smartphone screen) and control all the settings on the camera through the app.
4 years, 4 months ago
by
ReviewedByPhil
The reliable, robust Brother HL-L3290CDW compact digital color printer with copying and scanning capabilities is a great choice for the busy home or small office. The flatbed scan glass provides convenient copying and scanning. Quick print speeds of up to 25 pages per minute¹ plus manual feed slot accommodates varied printing needs and can handle a variety of paper types and sizes including card stock, envelopes and more. Connect with versatile options including built-in wireless or USB interfaces and print wirelessly from mobile devices. The 250-sheet capacity adjustable paper tray helps improve efficiency with fewer refills and handles letter or legal sized paper. Automatic two-sided printing helps save on paper costs. Brother Genuine high-yield toner replacement cartridges help lower printing costs. Comes with a 1-year limited warranty and free online, call or live chat support for the life of your product.Prints and copies up to 25 ppm in black and up to 25 ppm in color
What language does this printer support? Does it support Chinese mandarin?
No, Chinese is not supported on the LCD for the printer settings. It looks like the LCD can only display Latin and Slavic based characters e.g. English, French, Russian, Polish etc..
4 years, 7 months ago
by
ReviewedByPhil
Winning in business means working smarter. This HP Color LaserJet Pro M479fdw printer is designed to let you focus your time where it's most effective - growing your business and staying ahead of the competition.Prints up to 27 ISO ppm*, up to 27 ISO ppm* in color
If this printer is connected via USB to a computer, can other computers print wirelessly to it? I need to have it connected by USB to my work computer but also want to be able to use it for wireless personal printing from two other household laptops.
Yes, you can connect to the printer wirelessly using a direct WiFi connection (local network between the printer and computer) without connecting the printer to your router/home network. You can also connect wirelessly via Bluetooth. You'll get the most out of wireless printing features by connecting the printer to the internet by providing it your home WiFi network SSID and password. Once connected to the internet you can turn on Web Services and print from any device with e-mail capability by simply sending the file to be printed to a uniquely assigned e-mail address for the printer. This will also enable other computers and devices on the network to find and send print jobs to the printer.
4 years, 9 months ago
by
ReviewedByPhil
What does it mean for a webcam to be portable?
Simply that it is small and is versatile in terms of mounting options, for example, if it can be clipped to a laptop monitor as well as a LCD panel or set on a desktop or used with a tripod. They usually still need to be plugged in via USB and require software/drivers to run. Not many are compatible with mobile devices.
7 years, 3 months ago
by
ReviewedByPhil