ReviewedByPhil's stats
- Review count135
- Helpfulness votes1,231
- First reviewJanuary 6, 2016
- Last reviewApril 23, 2024
- Featured reviews0
- Average rating4.6
Reviews comments
- Review comment count0
- Helpfulness votes0
- First review commentNone
- Last review commentNone
- Featured review comments0
Questions
- Question count0
- Helpfulness votes0
- First questionNone
- Last questionNone
- Featured questions0
- Answer count7
- Helpfulness votes7
- First answerJanuary 18, 2017
- Last answerSeptember 1, 2021
- Featured answers0
- Best answers1

ASUS TUF Gaming Laptop. Enjoy everyday gaming with this ASUS notebook PC. The Intel i7 processor and 16GB of RAM let you run graphics-heavy games smoothly, while the potent NVIDIA GeForce RTX 3060 graphics produce high-quality visuals on the fast 15.6-inch 144hz FHD display. This ASUS notebook PC has 512GB SSD that shortens load times and offers ample storage.
Customer Rating

5
Powerful, fast, lightweight
on March 9, 2021
Posted by: ReviewedByPhil
from Easton, PA
The ASUS TUF DASH F15 is a mid-tier gaming laptop that packs in a lot of value for its price tag. Physically, the F15 is only ¾” thick and weighs in at just under 5 lbs thanks to its mostly plastic chassis. Despite that, the matte finish on the lid gives it a premium look and feel and the TUF branding, while prominent, isn’t garish. Every surface, however, is a fingerprint and smudge magnet so be prepared to constantly be wiping it down if you want to keep it looking tidy.
The 15.6” IPS-level/type panel has impressive color depth, viewing angles, and contrast delivered at a 144Hz refresh rate. This makes for a smooth gaming experience in FPS games like CS:GO and other fast-paced action genres like MMORPG and racing games. I’ve played several AAA titles with all the max graphic settings (including V-sync) with only the rarest occasional stutter. I also felt the cinematic experience was quite good with natural colors and sharp detail on the 1080p display, so it’s also pretty good for watching movies and video.
I appreciate that there are three USB 3.2 Type-A ports for I/O devices for all my peripherals and an HDMI 2.0b out for a second display since I tend to use dual monitors a lot; though, I did find grouping much of that on the left side a bit crowded. I also noticed that the FPS on my external monitor hooked up via HDMI was slightly less, on average, than the laptop’s screen despite also being a 144 Hz panel. The USB-C port (Thunderbolt 4) is multi-purpose for I/O, PD charging, and DisplayPort 1.4 out, and the headphone jack is capable of audio out and mic in; I had no problem hooking up my gaming headset with integrated mic for both chat and in-game audio.
For those of you that are into mobile gaming on PC, I was able to run games on the Android emulator BlueStacks with no lag or stutter for responsive smooth gameplay. One thing I didn’t love is the trackpad. The left and right “mouse keys” are embedded into the bottom half inch or so of the trackpad, so while it looks nice as one smooth surface, it was hard to find the delineation between the keys and some of my left-clicks inevitably ended up right-clicks and vice versa. It also features gesture recognition, so be aware that if you try to wipe off the mousepad that you may end up switching active windows inadvertently.
The laptop features a dedicated “Armoury Crate” button, alongside the one-touch volume and mute keys, which launches the proprietary software by the same name. This portal allows you to change system settings, choose performance profiles, and setup sync-able peripherals like RGB lighting and audio. I was very impressed with the two-way AI Noise-cancellation feature’s ability to scrub out background noise from mic input (both onboard and external) including typing sounds from the keyboard. The keyboard itself is tenkeyless chiclet style with good tactile feedback and low noise. It has highlighted WASD keys which are backlit, however, the lighting isn’t RGB, so you can’t change its hue from the default greenish-cyan (it has 3 brightness levels or can be turned off). The secondary commands on the keys are also backlit.
Setting the laptop to ‘Silent’ lowers its power consumption and uses the fans minimally so the laptop is super quiet. However, bumping it up to Performance or Turbo mode when gaming runs the fans at full blast which are loud enough to compete with the onboard speakers’ tiny output; which makes sense given that it runs pretty hot when operating at full capacity. You’ll probably want to get a decent set of headphones, wired or Bluetooth, or external speakers for the best auditory gameplay experience. This laptop does not have a built-in webcam, which I’m ambivalent about, as gaming laptops often have disappointing webcams anyway, so its exclusion allows for a thinner bezel along the top of the screen, but also means you’ll need an external accessory if you do need to get on camera.
The WiFi 6 is lightning fast (and there’s an Ethernet jack to boot) and downloads took no time at all, an essential feature for online gamers and streamers. The included 512 GB m.2 SSD is enough to get you started, but if there are several space hungry games that you plan on installing, then I recommend swapping with a larger 1 TB capacity or adding in another drive, though you’re limited to one additional m.2 NVMe SSD, as there is no HDD bay, and you have to remove the entire bottom of the case to access the slot. In terms of other upgrades, there is 1 SODIMM RAM slot, pre-installed with an 8 GB stick, which you can replace with a higher capacity, and with the additional 8 GB soldered on the motherboard have up to a combined 32 GB dual-channel RAM.
Outside of gaming, the laptop performs well too, from simple web browsing to productivity apps and content creation. Battery life in “battery saver mode” and silent mode is between 3-6 hours depending on your usage. In performance mode, this figure is cut down to under 2 hours. Overall, I’d say there’s a lot to like packed into this laptop for the price. It’s lightweight and powerful enough for daily use, for both work and play, and is decently spec-ed to handle most contemporary games at or near the highest quality settings. While you’re limited in terms of upgrading, and you don’t have all the bells and whistles like RGB backlighting or a webcam, you can always build out your setup with peripherals.
Mobile Submission: False
I would recommend this to a friend!


Share this review:
+6points
17of 28voted this as helpful.
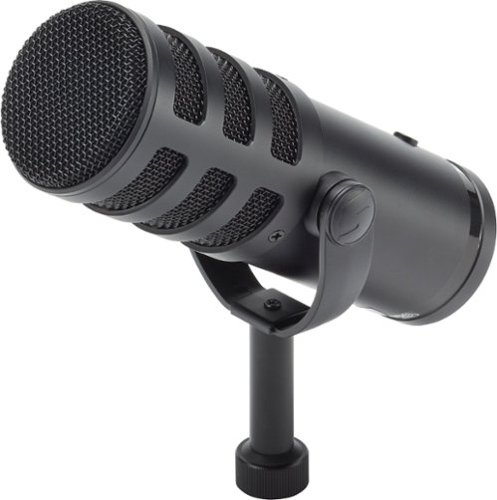
Achieve studio-quality audio for broadcasting, podcasting, streaming and recordings with the Samson Q9U XLR/USB Dynamic Broadcast Microphone. Easily integrated into any professional or home recording studio, the Q9U features both an XLR output and USB-C connection with stunning 24-bit/96kHz resolution. The cardioid polar pattern rejects off-axis sound, focusing the pickup in front of the microphone. A wide frequency response and large dynamic range ensures the detail and nuance of the voice are captured for a natural sounding performance. A pneumatic capsule shockmount and dual-layer windscreen minimizes popping, plosives and mechanical noise. The Q9U also includes zero-latency headphone monitoring, onboard mute switch, and seamless plug-and-play connection with Mac and Windows computers.
Customer Rating
5
Crystal clear audio, versatile, professional
on March 4, 2021
Posted by: ReviewedByPhil
from Easton, PA
The Samson Q9U is a beautifully designed studio microphone with plug-and-play operation, clean and clear audio capture, and flexible hookup options. It comes with both a USB-A to USB-C cable and USB-C to USB-C cable, and the mic natively supports USB-C as well as XLR output. However, an XLR cable is not included with the mic and you would need to supply that as well as an AI (audio interface) or mixer in order to use that connection type.
The mic itself is hefty, at over 2 lbs, thanks to its all-metal zinc-alloy/steel design and integrated swivel yoke stand mount. It does not include a stand in and of itself, so be aware that if you purchase this mic you will need to provide your own boom or mic stand in order to use it. The mounting hole on the bottom of the mic is a standard 5/8”-27 thread, so stands using a 3/8” mount would require an adapter, which is also not included. While the metal grill on the mic and internal capsule shockmount already provide some noise attenuation, it also comes with an external foam wind screen as an additional buffer against pops and plosives for vocal performances.
Inside its matte black metal housing, the mic uses a cardioid, or unidirectional, dynamic element with humbucking, which is a coil used to reduce the amount of electromagnetic interference and pickup from nearby radio frequency devices. The mic primarily captures sound directly in front of it while rejecting the sound coming in from the sides and back, allowing it to separate its source from other sounds in the room. However, this type of mic also produces the proximity effect, so when the mic is very close to its sound source you’re going to capture more bass tones than when you position the mic several inches to a foot away. You can also experiment with placing the mic on axis, pointing directly at the sound source, or slightly off axis to reduce the amount of highs and increase low frequency pick up.
There are 3 physical controls on the mic, a press-in to activate mute button on the side, and low-cut and mid-boost switches on the bottom. Since I record mostly at home and don’t have a soundproof studio, the low-cut filter really helps to reduce low vibration noises such as the rumble of trucks and delivery vans as they pass on the street. When using the mic for spoken word with mid-boost, I noticed that my vocals were brighter with a clearer focus. I do wish that the mute button had an LED indicator when activated because it’s easy to forget that you’re on mute, especially if you’re not using monitoring headphones while live streaming. To that point, there are no lighted indicators whatsoever on the exterior of the mic, not for power nor EQ settings; though if you peer into the headphone jack when the mic is plugged in, you’ll see a faint green glow inside.
Connecting the mic to a computer via USB-C is basically plug-and-play; since the drivers are all built-into the mic you don’t need to install any additional software or drivers. The mic has an internal pre-amp that can be adjusted using the volume slider in the device's properties on a Windows 10 machine. Both USB and XLR connection types provided clear and distortion-free sound at max gain, though for me, the USB connections produced slightly higher levels when speaking at a normal volume right up against the mic, around -10dB, than when using my AI (Scarlett Solo), around -15dB. There’s also a 1/8” headphone output jack for direct connection to headphones or speakers for latency-free monitoring of the mic feed which worked flawlessly. I found that when using an AI with XLR, the monitoring headphones/speakers have to be connected to monitor port on the AI instead of directly to the mic. I’ve also used the mic directly connected to my smartphone’s USB-C charging port. I didn’t need to use an externally powered USB hub to do so, and I was able to record decent levels from 0 - 6 inches away from the mic.
The sound captured from this mic has a bit-depth of 24-bit and sample rate up to 96kHz, broadcast quality, regardless of which connection type you use. This hi-res format might be useful if you’re mixing the tracks or re-mastering the audio in post-production, though I personally didn’t hear the difference versus using the mic to record at 44.1kHz. Overall, I found that the mic produces warm and natural sounding recordings as well as clear and crisp audio with minimal background noise/hiss noise when live streaming. While I use it primarily for spoken word, I think it would also perform great for singing and instruments.
Mobile Submission: False
I would recommend this to a friend!


Share this review:
+2points
2of 2voted this as helpful.

Now that quality you've come to love from GE is available right on your countertop, thanks to GE Appliances blenders, available in both Standard and Immersion designs. Our immersion blenders are ideal for one-handed operation, and available whisk and chopping attachments make whipping up family meals a cinch. You can even take it with you to help make kitchen magic on the go. GE Appliances standard blenders are the perfect addition to any kitchen and have the power to blend through tough ingredients to make delicious shakes, sauces and purées. The available personal blending cups are perfect for your morning smoothie and help make clean-up a snap. Make your blending experience a snap with help from GE Appliances, a brand you trust.
Customer Rating

4
Multi-purpose, durable, and powerful
on January 24, 2021
Posted by: ReviewedByPhil
from Easton, PA
This GE hand immersion blender is replacing a stick blender that I’ve been using for many years now but has cracked near the blending blade due to the housing being made of plastic. I like that the GE immersion blender is made mostly of stainless steel, including the blender stick attachment, so it feels a lot more durable, and I also don’t have to worry about plastic melting or leeching into hot foods during use. There are, however, still a couple plastic parts that don’t contact your food, like the attachment point for the accessories on both the motor and attachment sides.
I like having the additional attachment options of the chopping base and whisk since kitchen storage space is at a premium, and I just don’t have the room for a lot of single-function kitchen gadgets. This stick blender has two speeds, high and low, which are controlled with separate buttons on the handle grip. The upper button is low speed and the lower button is high, which for me was counterintuitive, and I had to get used to remembering which one to press. The tool isn’t that heavy though, and it can be operated using one-hand which is convenient.
Even at low speeds though, the motor is quite powerful. On more than one occasion, for example when using the whisk attachment to beat eggs and whip heavy cream, some of the contents spattered out of the bowl as soon as the whisk started spinning since there’s no gradual ramp up in speed. This also happened when I pureed chunks of cooked, whole pumpkin using the blender attachment directly in a hot pot of spiced pumpkin soup. Therefore, I recommend using a fairly tall and deep vessel with the whisk and starting with and keeping the mixing blade submerged when pureeing foods in liquid to reduce spillover and spatter. The blender blade was able to quickly shred cooked chicken breast finely, for use in chicken salad, without making much of a mess.
I really liked using the chopping cup for preparing small quantities of foods rather than lugging out my full-size food processor. The chopper on low speed is perfect for making a single-serving bowl of guacamole and chutneys with just a few pulses; on high speed, it churned a handful of toasted almonds into deliciously creamy and smooth almond butter in a matter of minutes. The chopper container is made of clear plastic so you can see the contents while chopping, and you can stop the blades as soon as your food reaches the desired consistency. The base of the cup is also rubberized and doesn’t slide about your countertop if you put a little downward pressure on the wand when blending.
Overall, I’m happy to add this versatile cooking tool to my kitchen, though I do wish there was a clearer distinction between the high and low speeds, since the low speed, it seems to me, is still a bit overpowered.
Mobile Submission: False
I would recommend this to a friend!


Share this review:
0points
1of 2voted this as helpful.
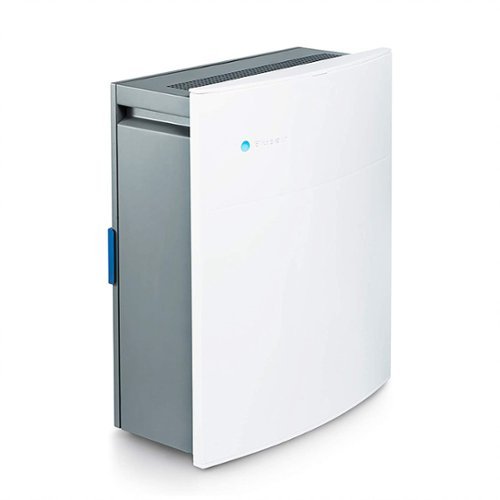
The Blueair Classic 280i air purifier brings clean, energizing air to spacious bedrooms, living rooms, or any rooms up to 279 sq. ft. A built-in air quality sensor makes it easy to confirm your air is virtually free of asthma and allergy triggers and indoor air pollutants such as mold, dust, pet dander, and pollen by scanning the air quality in real-time and adjusting fan speed to your current air quality. The Classic 280i delivers unmatched performance thanks to HEPASilent technology, which combines electrostatic and mechanical filtration technologies. This combination, pioneered by Blueair, delivers a high Clean Air Delivery Rate (CADR) with whisper-quiet operation (32- 56 dB), using 20-80 W of energy.
Customer Rating
5
Whisper quiet, cleaner air in no time
on January 8, 2021
Posted by: ReviewedByPhil
from Easton, PA
We got this room air purifier to combat seasonal allergies and air quality concerns in our home. Recently, we’ve been doing a lot of interior home improvement projects that have subsequently caused a visible layer of dust to settle on surfaces on a near daily basis, so I was concerned with how much of that we were breathing in as well.
The Blueair Classic 280i was a good fit for us because it handles a max room size of 279 sq ft and the largest room in our house is just about 300 sq ft. At the recommended max room size, it is supposed to completely filter the air in the room five times an hour. The unit is sizeable at 21” tall, 16.5” wide, and 8” from front to back. The body of the unit is made of sturdy sheet metal, and the only plastic parts are the handle on the back for the filter compartment and hinged lid on top that covers the touch control panel. The unit doesn’t have wheels on the bottom; instead there are just 6 rubber feet, so if you do need to move the unit, it needs to be picked up. However, it’s not all that heavy, weighing only about 25 lbs, and it has built-in recessed handles on the sides to help you carry it. The overall build quality of the unit feels solid, and it has a sleek, modern look to it.
The unit draws in air from the back, so you’ll need to leave enough clearance behind the unit for it to draw in air from the room; be careful near window curtains which may stick to and block the back if placed directly in front of them. Fortunately, the filter and grated door on the air purifier prevents anything from getting inside the unit and going into the fan itself. Filtered air exhausts from the top of the unit, so if you set the unit below lightweight objects like papers on a desk, it may blow them around.
This is a smart air purifier, so it can be connected to your home’s wireless network via WiFi and can be controlled using Blueair’s smartphone app. Wireless setup was quick and easy, following the on-screen prompts in the app. The unit can be controlled manually as well using the touch controls at the top of the unit. The touch controls are backlit using bright blue LEDs which are always on. These lights are not dimmable and don’t turn off even when the control panel’s lid is closed -- you can see the blue light bleeding from the back of the panel, though this usually faces the wall. Thankfully the light is not visible from the front when the panel is closed, even in a pitch dark room. The unit has a small blue LED indicator light on the front that can be dimmed or turned off completely via the smartphone app (but not from the unit’s physical controls).
You can set the filter fan to low, medium, or high by tapping the power button on the unit. The Classic 280i has an “Auto” mode which uses built-in sensors to detect the level of pollutants in your air and automatically adjust the fan speed to provide the most efficient level of filtration based on current conditions. The contaminants that it checks for are PM1, PM2.5, PM10 (different sized particles) and tVOC for chemicals and vapors. If you use the smartphone app, the measured levels are recorded on a graph that tracks the level of air contaminants over time so you can see when there are spikes of pollutants and how quickly they are removed by the unit. The sensors seem to work well as we saw predictable increases in pollutant levels for example during/after cooking, and when we were painting the dining room we saw an expected increase in tVOC levels. The icons on the unit’s control panel will change from blue to orange when contaminant levels are high. I was impressed with how quickly these levels were lowered with the unit running on high, typically within an hour or two.
I’ve noticed as well that smells and odors no longer linger. For weeks, after we installed new ceilings on the first floor there was a lasting scent of dust and construction lime from the new drywall. That smell is all but faint trace after running the 280i on the first floor for about a week. We even noticed that the day after painting the walls, after running the air purifier in the room overnight, the “fresh paint” smell was not that noticeable.
We’ve also used this unit in the bedroom, as this tends to be one of the dustiest areas of the home. It’s on top floor, gets a lot of in and out traffic, and is fully carpeted. We usually see a lot of dust motes floating in the sunbeams casting through our windows, but with the 280i running, we don’t see them anymore. The air is cleaner and fresher smelling too, and I don’t wake up stuffy-nosed and itchy-throated in the mornings. The best part is that when the unit is on low, we barely hear it. Sometimes I forget that it’s even on until I walk past and hear the gentle hum of the fan whirring, so it hasn’t interfered with our sleeping at all. Even at the highest fan speed, I don’t find it too loud, much less so than say a running box fan.
The only downside to the unit is the high cost of the replacement filters which Blueair recommends replacing every 6 months. There is a “filter status” tracker in the app that counts down from 180 days, indicating when the filter should be replaced. Blueair has an auto-refill program where subscribers can receive a discounted price on filters that are automatically shipped at 6 month intervals. The included filter with this unit is a dual-stage filter with HEPA fibers on one side and a carbon filter on the other which is supposed to help remove gaseous particles like VOCs and odors faster than a HEPA filter alone, though it comes at a premium price versus the standard filter. The process for switching the filters is simple though: just open the door on the back, lift out the old filter, vacuum out any dust into the compartment, and pop a new filter in.
Overall, I’m quite happy with the performance of this unit. It feels well-made and durable, is quiet when operating, and the air quality really does seem to be much cleaner and fresher in our home. Maintenance is simple and straightforward, and I like the user-friendliness of the app, which also gives you outdoor air quality reports in your area, if you provide your location, and reports the temperature and humidity levels inside your home measured at the unit. You can also create a custom schedule for the unit to run only at certain times or days of the week and set a child lock to disable the manual controls, though I prefer to just leave the unit on autopilot an let it do its thing.
Mobile Submission: False
I would recommend this to a friend!


Share this review:
0points
0of 0voted this as helpful.
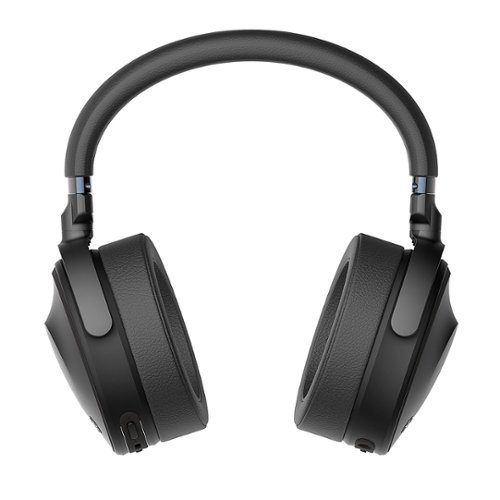
Optimized for you. Premium sound, over-ear wireless headphones that adapt to you and your listening environment, featuring Listening Optimizer, Advanced ANC, Ambient Sound and Listening Care. Bluetooth 5 with aptX Adaptive for ultimate streaming quality. Provides up to 35 hours of battery life, making it perfect for long listening sessions at home, at the office or on the road.
Customer Rating
5
Crystal clear, consistent sound, comfortable fit
on December 30, 2020
Posted by: ReviewedByPhil
from Easton, PA
I’ve owned many a wireless headphone, with and without active noise cancelling, ranging from very affordable to consumer grade audiophile, and I have to say that the Yamaha YH-E700A headphones have earned their place as one of my favorites in terms of sheer sound performance.
For me, these have a comfortable fit, with moderate clamping pressure that keeps the earphones seated on my head without feeling like it’s squeezing the sides of my head too hard. The 10” headband has a flexible steel core and is wrapped in leatherette with a thin, quarter-inch foam-padded underside; it can extend up to 1.5” on each side. The matte plastic exterior, although lightweight, feels somewhat cheap and unfortunately picks up fingerprints and skin oils easily, so I found myself constantly wiping down the outside of the earcups to keep it looking clean.
The large, round earcups, while bulky at 3.5” in diameter, have ample interior space with a circular cavity that measures 2.25” diameter. The 0.75” leatherette-wrapped foam ear cushions are soft, but not memory foam, so they have a bit or resistance that can be felt on the skin around my ears. They do, however, also provide a decent seal so that even without active noise canceling (ANC) enabled, there is a good amount of passive noise isolation dampening outside sounds around you. The earcups tilt about 25°and swivel about 100°; they can lay flat around your neck, though I felt the heft and bulk of the design made wearing them this way somewhat claustrophobic.
The earphones come in a semi-rigid zippered clamshell case, also leatherette wrapped, which includes a storage area for the accompanying accessories: a USB-C charging cable, an AUX cable with gold-plated connectors and right-angle jack, and a two-prong flight adapter. The folding design for storage is cleverly compact, but not intuitive, so I was thankful that there’s a printed visual guide inside the case to remind you how to get the headphones to fit in the space.
Upon powering on the headphones, you’re greeted by a pleasant voice-prompt notifying you of the headphone’s battery level and it immediately enters pairing mode. Pairing the headphones to devices was somewhat of a mixed bag. When I first paired the headphones to my Windows 10 PC via Bluetooth, the computer didn’t recognize it as an audio device and wouldn’t output sound to it. I did resolve this by changing the device’s properties in Windows settings manually to enable all the Bluetooth services and got them working, though it was odd to me that they weren’t enabled by default. When pairing it to my phone it worked straight away. These headphones can remember up to 8 paired devices and automatically connects with the last one it paired to (provided it is in range) when you turn the headphones on.
The audio quality of the YH-E700A is crystal clear and crisp and did not disappoint. The bass response is full and deep with lots of low bass support. The midranges were balanced and well-rounded, and the treble ranges sparkled without sounding harsh or overly sibilant. The sound stage is wide and placed a bit farther than I’m used to, but I found that I actually liked it better because it almost feels as if you’re listening to music in front of a stage in a larger venue. I was quite impressed with the active noise cancellation. As soon as it is enabled, background noises nearly disappear but what surprised me more was that the output sound is virtually unchanged otherwise. With other ANC headphones I typically expect some sort of artificial EQ boost; not so with the E700. Without any music playing, I didn’t hear much white noise or hissing which I find commonplace with other ANC headphones. These headphones use Yamaha’s “Listening Optimizer” technology which utilizes a microphone on the interior of the earcup to sample how sound is reaching your ear several times a minute, continuously updating and adjusting the playback to customize the sound stream. As a result, the listening experience remains very consistent, even if your listening environment changes while you’re using them.
I found out the hard way that the output power of these headphones is really powerful, so now I always make sure to turn down the volume first before starting any music, then ramping up the volume to a comfortable listening level. When using the headphones wirelessly for watching video, there’s virtually no input lag or delay between the video and the audio, though sometimes it takes a few seconds to sync up.
One interesting feature that the YH-E700A has that I’ve seen on a few other ANC units is the ability to pass through ambient sounds intentionally using the exterior mic using ‘ambient sound’ mode. This allows the listener to have more situational awareness and hear things going on around them while music is playing. That’s great for commuters who need to hear announcements on public transport or folks using these while out cycling. To change modes, short press the ANC button adjacent to the AUX port on the left earpiece to enable noise cancelling, ambient sound, or turn the feature off. There’s also a mobile app, “Yamaha Headphones Controller,” which allows you to enable or disable features like listening care, listening optimizer, noise cancelling, and auto power-off timer from your phone.
Power, volume, and playback buttons as well as the USB-C charging port are along the bottom edge of the right earcup. The unit needs about 3.5 hours to charge fully and can reportedly last up to 35 hours depending on your listening volume and whether or not ANC is on. The volume keys double as track skipping controls with long presses, and you can use the headphones for hands-free calling when paired with a mobile device. A word of warning though, callers on the receiving end mentioned that the mic pickup from the headphones is sometimes low and a few times I felt the caller’s audio feed on the headphones had audible digital distortion like compression artifacts, though this may vary based on signal strength and carrier signal quality.
Overall, I enjoyed the listening experience of the Yamaha YH-E700A; they are comfortable for use over a long period of time and have a battery life that can sustain longer listening sessions for several days between charges. The active noise cancellation works great and doesn’t distort the audio output which is very consistent. The only feature I felt was “missing” was the ability to use an AI voice assistant like Siri or Alexa at the touch of a button on the headphones, but that's not a deal breaker for me.
Mobile Submission: False
I would recommend this to a friend!


Share this review:
+2points
3of 4voted this as helpful.

Shark AI Robot VACMOP combines powerful vacuum suction and hard floor wet mopping for a complete clean, all in one robot. Features include: Shark suction power, Sonic Mopping that delivers 100 scrubs per minute for stuck-on stains, and AI Laser Navigation for precision cleaning.
Customer Rating
4
Fast cleanings, best suited for hard floors
on December 22, 2020
Posted by: ReviewedByPhil
from Easton, PA
The Shark AI Robot VacMop isn’t our first robot vacuum nor robot mop, but is the first device we’ve owned that does both these operations simultaneously. I like that it is a little bit smarter than the robot vacuum we’ve been using because it supports room mapping and has laser-guided vision in addition to drop sensors and physical bumper sensors. I’ve noticed that these in combination makes it less likely to ‘bump and redirect’ than our other robots, protecting our walls and furniture from nicks and scratches and things from being knocked over.
The initial setup was a mixed-bag experience. If you want to unlock all the features of the robot, you must use the accompanying smart phone app, SharkClean. This allows you to access features like scheduled cleanings, view and edit the rooms mapping, and adjusting the settings on the vacuum like eco/max suction modes. Without the app, you can still use the robot and initiate a simple cleaning cycle by pressing the 'clean' button on the unit. The main complaint I have about the app is that it requires an internet connection, and won't work if the robot and smartphone are connected to the same WiFi router without Internet access. That makes this robot impossible to use with the app if your Internet service goes down, in areas of the house without a WiFi signal, or if you don’t want the device to be online.
After creating an online account and adding the robot to it, it needs to go through a couple of exploration cycles. The first maps the room and the second detects carpets and rugs for creating ‘no-go’ areas when mopping. Depending on the size and complexity of your room layout this mapping may or may not be very accurate. For example, in my home we have a fairly high transition between the dining room and the kitchen which the robot was unable to traverse. Indeed, it got stuck on the transition and was spinning its wheels for several minutes before it dislodged itself. This resulted in a map with a distorted the layout of the rooms since it continued to ‘map’ its path despite remaining in one spot. It fared much better when we physically blocked its path to areas where it could not, or we did not want it to, go. You can optionally use adhesive magnetic BotBoundary strips (sold separately) placed on your floors to create a ‘virtual wall’ that it will not cross. The robot was not able to travel our high-nap carpeted hallway, getting stuck within the first few feet and simply turning around, therefore I do not recommend it for carpeted floors.
It performed best in square, enclosed rooms with few obstacles and hard flooring; the instructions are clear that you should remove objects and wires that may block its path or get stuck on prior to mapping. The map editing feature in the app was disappointingly frustrating to use to modify incorrect mappings and add missing areas, often resulting in the error ‘one of rooms will not be added to your map.’ We found it easier to simply delete the map and start the exploration cycle over; note that syncing updates to the map with the robot, including deleting the map, is surprisingly slow. Also, the robot can only store one map at a time, making it impossible to pick up and move the robot/base to another floor of the house, or even a room that’s separate from the existing map, without remapping the new area from scratch each time.
Software user-friendliness aside, the actual vacuuming and mopping performance is very good, though a bit loud when running. The robot picks up a lot of dust, hair, and debris. However, the dust bin is a bit messy to empty out, oftentimes dropping a bit of its contents when detached from the main body of the robot, and fine dust clings to it readily. Though, it is completely washable in the sink under running water, including the removable dust filter tray. When mopping, coverage was about 95% efficient. Areas where we found the mop pad didn’t touch were along the perimeter of the rooms, 1 to 3 inches out from the walls and all around the dock base plate.
I liked that the mop tank attaches to the back of the vacuum tray, rather than being an exchangeable component. This allows the unit to both vacuum and mop at the same time and convert from one mode to the other quickly. The water tank held enough water for us to cover our 300 sq ft space in one pass before requiring a fill up. You can also adjust the flow level to dispense more or less water depending on the level of soil of your floors, and you set the unit to ‘recharge and resume’ if your space is large and it cannot finish the cycle on a single charge; we did not require this in our small home. Heavy and dried on messes like spilled sticky substances and mud were not picked up by the mop, even over multiple passes, so these areas are best cleaned before they dry, or using a more robust method.
For regular cleaning, however, I do think the Shark VacMop robot does a nice job in keeping a consistent, baseline level of cleanliness through scheduled cleanings. I also liked that I can do one-off additional cleanings using voice commands using Alexa. Mopping always requires a bit of advance planning as you do need to fill the water tank AND remove and empty it after each mopping run to prevent mold and mildew growth on the pads and water tank. The four included microfiber mopping pads attach easily to the tank bottom via Velcro and are machine washable. The robot works well in our small home, but the app could use some improvement.
Mobile Submission: False
I would recommend this to a friend!


Share this review:
+10points
11of 12voted this as helpful.
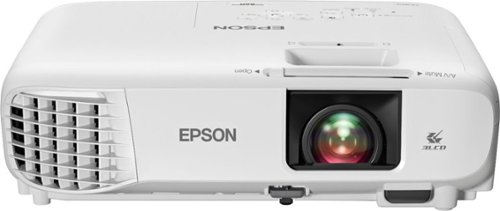
Sit back, relax and watch movies with this Epson video projector. It offers 3,300 lumens of color & white brightness to ensure vibrant, accurate colors, and its HD resolution delivers crisp image quality at 1080p. This Epson video projector lets you connect a Blu-ray player or gaming console via an HDMI input for smooth streaming of your favorite media.
Customer Rating
4
Bright/vivid image, quiet fan, lacking inputs
on November 30, 2020
Posted by: ReviewedByPhil
from Easton, PA
We use a projector as our main TV in our living room and this Epson Home Cinema 880 is replacing our current 1080p LED projector. The first thing we noticed is that the Epson’s 3LCD display generates a much brighter image than our previous projector, so at 3300 lumens, it is bright enough to be seen clearly during the day and with some lights on (indoors). The clarity of the image is also super sharp and crisp all the way to the edges of the screen with no vignetting at the corners.
The projector has a built-in spring-loaded front foot for pitching the image upward and two adjustable leveling feet at the back, but these couldn’t go high enough to get the image where we needed it from where the projector was placed. Since the image was too high, we had to pitch the projector at a downward angle by putting a book under the back side of the unit. The automatic keystone for both vertical and horizontal skew correction worked okay sometimes depending how we positioned the projector, but I did have to manually adjust it to get it perfectly square. I like that the sliding lens cover also acts as an A/V mute switch and cuts off the audio and switches off the lamp, helping to preserve the lamp life when not in use. You can also extend the lamp’s usable hours from 6000 to 12000 hours by setting the projector to ECO mode, which we primarily use and the image is still pretty bright and clear though contrast suffers a bit.
I had no problem getting the image dimensions up to a 100 inch diagonal, which is the size of the PVC screen we use in the living room. It was actually a little too big for the screen where we have the projector placed, so we use the digital “e-zoom” to zoom out and make the image smaller to fit the screen’s borders. You can also digitally zoom in, but note that there is no physical zooming capability so the projected “area” always stays the same size and the image scales within that. The picture also looked great on our outdoor 120 inch screen when we used it for outdoor movie night, and the image was unaffected by the light cast on the screen from the fire pit. The focus wheel behind the lens is smooth and easy to adjust incrementally, so you can get the clearest image possible (at larger projection sizes you’ll be able to discern individual pixels; the max is 320 inches).
The fan noise when set to ‘cinema’ or ‘game’ modes in ECO mode is pretty quiet, even though the projector still puts out a ton of heat. The fan only gets constantly loud if you set it to ‘bright cinema’ (good for day time viewing) or ‘dynamic’ color settings. The one other noise factor that we noticed when using the projector is that occasionally there are moments of clicking/grinding that sound like they are coming from the around the lens. We think it’s from the ‘Dynamic Iris’ setting which tries to adjust the brightness on the fly based on the content as this noise happens whenever we change scenes, screens, or apps on the screen.
The onboard internal mono speaker for this projector also isn’t very impressive. It is serviceable if you’re traveling and want to pack light, but it isn’t going to give you a cinema quality experience to go with the awesome picture. For that, I recommend you plug in an external speaker, sound bar, or even headphones into the AUX audio out port. The analog AUX is the only audio output option, though it can be converted to RCA using an adapter (not included); I would have preferred an optical audio output or Bluetooth for connecting an external speaker. This unit is also lacking on the input side with a single USB-A and a single HDMI port for input. We’re constantly pulling HDMI cables out to plug something else in so we may consider getting and HDMI switch to bridge this gap. You can also connect a computer to the projector using the USB-B port, though you will have to install the Espon USB Display software to use this port. One thing that did disappoint me was that the USB-A port doesn’t have sufficient power output to power the FireTV streaming stick; we had to run a long USB cable from the FireTV to a wall outlet instead of being able to use the USB port right on the projector.
While I did read that this projector supports wireless connections for projection, monitoring, and control via remote, it requires a separate Wireless LAN module, that’s not included in the box. The unit has IR receivers in the front and back so you can use the remote control from either side of the projector. The remote looks a bit complicated, but all the buttons are clearly labeled and each set of keys help you quickly access common functions, like brightness, color mode, and keystone, without making you dig through the projector’s on-screen menus. However, it’s not backlit so can be hard to see in the dark. If you don’t have the remote handy, you can also use the buttons on top of the projector.
Overall, the projector’s image quality and brightness is its main highlight. The unit is easy to use and set up, and the mediocre sound can be mitigated using an external speaker. Despite the lack of multiple inputs and underpowered USB port, you can still make due by simply working around these shortcomings, so they’re not show stoppers.
Mobile Submission: False
I would recommend this to a friend!


Share this review:
+15points
19of 23voted this as helpful.
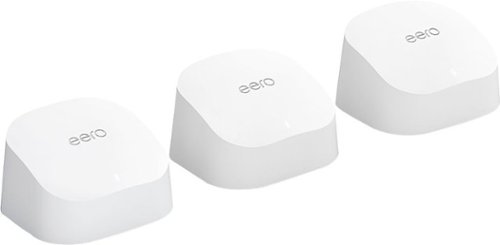
Experience Wi-Fi 6—the new standard for home wifi. The 3-pack Wi-Fi 6 system supports speeds up to 500 Mbps and coverage up to 5,000 square feet—so you can say goodbye to dead spots and buffering. Work, play, video conference, and stream from anywhere in your home. Set up eero in minutes and get automatic updates, a built-in Zigbee smart home hub, and more. Powered by TrueMesh, eero optimizes your wifi to work for your space and supports 75+ devices.
Customer Rating
5
Simple setup; reliable signal, decent range
on November 24, 2020
Posted by: ReviewedByPhil
from Easton, PA
The eero 6 is our first pre-packaged multi-node mesh Wi-Fi system. Previously, we had used an AiMesh system in our 3-story home consisting of a host router at the top floor and a child node two floors down because the signal was weak on the lower floors and the child node needed to be fairly close to our smart lock on the back door, but the signal from the child node was relatively weak and wasn't always reliable. The child node was also somewhat troublesome to set up and expensive which is why we never bothered buying a third node to boost the signal on the second floor. With the eero 6, since it came with two extenders in addition to the main router, we were able to place one on each floor, and now the signal inside the house is pretty uniform no matter what room we're in.
The mobile app is required for setup, and after signing up for an account and logging in, getting the main eero hub and extenders up and running took only about 15 minutes. All the nodes use USB-C powered and come with the same power brick with integrated USB-C cable. The app gives you a few tips on where to place them and will even tell you if you've found an optimal location. Since we made the network name the same as what we'd been using previously, all our 30+ devices automatically connected to the new Wi-Fi system, while choosing the node with the best signal. Some devices even switched to using WPA3 encryption, even though our previous router didn't support that. Since the eero 6 is dual-band there is a 5 GHz signal and 2.4 GHz signal, but both use the same network name. Our devices didn't seem to have any trouble determining which band to connect to. There's even an optional 'band steering' setting in the app that attempts to automatically connect devices to the faster 5 GHz network, if they are capable. We also activated the guest network for visitors. The guest network has a 'share' option that will send a text to your guests with the login credentials or you can display a QR code on your phone's screen that someone can simply scan with their phone to join the network.
I do have to say I like the low-profile and minimalist look of the eero router and access points, with the clean, glossy white plastic exterior and gentle curves. There aren't any antennas sticking up from the units and the single status LED on the front can be disabled (great when it's in a bedroom and you need complete darkness to sleep!). In fact, you can't even tell the difference between the router and extenders unless you take a look at the back. The main router has two ethernet ports while the extenders have none. One of those ethernet ports will be connected to your modem that brings your internet signal into the home. The other can be used for wired access to the network. That's probably the biggest drawback, is that you're limited to connecting one wired device to the network at a time, unless you get an ethernet hub or add an additional access point with ethernet ports. As it is, we have our printer connected to the router as a wired device and all our other devices are operating wirelessly without issue.
Our broadband service level is 250 Mbps through our cable provider and since the eero 6 supports up to 500 Mbps, we still have plenty of breathing room if we want to upgrade our internet speed in the future. Interestingly enough, the app measured our fastest download speed at just under 300 Mbps at consistent intervals. Where it didn't perform as well as our old router (with 4 antennas) is in sheer distance from the nodes. While we were able to maintain good signal in and around the house, the signal dropped off significantly in the backyard, since we live on top of a hill and the yard is 10-15 feet lower than our ground floor. At the limit of our property, approximately 100 feet from the house the Wi-Fi signal was non-existent, whereas with our previous router we were able to receive some signal, though speeds were slower.
I found the Amazon/Alexa integration interesting, as eero is an Amazon-owned brand. Linking my account was as simple as logging in and this gave me instant access to the eero via voice commands to do things like turn off Wi-Fi for specific devices or a group of devices organized under a user profile in the app. I could see this being useful for folks with kids: you could simply ask Alexa to turn off Wi-Fi for all of a child's devices at dinnertime, for example. You can even have Alexa ask eero to find phones connected to the network, and it'll call them. The eero 6 also has a built-in Zigbee hub and that'll allow you to sync up your compatible Zigbee devices without having to use a separate hub. I'm all about reducing complexity and the number of devices around the home when possible. While none of our smart home devices currently use Zigbee (all are direct Wi-Fi connections), it's nice to have this option available to use at no additional cost for future additions. If you have more complex network setup needs, the app allows for some advanced options like UPnP and port forwarding. We don't use those features, so I can't go into more detail about how well they work. For most average users, this system will be plug-and-play.
Overall, I've been pretty impressed with the eero 6. The ease and speed of setup was as advertised and the network just works. We haven't had any issues regarding network stability or signal loss inside the home. With the exception of the signal range outside the home and the lack of ethernet expansion options, this mesh network was a great fit for our needs.
Mobile Submission: False
I would recommend this to a friend!


Share this review:
+9points
18of 27voted this as helpful.
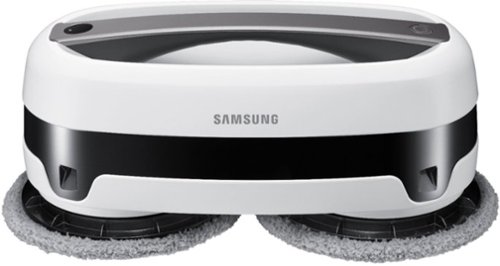
Sit back, relax and let the Samsung Jet Mop automatically clean your floors. Samsung’s Jet Mop automatically cleans all type of floors, like tile, vinyl, laminate or hardwood. This robotic mop features dual spinning fiber pads that easily and quickly remove dust and dirt. Now, you can simply take it easy as the intelligent Jet Mop does the hard work for you.
Customer Rating
4
A simple clean and shine, easy/convenient to use
on November 12, 2020
Posted by: ReviewedByPhil
from Easton, PA
Our household is pretty familiar with robot cleaners as we’ve got a robot vacuum that we use on a regular basis, but this is our first mop-type robot that cleans with water. The Samsung JetBot lets us automate cleaning for wet or sticky messes that the vacuum cannot. We have mostly hardwood and laminate tile flooring in our home, so with the exception of bedrooms that have carpeting or rugs, we can use the JetBot in almost all the rooms. We find we use it most in the kitchen where spills and drips happen more frequently.
Assembly is simple with a press and twist of the two water tanks onto the bottom of the robot; each tank holds about ¼ cup of water, and you do not add any detergent when using it. The JetBot comes with two sets of cleaning pads: a pair of heavy duty cotton pads and a pair of microfiber pads for buffing. These attach to the bottom of the water tanks with Velcro, though you do have to be mindful that the pads are centered and aligned correctly. The heavy duty pads pick up a decent mount of grime and dirt and even managed to pull some stuff out of the grout lines between the floor tiles. The lighter weight microfiber pads are good for light or regular cleaning and light mopping and give the floors a little buff. The manual indicates that you should not to operate the device without using water in the tanks.
The JetBot has a rechargeable battery that will last up to two 50-minute sessions for a total of 100 minutes of cleaning time. The battery takes about 4-5 hours to charge fully from the “low battery” state. After turning the unit on by pressing and holding the power button, you can choose an operating mode by pressing one of the mode buttons on the remote control (within 15 feet). The “auto” mode attempts to clean the entire room by starting from the center and moving outward towards the perimeter. There are sensors on the robot that help it avoid obstacles like furniture and walls, but we found that it typically gently bumps most things in its way before changing directions. There’s a drop sensor that will help it avoid dropping off a cliff, like a step or stairway, and it worked in our kitchen to avoid the step to the mud room. However, there doesn’t appear to be “virtual walls” that you can add to the system to confine it within boundaries or to a room.
The JetBot moves pretty slowly, so even in our small kitchen we usually run it for two 50-minute sessions to ensure it gets to every spot and corner. You can also run it in ‘intensive’ mode in which the pads rotate faster and the machine moves more quickly. This allows it to clean a little faster, saving you time but runs down the battery faster. However, you do have to refill the tank after 50 minutes or when it runs out of water. The machine doesn’t build an internal map of the layout of the room, so when you restart it, it will start a brand new cycle. Of the other modes, I found ‘edge’ to be the most useful after ‘auto,’ as this directs the robot to clean just the perimeter of the room near the walls, where dust and debris tend to accumulate. The only problem we had with this is due to the height of the device, it can’t get right up the floor edge of our kitchen cabinets or appliances, which are recessed starting at about 4 inches from the floor, so we still end up running the robot vacuum to get into these low crevices.
The focus mode is supposed to cover a specific area that might require deeper cleaning, but we found that even when manually placing it and starting on a particularly dirty spot, it would ‘wander’ away from this spot over time. While the unit is not actively in any operating mode, you can use the directional arrow keys to manually move the JetBot around the room. This helps if you want to target a certain spot that you feel the automatic programming isn’t getting. The ‘figure 8’ and ‘step’ pattern are interesting, but I haven’t found a specific use case for them.
I really like that there’s a ‘handy cleaning’ mode that lets you operate the unit handheld. Just press the power button twice after turning it on and the pads will spin, allowing you to clean up messes anywhere while holding the handle. This is useful for lightly cleaning walls, shower tiles, windows, and even countertop surfaces. You do have to remember not to put the unit down while in ‘handy’ mode because all the sensors will be off, including obstacle and drop sensors. If you put it down will in this mode it’ll run into things and could fall from high surfaces. To exit this mode, press the power button twice or the start/stop key on the remote.
It’s important to note that the storage base that the unit comes with is not a charging base; you just place the JetBot there after use, but you still have to plug the included adapter into the power port on the back of the robot. Even then, sometimes the plug did not make a good connection on the first try, and the charging light wouldn’t illuminate so we had to unplug and plug it in again before the unit started charging. The robot also doesn’t “find” the base on its own when it’s low on battery. It simply stops wherever it is and beeps a couple times with a flashing yellow light around the power button -- this is because you’re not supposed to store the unit with the wet pads still attached. After each use you should remove the wet pads, empty out any remaining water in the tanks, and allow everything to dry thoroughly before the next use. This will help avoid mold and mildew developing in the water tanks and on the pads. Be sure to dab the corner of a towel inside the tank door to sop up any residual water, as the lip of the opening prevents you from dumping out the last ½ teaspoon of water in the tank.
The pads were easy to clean in the sink with a little bit of laundry detergent. A silicone scrub is included to help loosen and clean away any debris that may have accumulated on the pads. Machine washing and drying were not recommended in the manual, so I hand-wash then hang-dry the pads. Overall, although the unit takes a while to fully clean a room, the JetBot helps us automate mopping of the floors, freeing us up to do other things. It’s not entirely hands-off though, as you do have to fill/re-fill the tanks and ensure you remove and clean the pads after each use, but that’s a lot easier than traditional mopping. I like that you can also use it as a handheld cleaner on other surfaces, though for really thick, dried-on messes, it wasn’t able to make significant headway versus a good detergent and elbow grease.
Mobile Submission: False
I would recommend this to a friend!


Share this review:
+12points
17of 22voted this as helpful.
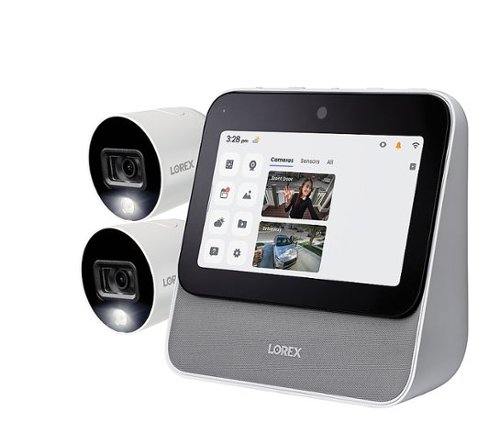
Touch, Talk and View - a smart all-in-one solution for your home monitoring needs. Have complete coverage of your home with the two wi-fi cameras and easily access footage with the intuitive touch screen or by the sound of your voice. "Lorex, show me the front door camera." - it's that easy. This system is compatible with Alexa and Hey Google, and it truly has everything you need with no monthly fees.
Customer Rating
5
Easy setup, many features, clear video/audio
on October 25, 2020
Posted by: ReviewedByPhil
from Easton, PA
The Lorex Home Center isn’t my first security camera system, but it is the first one that I’ve owned that has an integrated monitor base station and smart home type features. My previous system was a wired DVR, and it was a lot of work to running the cables from each camera to the DVR. Since the Lorex cameras for the Home Center are wireless, all I needed to do was ensure that the cameras were placed within 20 feet of a power outlet and that the Home Center base was located centrally relative to the cameras and my WiFi router. Initially, I was having intermittent difficulty getting the Home Center to reliably bring up one of the camera’s video feeds, but after I moved the Home Center closer to that camera this issue went away. Each camera has a 10 ft integrated USB power cable and comes with a weatherproof 10 ft extension cable as well as a USB wall adapter.
You also receive two mounting template stickers, one for each camera, to map out where to drill the holes for wall/ceiling mounting. This makes securing the camera to a wall or other surface super easy since you just place the stickers on the wall, pilot the marked positions, and peel them off when you’re done. I also made a photocopy of the stickers just in case I wanted to move the cameras later. I appreciated that each camera unit includes cable management clips, screws, and wall anchors to make your installation look tidy afterwards.
Setting up the system only took about 10 minutes. Just plug in the base station and setup a passcode to unlock the device and disarm the cameras and sensors. Then plug in the cameras and add them directly on the Home Center or alternately through the mobile app. You can also choose to setup ‘face unlock’ on the base station as it has a small camera above the touchscreen LCD that is only used for facial recognition purposes. Only one face unlock user can be stored at a time. A separate device password also needs to be set for the base station and each camera if you want to add them to your Lorex account on the Lorex Home mobile app.
Once set up, you can use the base station monitor to view the cameras live any time, activate the mic for two-way communication, since each speaker has both a built-in mic and speaker, trigger the audible alarm or deterrence light (a bright spot light), and change various settings in addition to manually initiating a recording or photo snapshot. You can shut off the live camera feed by enabling “privacy” mode. These same features are also present in the mobile app. Just be aware that this system is not “always-on” and continuously recording/saving footage the way a traditional DVR system would. While you can view the cameras' live feeds any time, it only saves footage when there’s a motion-triggered event or if you manually start a recording.
You can also choose to be notified for motion detection events and set a schedule for the times during the day when you want those triggered. You can receive notifications on the Home Center with an audible signal and/or a push notification on your phone. Each camera can be customized to detect motion, people, and/or vehicles with the ability to block out “zones” in the field of view of each type and set the overall sensitivity of the sensor. I thought this was pretty neat because this helps to reduce the amount of nuisance notifications, for example, if your camera is pointed towards a busy street and you’re really only interested in capturing a person on camera, or if you want to ignore motion in the sky portion of the camera's field of view. You can also set a notification cooldown period where you wouldn’t receive additional alerts, up to 30 seconds, though that still seemed a bit too frequent to me.
To access your cameras and video footage anytime from anywhere you have an internet connection, you must connect the Home Center case to your home WiFi network wirelessly (5 GHz only) or wired using the included Ethernet cable. However, the system does not require internet to operate, and it works perfectly fine completely offline; you would, however, lose the ability to access your system though the mobile app and cannot receive automatic notifications while using the system offline. Recorded video/audio footage are saved locally to the SD cards (up to 256GB) installed in the Home Center base station and/or in the cameras. The base station comes with a 64 GB SD card pre-inserted, so you can get started right away, but in case the Home Center loses power, you may want to install SD cards in the cameras themselves as a backup recording method. You can also choose to install a 1TB M.2 SSD (SATA interface only) in the Home Center to have 4 times more max storage space. Since all the footage is saved locally, there is no monthly cloud storage subscription fee to access or store your footage. If you link your Home Center and cameras to your Lorex Home account, you can also share your devices with other users you want to have access to the live views and recordings.
I found the footage and snapshots captured by the 1080p cameras to be clear and detailed, both indoors and outdoors, and even in pitch black conditions thanks to the auto-activated infrared lights. The interface for both the Home Center base station and the mobile app are easy to navigate/use, and the two-way audio for communicating with someone near the cameras was actually better than expected, with the best audio quality when the person was within 6-8 feet of the camera. For me, the deterrence siren could actually be a little louder, and I would have liked to have seen customization options for the duration of both the deterrence light and siren (only active for 10 seconds from the time of being triggered). However, the system is expandable with a range of wireless Lorex products including a video doorbell, door and window sensors, and floodlight camera. It supports 8 Wi-Fi cameras and 32 sensors total.
I liked having the option to issue voice commands to the Home Center using the wake word ‘Lorex’ to bring up the live views of camera, recorded footage, or trigger the security features. It just takes a little while to get familiarized with what commands are available to use. If you prefer privacy, both the mic and camera on the Home Center can be disabled. While I was able to connect my Lorex account to my Amazon account, you do need an Echo device with a screen, like the Echo Show, in order to utilize Alexa commands; though, there’s only really one command for the skill to show the live views of the cameras. I also thought it was cool that it grabs weather information from the internet based on your location, and can display it on the screensaver and even tell you the hourly/weekly forecast. Overall, I’m pretty happy with this security system. It was easy to install and setup, is intuitive to use, and has more advanced AI and smart home features than my older DVR system.
Mobile Submission: False
I would recommend this to a friend!


Share this review:
+1point
1of 1voted this as helpful.
ReviewedByPhil's Review Comments
ReviewedByPhil has not submitted comments on any reviews.
ReviewedByPhil's Questions
ReviewedByPhil has not submitted any questions.
ReviewedByPhil's Answers

The Nest Doorbell is the battery-powered video doorbell that works with any home. See what’s happening at your door from anywhere and get intelligent alerts about important activity, like when there’s a person, package, animal, or vehicle.* And because there are no wires, you can install it yourself. Nest Doorbell requires the Google Home app and a Google Account – it’s not compatible with the Nest app or the home.nest.com site.
My existing doorbell chime (electric) says "must install diode" on the back, and there is a 1N4001 diode installed in my existing doorbell button. Do I need to use the diode in my installation of the Nest Doorbell if I'm hard wiring it to my chime?


The compatibility checker said my electronic chime and transformer are compatible, but the video instructions for a wired installation of the Nest Doorbell (battery) doesn't make mention of installing a diode (or not), if one comes with the chime. At any rate, I performed the installation without it and adjusted the "length of ring" setting to 6 seconds, which is nearly long enough to play through the melody, though it loses power and cuts off at the end. Any longer setting results in the chime beginning to repeat before it gets cut off which I find less desirable.
2 years, 8 months ago
by
ReviewedByPhil
The Blueair Classic 280i air purifier brings clean, energizing air to spacious bedrooms, living rooms, or any rooms up to 279 sq. ft. A built-in air quality sensor makes it easy to confirm your air is virtually free of asthma and allergy triggers and indoor air pollutants such as mold, dust, pet dander, and pollen by scanning the air quality in real-time and adjusting fan speed to your current air quality. The Classic 280i delivers unmatched performance thanks to HEPASilent technology, which combines electrostatic and mechanical filtration technologies. This combination, pioneered by Blueair, delivers a high Clean Air Delivery Rate (CADR) with whisper-quiet operation (32- 56 dB), using 20-80 W of energy.
HOW MANY FET DOES TRHIS BLUEAIR COVER

Play to your full potential with this 23.8-inch ASUS TUF gaming monitor. The 1ms response time prevents blurring and lagging for quality visuals, while the FreeSync technology eliminates stuttering and tearing for seamless gameplay. This ASUS TUF gaming monitor has an anti-glare display that reduces reflections, and it features flicker-free technology that reduces eye strain for comfortable viewing.
Will this monitor support 144mhz for Xbox 1x over HDMI, is the HDMI ports 2.1?
The HDMI port on the monitor is HDMI v1.4, so on the Xbox One X it'll only allow you to output at 1080p @ 60fps and only goes to 75Hz.
4 years, 2 months ago
by
ReviewedByPhil
Record 4K UHD videos and capture high-quality stills with this Canon EOS M6 Mark II camera. The 32.5MP APS-C image sensor lets you take detailed, true-to-life photos, while the electronic shutter capable of speeds up to 1/16000 is ideal for taking professional-caliber action shots. This Canon EOS M6 Mark II camera comes equipped with an 15-45mm f/3.5-6.3 interchangeable zoom lens for wide-angle and short telephoto shots..
Does it have a self timer/self-timer delay or remote compatibility?
Yes, the self-timer can be set to 10 seconds, 2 seconds, or continuous, which takes 2 to 10 photos consecutively after a 10 second timer expires. You can use your smartphone as a Bluetooth remote control as a shutter trigger, or connect the phone via WiFi to the camera for remote monitoring (see what the camera sees on your smartphone screen) and control all the settings on the camera through the app.
4 years, 4 months ago
by
ReviewedByPhil
The reliable, robust Brother HL-L3290CDW compact digital color printer with copying and scanning capabilities is a great choice for the busy home or small office. The flatbed scan glass provides convenient copying and scanning. Quick print speeds of up to 25 pages per minute¹ plus manual feed slot accommodates varied printing needs and can handle a variety of paper types and sizes including card stock, envelopes and more. Connect with versatile options including built-in wireless or USB interfaces and print wirelessly from mobile devices. The 250-sheet capacity adjustable paper tray helps improve efficiency with fewer refills and handles letter or legal sized paper. Automatic two-sided printing helps save on paper costs. Brother Genuine high-yield toner replacement cartridges help lower printing costs. Comes with a 1-year limited warranty and free online, call or live chat support for the life of your product.Prints and copies up to 25 ppm in black and up to 25 ppm in color
What language does this printer support? Does it support Chinese mandarin?
No, Chinese is not supported on the LCD for the printer settings. It looks like the LCD can only display Latin and Slavic based characters e.g. English, French, Russian, Polish etc..
4 years, 7 months ago
by
ReviewedByPhil
Winning in business means working smarter. This HP Color LaserJet Pro M479fdw printer is designed to let you focus your time where it's most effective - growing your business and staying ahead of the competition.Prints up to 27 ISO ppm*, up to 27 ISO ppm* in color
If this printer is connected via USB to a computer, can other computers print wirelessly to it? I need to have it connected by USB to my work computer but also want to be able to use it for wireless personal printing from two other household laptops.
Yes, you can connect to the printer wirelessly using a direct WiFi connection (local network between the printer and computer) without connecting the printer to your router/home network. You can also connect wirelessly via Bluetooth. You'll get the most out of wireless printing features by connecting the printer to the internet by providing it your home WiFi network SSID and password. Once connected to the internet you can turn on Web Services and print from any device with e-mail capability by simply sending the file to be printed to a uniquely assigned e-mail address for the printer. This will also enable other computers and devices on the network to find and send print jobs to the printer.
4 years, 9 months ago
by
ReviewedByPhil
What does it mean for a webcam to be portable?
Simply that it is small and is versatile in terms of mounting options, for example, if it can be clipped to a laptop monitor as well as a LCD panel or set on a desktop or used with a tripod. They usually still need to be plugged in via USB and require software/drivers to run. Not many are compatible with mobile devices.
7 years, 3 months ago
by
ReviewedByPhil