Share Zipeedee's profile
Zipeedee
Zipeedee's stats
- Review count4
- Helpfulness votes182
- First reviewMay 27, 2015
- Last reviewApril 8, 2016
- Featured reviews0
- Average rating5
Reviews comments
- Review comment count0
- Helpfulness votes0
- First review commentNone
- Last review commentNone
- Featured review comments0
Questions
- Question count0
- Helpfulness votes0
- First questionNone
- Last questionNone
- Featured questions0
Answers
- Answer count0
- Helpfulness votes0
- First answerNone
- Last answerNone
- Featured answers0
- Best answers0
Zipeedee's Reviews
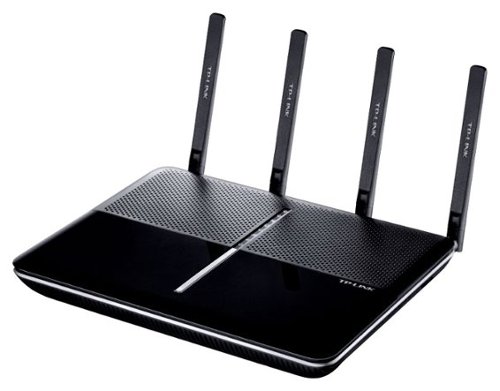
Unleash powerful Wi-Fi on all your devices. Watch your favorite shows on a smart TV, fight virtual battles on your gaming console, and finish up the workday from your tablet all at the same time. With this TP-LINK router, you won’t be interrupted by lag, buffering, or slowdown.
Customer Rating

5
Great signal strength and awesome connectivity
on April 8, 2016
Posted by: Zipeedee
I installed the Archer C2600 in our sister office which has two computers, a server and a network all-in-one printer. They just got broadband hooked up but the installation only included the modem. We had to supply our own router. The Archer C2600 was perfect since it is a dual router offering both wired and wireless connectivity.
Installation was extremely easy. Just follow the illustrated sheet. It is sleek and stylish looking with 4 very large antennas. I really like how the LED lights are barely visible. You can even turn them off in the settings menu. The router's interface setting menu is easy to use. It has great features such as parental controls, QoS (prioritizing devices), guest account just to name a few.
The router has two USB ports. I attempted to setup a network printer but a heck of a time. The printer showed up on the router device map but even after downloading the TP-Link USB Printer Controller Utility it still would not print. I than attempted to make the printer a local printer again and it would not work. I finally figured out I had to uninstall the USB Printer Control Utility program then everything went back to normal. The printer I was trying to install was an HP 4050N, so it was an antique. I will give the router the benefit of the doubt and maybe the printer driver was just too out of date. You can see in the attached pictures the printer was recognized.
The Archer C2600 has superior signal strength. Pretty much throughout the open layout office all mobile devices had full bars. I also had to buy a switch to add more Ethernet cables and there was or lag or decrease in speed.
If you are looking for an easy to connect dual router that offers great signal strength, awesome connectivity and able to take on the mass amount of wireless devices - the TP-Link Archer C2600 is for you.
My Best Buy number: 3476155793
I would recommend this to a friend!


Share this review:
+2points
3of 4voted this as helpful.
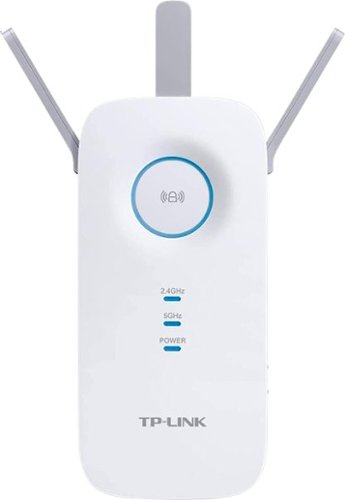
Eliminate dead spots in rooms with weak Wi-Fi coverage with the RE450. It installs easily and delivers blazing-fast dual-band AC1750 Wi-Fi across your home for HD streaming and gaming in any room.
Customer Rating
5
Amazing Range Extender – Now I’m Getting The Speed
on March 14, 2016
Posted by: Zipeedee
Long time users of the internet can remember modems and dialup. I had two phone lines so I wouldn’t tie up the main phone line. I then progressed to DSL and finally cable. The instant internet connections were glorious – and then came WiFi. I thought I was in heaven!
However, there was one problem. My house is long and the cable came in at one end of the house and that’s where my router was located. I had great coverage at that end of the house but was a little spotty in the other end. I have an Airport Extreme base station and was very happy with it. I had tried other range extenders, but they seemed to slow down my connection and they proved to not be very reliable. So when I had the chance to try the TP-Link AC1750 RE450 Range Extender, I was expecting to be disappointed as I was with the other range extenders. Boy was I surprised!
The first thing you notice about the AC1750 is it size. It’s not small. The electrical plug is at the bottom of the unit and covers most of the other plug in your electrical outlet. This is a small price to pay for the performance – more on that in a bit. It is 6.5 inches long and 8 inches with the middle antenna extended. It is 1.5 inches deep and 3 inches wide but 5.5 inches wide with both side antennas flipped up.
Once you plug it in, a blue LED power light lets you know that it is ready to go. The quick instruction guide follows you through the set up. There are two options – using a web browser and using WPS. I used the web browser. In your Wi-Fi settings you will select TP-LINK_Extender_2.4GHz and then go to your web browser of choice and enter http://tplinkrepeater.net. Use admin for both the username and password. You will be prompted to change both of these and then you will be guided through the rest of the setup process. I selected to keep the existing SSID and to have both the 2.4GHz and 5 GHz networks show as one. When the settings are to your liking, the extender will reboot and you will set the 2.4GHz and 5GHz light lit up. The large circular button will have a blue ring around it if your extender is in a good location (at least halfway between the router and your dead zone) and red if it is too far away.
Now for the real test. Did it help my dead spot and increase my speeds? I know that the 2.4 GHz band can travel farther, but the 5 GHz is better because it can transfer larger amounts of data and is less congested. I used a Wi-Fi app to test the coverage on my Mac. The results are shown in the pictures. I was in the middle of my house and could barely see the 5 GHz band before the extender, but after I was not only seeing it there but everywhere in my house! I recently upgraded to a 30 Mbps internet plan and was only getting that in the bedroom above where my router was located. As you can see in the picture, I was not getting the speed I was paying for. This picture was taken at the complete opposite end of the house! I went from 15 Mbps to 34 Mbps. There is also an Gigabit port if you want to run an Ethernet cable to it.
I can not sing the praises of this range extender enough. With all the streaming and downloading that is being done in my home, the increased speeds and coverage is amazing.
If there are any problems, it comes with a two year warranty and 24/7 technical support. It says on the box it will work with any W-Fi router. It played very nicely with my Apple Airport Extreme. I’m sure that it you get this extender you will not be disappointed!!
(This is a review of a free product received by TP-LINK as part of the review program.)
My Best Buy number: 3476155793
I would recommend this to a friend!


Share this review:
+33points
33of 33voted this as helpful.
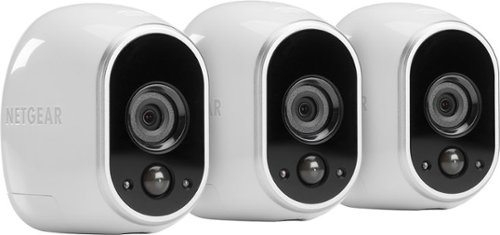
This 3-pack of motion-activated NETGEAR Arlo Smart Home VMS3330-100NAS indoor/outdoor wireless IP security cameras lets you record 720p videos, both during the day and at night, so you can easily keep an eye on your home or business.
Customer Rating
5
Up And Running In Less Than Ten Minutes!
on June 16, 2015
Posted by: Zipeedee
I wanted a security system for my home but was a little intimidated by having to run wires inside and outside my house. So I was thinking that a wireless system may be the way to go. I was concerned that the quality would not be good enough for my needs. The Arlo wireless system from Netgear takes all those worries away!
When I first received my unit the first thing that I noticed was the Arlo logo…a bird that has the wireless logo as its wings – very clever! I unpacked the unit and had a base station, power cord, Ethernet cable, 4 magnetic wall mounts, mounting screws and anchors, and cameras with batteries. The quick start is nicely illustrated and will get you up and running very quickly.
The first thing you need is the Arlo app…you can search for it in your respective app store on scan the QR code in the guide. You then have to hard wire the base station to your router. You plug in the power adapter and turn on the power button. The base station is very light at 11.5 oz. At waiting a minute or two, the power and Internet LED will turn green and now you are almost ready to start playing with your new cameras. You launch the Arlo app (or you can use your computer) and select New System Setup. You put in an email and password to setup your Arlo account. You now put in 4 CR123 batteries into each camera. You bring each camera within 1-3 feet of the base station to complete the sync process. You press the Sync button on the base station and wait for the Camera LED to blink green and then press the Sync button on the camera. A blue LED on the will blink rapidly and then go out – a green Camera LED on the base station will let you know the camera is now ready.
Launching the app will bring up the views of the camera with a play triangle in the middle of each screen. Pressing the button will activate the video feed on the camera. You can connect up to 5 cameras for free (nice as some companies charge you for this service) with 1 GB of cloud storage. You can only login in from one device at a time. I was amazed at how easy the setup was to get the cameras running!
At the bottom of the app you will see four selections: Cameras, Library, Mode and Settings. Cameras is where you can see your video feeds – you can activate one or all of the cameras. Library is when you will see a calendar with the dates of your recordings. Mode is where you can set up a schedule for when you want the cameras to record motion. Mine had a default setting of 8:00 AM – 4:59 PM Monday-Friday to record motion and all other times had motion turned off. It is very easy to change any of the settings by just dragging the time sliders. Settings is where you can change the settings of your system. You can adjust the sensitivity of the camera and the length (from 10 seconds to 120 seconds) of the recording once motion has been detected. You can also change the names of your cameras and the base station. You can also adjust the orders of the cameras as they appear in your feed. Once motion is detected, your iPhone will get an alert telling you. I recently got an Apple watch and now the alert also appears on my wrist! How cool is that!
The video quality of the cameras are simply stunning! HD quality at 720p is amazingly sharp – I guess I didn’t expect such quality in a wireless camera. I tested both indoors and out and got good results in both. I would recommend you downloading the manual from the Netgear website. It gives you much more information on all aspects of the camera – for example – “For best results, the path of expected motion should cross Arlo’s field‐of‐view and not head directly into or away from the camera. For example, if you want to detect motion near a couch, place the camera to the side of the couch, rather than above it or opposite it.” It has a great diagram that shows that the detection zone for motion is 20 feet at maximum and 5 feet at minimum. There a motion detection test feature that that will flash the camera’s LED amber when motion is detected. You can also adjust the motion sensitivity of the camera. This is something that helped me. I had a camera pointed at my driveway, but it keep alerting me for motion whenever I car passed on the street in front of the driveway. I adjusted the sensitivity so that it would only detect motion in the driveway and not the street. The directions also walk you through how to set up a schedule to have the camera record motions at a certain time – for example Monday-Friday from 9-5 when you may be at work. I didn’t want it recording on the weekends during the day when I was on my tractor mowing the yard! It is very easy to click record everything on motion if you want to supercede the schedule.
Night vision works very well for short distances. I have one camera directed on my front door and at night I can easily see what’s going on. However, the camera I have on my driveway, because it covers a larger area, is pretty much useless at night. The directions say the best height for the camera is above seven feet – the driveway one is about 15 feet up and covers a large area.
I have two suggestions for Netgear for this product. I appreciate that the system comes with four magnetic mounts. This will allow you to mount them in different locations and move the cameras as needed. However, since they only attach to the back of the camera and the mount is not completely round it limits the angles you can get with the cameras. You can only attach the camera to the mount at the back of the camera (quite firmly I might add). It would be nice (and probably an engineering nightmare) to make it so that they could be attached at the top and bottom as well. Also, instead of including the four half-round mounts – maybe include one of their adjustable mounts (VMA1000) or a table/ceiling/wall mount (VMA1100). As of June 2015, the shipping times on these from Amazon are 1-3 months!
My only other concern about these cameras is the battery life. They only record when they detect motion so battery life won’t be wasted. I’m hoping that I can get up to 6 months on a set of batteries. I’ll update in about six months and let you know how I did! I realize that in the colder months the battery life will not be as good.
The basic Arlo account gives you seven days of secure cloud DVD storage (up to 1 GB) and support for up to 5 cameras. You can upgrade if this basic service does not meet your needs.
These cameras are also weatherproof. They have already survived a couple of good thunderstorms will no ill effect. I hope they will do equally well in a western New York winter.
This is an amazing home video security system! I am so glad that I found a wireless system that meets my needs, has a ton of features and has a great app and website. I mean it when I say that the setup and features on this system is amazing!
Product sample.
I would recommend this to a friend!


Share this review:
+96points
129of 162voted this as helpful.
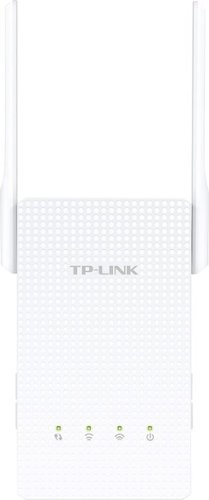
Boost your wireless network with this TP-LINK RE210 range extender, which features Wireless-AC technology and 2 antennas for reliable signal strength and coverage. A Gigabit Ethernet port enables you to connect wired devices.
Customer Rating
5
Boost your WiFi Signal
on May 27, 2015
Posted by: Zipeedee
The TP-Link AC750 WiFi Range Extender is perfect for anyone who has problems with weak or dead WiFi signals in their home or office. It allows you to strengthen the WifI signal as well as connect an Ethernet connection directly to the adapter.
Setup is extremely easy. Just plug the adapter near your wireless router and press the WPS on your wireless router and then push RE button on the adapter. Wait until the blinking light turns solid green and you are ready to relocate the adapter to your desired location.
We have a auto repair and used car lot that has a metal roof and concrete walls. The WiFi signal gets weak between the front and back offices which are about 15 feet apart. After installing the TP-Link range extender in the front office the signal increase from 1 to 5 bars! That is the strongest signal possible. The adapter uses the same login information as your wireless Network. If you don't see your network information and you see the TP-Link name instead, that means the adapter did not configure to your network correctly using the WPS option. You may see the name of your wireless router instead and that is okay. I actually saw four entries, 2g and 5g for our Network, and the name for the brand of the wireless router. They all worked to sign in with the Network password. It probably has something to do with the setup with the router.
If you do not have a WPS feature on your wireless router, don't worry you can setup the adapter manually by logging into the TP-Link Network and web browser after plugging in the adapter. The instructions easily explain and show images on how to do this option.
You can also sign into the adapter configuration settings page from any device that is directly connected to the adapter wirelessly. Here you are able to make changes to any settings.
The adapter also has one Ethernet port which allows you to connect devices via Ethernet instead of wirelessly. So no need to run lines or drill holes.
Overall this adapter is a great update from the previous adapter set I had that required two adapters that had to be synced together in order to work. It works flawlessly and keeps the signal strong.
I received this item directly from TP-Link for an honest, unbiased review.
I would recommend this to a friend!

Share this review:
+11points
17of 23voted this as helpful.
Zipeedee's Review Comments
Zipeedee has not submitted comments on any reviews.
Zipeedee's Questions
Zipeedee has not submitted any questions.
Zipeedee's Answers
Zipeedee has not submitted any answers.