MarilynB's stats
- Review count63
- Helpfulness votes470
- First reviewMarch 5, 2013
- Last reviewApril 12, 2024
- Featured reviews0
- Average rating4.7
Reviews comments
- Review comment count0
- Helpfulness votes0
- First review commentNone
- Last review commentNone
- Featured review comments0
Questions
- Question count0
- Helpfulness votes0
- First questionNone
- Last questionNone
- Featured questions0
- Answer count26
- Helpfulness votes96
- First answerJune 20, 2014
- Last answerAugust 1, 2021
- Featured answers0
- Best answers6
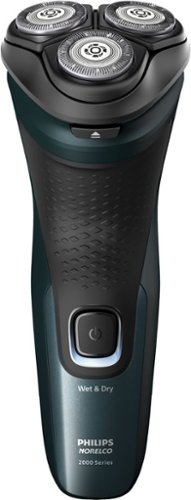
Experience a comfortable, clean shave every day with 27 self-sharpening ComfortCut blades and SkinProtect Technology. Includes a convenient travel pouch.
Customer Rating

5
Excellent shaver with well-thought-out features
on April 12, 2024
Posted by: MarilynB
The Philips Norelco Shaver 2600 (Model X3052) arrived well packaged. The inside of the package included a form fitting insert to prevent the shaver from moving around inside the box. Included in the box are a cord for charging, a blade cover, a canvas-like bag with a zipper for travel or storage, and an instruction manual.
The shaver is rechargeable, and the USB cord is specific to the port on the shaver; you won’t be able to use any of the standard “cell phone-type” USB cords, so don’t lose it. Since the cord fits nicely inside the zipper bag with the shaver, this shouldn’t be an issue. The shaver is light-weight and easy to handle with comfortable grip. The shaver works wet or dry with or without shaving creams or gels. It was tested using 3 methods for shaving: Dry face, wet face with shaving cream, and wet face without cream or gel in the shower. All shaving methods worked well and produced a comfortable, close shave. The shaving heads move in 4 directions, thus conforming to the curves of your face as you shave. The pop-up trimmer included on the shaver was easy to use and worked well. After shaving, pressing the one-touch button flips open the shaver head for easy cleaning. Just rinse under water and snap the head back down. The instruction manual suggests you replace the blades every 12 months with their SH30 blades sold separately.
There is a convenient indicator light for letting you know the status of the rechargeable battery. It flashes orange when the battery has less than 5 minutes of shaving time left. When you turn off the shaver, it will continue to flash orange for a few seconds. While the shaver is charging, the indicator flashes white. When the battery has completed charging, the indicator shows a continuous white light. (A full charge takes up to 1 hour and there is up to 50 minutes of shave time on a full battery.) The light will remain on for 30 minutes, but will then go out to save energy. If you find yourself with a dead battery and you need to use the shaver, you can charge it for 5 minutes for a quick shave. When you plug it in to charge it, the light flashes white quickly and once there is enough power for a 5-minute shave, the light begins to flash white slowly. The manual states for this model, the first charge should be 3 hours without interruptions, then up to 1 hour thereafter.
I would highly recommend this product as it lives up to all of the claims made by the manufacturer and produces a close comfortable shave, is light-weight, easy to clean, fast to charge, and includes a convenient bag for storage and travel. All of the included features are well-thought-out and enhance the experience of using this shaver.
I would recommend this to a friend!
Share this review:
0points
0of 0voted this as helpful.
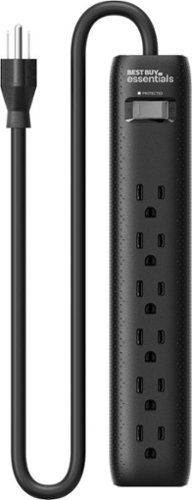
Don’t let power surges damage your valuable electronics. Protect connected devices with the Best Buy essentials BE-H206 6-Outlet 1,080 Joules Surge Protector. Its 1,080-joule rating helps keep equipment in your home or office safe from harmful power surges. Safely connect up to six wall chargers at the same time. The 2 ft. power cord offers flexible placement options, and an LED indicator shows when your surge protector is on. This Best Buy essentials Surge Protector is just what you need to keep your connected electronics safe.
Customer Rating

4
Could use a better design, but works well
on November 7, 2023
Posted by: MarilynB
This surge protector power strip comes with a 2 ft cord and 6 outlets. There is an on/off toggle switch. The black color is helpful in making the power strip less conspicuous if using under or behind furniture because the black is less noticeable in the shadows. If you cannot hide the power strip, though, the sleek and curved design looks nice.
When opening the power strip from the box, the power cord is folded and bent to fit in the box. When you remove it, it doesn’t straighten out well, but that can be achieved by slightly bending the cord in the opposite direction at each bend/curve, resulting in a fairly straight cord.
There are holes on the back so that you can hang the power strip on a wall.
I plan to use this to plug in some Christmas decorations which I will want to turn off during the night. I can easily reach down and press the on/off toggle to do so instead of having to unplug each cord individually, especially since the plug will be behind the Christmas tree.
The plugs are placed close together making it impossible to use every plug if you use any transformer plugs or angled plugs. Also, the plugs would work better if placed sideways on the strip, so that if you have a cord that comes out of the side of the plug, instead of the top, it wouldn’t interfere with being able to use the next plug.
I cannot review the surge protection capability of this power strip, as I have not experienced any power surges since I began using it, but I think it is important to use surge protectors whenever possible.
The value is very good for the features that it has. I would recommend this for anyone who would not be affected by the limitations mentioned above.
I would recommend this to a friend!
Share this review:
0points
0of 0voted this as helpful.
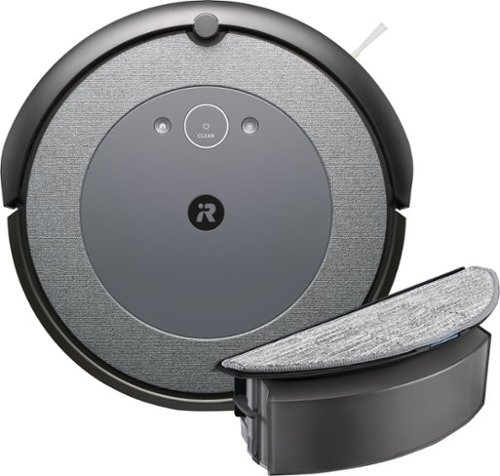
Whether your mess is wet or dry, the Roomba Combo i5 robot vacuum and mop can double up on cleaning tasks with one machine. From spilled crackers to everyday shoe prints—this robot can handle it. Set it to vacuum only or vacuum & mop your hard floors by swapping in the Roomba Combo Bin.
Customer Rating
4
Some minor issues but definitely worth getting
on November 3, 2023
Posted by: MarilynB
iRobot Roomba Combo i5 Robot Vacuum and Mop
Registering and Pairing Issues: After charging the Roomba, I had difficulty setting it up because of two separate issues. It took over 20 minutes to receive the first verification email when I tried to register it with the app, and since it gave me the option to “send email again”, I clicked on that a few times. Finally it sent all of the emails at once. So, be patient – it may take a long time to get that email. Also, the app kept saying it could not detect my Roomba. I went through the steps several times with no results. Finally, I looked on the Internet for troubleshooting advice. Nothing on the iRobot site helped, but I found a lot of forums stating the same problem. Even though the instructions say that putting the Roomba on the charging dock will wake it up and the lights on the Roomba came on when I did that, I had to press the power button once before the app could detect it.
Installing the Combo Bin: Make sure you scan the QR code on the “Activate your Combo Bin” card during installation. I have read in several Troubleshooting forums that if you miss this step, you may have to start over from scratch.
Mapping your Home: Completing a mapping run is a lengthy process. With this model of Roomba, you can only save one map on your app, so make sure you include every room in your home. The first time, I only mapped part of my house (I had some doors closed, thinking I could add them later, but you can’t do that.) I had to delete that map to start a new mapping run. For some reason, I had 4 failed attempts at making a new map, but it was successful on the 5th try. Each attempt took between 3.5 to 7 hours, so it took me 3.5 days to get my house mapped. Keep your lights on in every room so Roomba can “see” landmarks. Pick up dog toys and anything else on the floor during the mapping run. Roomba will not clean while doing a mapping run, but it completes the mapping run faster that way. After the mapping run was complete, the app had set up dividers to separate areas that it thought were rooms and there was a label on each area called “Unnamed Room”. Because I have an open floor plan, some of the rooms were divided differently than how I wanted, so I edited the dividers. You can delete dividers you don’t want, move dividers, rotate them, and add new ones. After you get the rooms divided how you want them, you can edit your room labels (Living Room, Dining Room, Den, Kitchen, etc.) Both of these tasks were very quick and easy to do.
Dust and Mop Bins: The Roomba Combo i5 comes with 2 bins. One for vacuuming and a Combo Bin for both mopping and vacuuming. Use the correct bin for the correct job. You can set up the app so that Roomba will return to the docking station when the dust bin is full. You will receive a notification telling you it needs to be emptied. After you empty the bin, and replace it back in your Roomba, it will automatically resume the current job.
Vacuuming: You may choose one or more of your labeled rooms, or “Clean Everywhere.” I wanted to see how my edited room dividers were going to work out, so I chose “Dining Room.” The Roomba left the charging dock and went straight to the dining room and began to vacuum, deftly moving around the 28 chair and table legs. It also did a very good job at cleaning corners.
Next, I set Roomba to vacuum one or two rooms at a time. The Roomba did a very good job. After each session, I could look at “History” on the app and see how long it took, how any square feet were vacuumed, and it showed a map of my home with green coloring in the areas that were vacuumed. It covered every bit of space that it had access to. I was very impressed. When the battery became low, it returned to the docking station and showed on the app that it had a low battery and would return to the base to recharge. It also told me how long the Roomba would be recharging before resuming the current job. The app gave me the option to end the session, but I let it continue. After the allotted time for recharging, the Roomba automatically left the docking station and resumed vacuuming.
Mopping: Because I mapped my home, I was able to keep carpeted rooms separate from my wood and tile floors. Swap out the vacuum dust bin for the mopping Combo bin filled with water or a cleaning fluid from their approved list. Roomba automatically recognizes that you are going to do a mop job. Start a new job, choosing the room(s) you want it to mop. The Roomba vacuums while it mops, which is nice because that means you don’t have to vacuum first every time you want to mop. It did as well as expected. There were some spots in the kitchen that did not come clean, but that was only because they needed a little elbow grease to scrub them clean. However, it is nice to only have to go back and clean a couple of spots instead of hand mopping the entire floor AND cleaning the spots.
PROS:
Once you have it set up, you can send your Roomba on a job and forget about it, unless the dust bin gets full.
The Roomba lets you know when the battery is low, the dust bin is full, or if it gets stuck.
You can set up vacuuming schedules and can include one or more specific rooms in your home, or you can have it vacuum your entire home.
Roomba learns your rooms better the more you use it.
You can pause your Roomba and resume it later.
If the battery gets low, the Roomba re-docks, charges, and then resumes vacuuming.
Using History, you can see the areas vacuumed, the square footage, and how long it took.
Connects with Alexa or Google Home so you can use voice commands with Roomba.
Automatically updates new features with WiFi.
Navigates well around obstacles and barriers and does a good job at cleaning corners.
CONS:
* Set up instructions were lacking some important points. Registration verification should not take such a long time to send an email.
* The mopping feature is equivalent to sliding a mop across the floor with only a little pressure put on the mop (basically, the weight of the Roomba), so it won’t clean spots that need some scrubbing.
* It took me 5 attempts and 3 1/2 days to complete a new Mapping Run.
I would recommend this to a friend!

Share this review:
+3points
3of 3voted this as helpful.
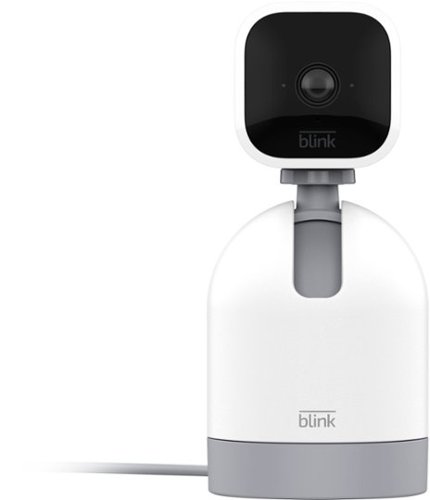
See more of what matters most. Plug in your camera to get a 360 degree view of any room in your home in seconds so you can help protect what you love from anywhere. It's like you're home - even when you can't be.
Customer Rating
5
Excellent addition to the Blink camera line
on December 8, 2022
Posted by: MarilynB
I already own 2 Blink Mini and 2 Blink Outdoor cameras and I really like them, so when the Pan-Tilt mount came out, I knew it would be something I would want to add. I wanted a camera that I could pan and tilt so that I can view the room at all angles when I’m not there. I wanted to set it so that it wasn’t motion activated and would only be viewable on “Live View.” After using this for a week, I think I will get 2 more for the other 2 mini cameras.
Blink Mini Camera: The camera quality is good. I keep it set on the “Best” quality video, but there are 2 lower settings (Standard and Saver.) The Blink App is very user friendly and does everything you would want it to do. Activity Zones allow you to block off areas that you don’t want any motion to cause your camera to start recording. For motion-detected recording, you can set the recording time for up to 30 seconds and the retrigger time can be set anywhere between 10 seconds and 60 seconds. You can enable or disable the motion detection on any individual camera and if you set your cameras up in “groups” you can “arm” or “disarm” any group. You can also switch any camera to Live View at any time. In Live View, I recorded for a little over 3 minutes to test and see if the 30 second limit applied to “Live View” and was glad to see it does not. You can also set the camera to end the clip early if motion stops. There is a very slight lag time of about 1 second between when the camera detects motion and when it begins recording. The camera has excellent night vision and you can set the IR intensity to 3 different levels. The camera has audio – both sending and receiving. You can set the audio level you want. To speak through the camera, you hold a button down on the app as you speak. The only thing I would like to see changed is to speed up the retrigger time for motion detection and/or to have the option to keep recording past the 30 seconds if there is still motion being detected.
The Pan-Tilt Mount: The mount is easy to set up and the app found the camera immediately and knew that it was on a pan-tilt mount. I set the camera to view both the sound board and the dog crate so that I can check on my dog at night in case of a storm. When we leave the house, I am able to go into the app and pan and tilt to get a full view. There is a 360 degree pan button on the app, which causes the camera to pan first to the right until it is completely turned backward, then it automatically pans all the way to the left until it completely turned backward from that side. Then it automatically returns to the previous view. The view from behind slightly overlaps so you don’t miss anything. In addition to the right and left arrow buttons for panning, and the up and down arrow buttons for tilting, there is a “Home” button that returns the mount to neutral. The only complaint I have is the lag time. If you hold down the arrow to pan, by the time you see the camera starting to move in the app, you’ve held it down long enough so that it continues to pan all the way to the side, even after you removed your finger from the arrow button. The same thing occurs with the tilt arrows. You can press the arrows 1 or more times to get smaller panning increments, but the camera will be jerky. You can also hold down the button for less time and through trial and error, you could learn about how long to hold it to move it the amount you need.
I opted for the Blink subscription to be able to save my videos on the cloud, but that it optional.
Overall, I am very happy with the Blink Mini-Camera and would recommend it highly.
I would recommend this to a friend!
Share this review:
0points
0of 0voted this as helpful.
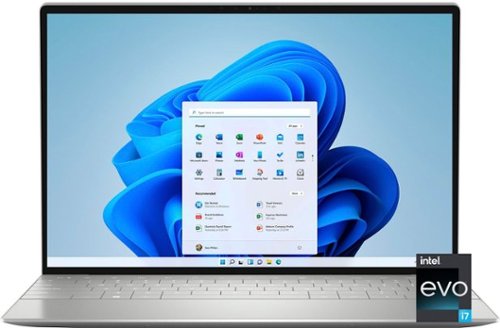
XPS products are designed to be the best, withcutting-edge technologies, exceptional build quality,unique materials and powerful features. XPS brings together the most elegant designs and premiumexperiences to enhance your work and personalsuccess. This combination ultimately results in beautifully crafted products with no compromises. Introducing the new Dell XPS 13 Plus - our most powerful 13-inch XPS yet. Designed from the ground up to be our highest performing flagship 13 ever so you can do everything you love to do faster. The simplified interiors wow and the best-inclass panels bring your content to life. Featuring the latest Intel 12th Gen Intel Core Evo platform processors and displays with high resolution, brightness and color gamut to bring content to life. Simplified, modern and edge-to?edge interiors are beautiful and provide a seamless, touch?friendly experience for users.
Customer Rating
4
Very happy with laptop, but not the included OS
on July 16, 2022
Posted by: MarilynB
If you are considering this laptop, you should know that you are getting a slimmed down version without a lot of extras. I think the whole point is to give you something that is very mobility-friendly with a low profile and is light-weight. However, I will mention some of the missing features that you should know about before you buy.
There are 2 ports. Both are Type C. One is to charge the laptop and the other is to plug in any peripherals. I like using a mouse, so that’s what I plugged into that extra port. If you really need another port, you can buy a splitter. I have one that is a Type C and a Type A (regular USB). However, the laptop does come with an adapter, so you can plug in the adapter and change one of the Type C ports into a regular Type A.
There are no other ports at all on the entire laptop; no Ethernet, no HDMI, no earphone, no DVD/CD drive, no SD card reader. All of those items can be purchased as adapters and there are plenty of splitters and hubs available on the market if you really need more ports. The laptop does come with an earphone adapter, though, so you can make your extra Type C port into an earjack port.
As I mentioned above, this laptop is lightweight with a slim profile. It would be ideal as a mobile laptop. The keyboard is backlit and you have two different levels of brightness you can choose from. It has a touch screen and the bottom 1/3 of the keyboard works as both a wrist rest and a touchpad. The touchpad is hidden, but it is about the same size as a normal touch pad and is located below the space bar. The keyboard keys are very large and easy to type with. There is no number keypad, but that’s to be expected due to the narrower size of the laptop. The top row of the keyboard is not buttons; instead it is a capacitive row. I wish the Esc and Del keys were actual buttons because I use them more often and the capacitive row is hard to get used to, but one feature I liked was that if you press the Fn key, the capacitive row changes to a Function row. However, you have to memorize how each Fn button works, because there is no text except for F1, F2, etc. Also, this row’s backlighting is always on and if you are watching a movie in a darkened room, the top row light can be annoying. Be prepared to cover it with something. A feature I like is that you can have multiple desktops. I can set up 1 for home and 1 for work. Also, you can have 1 for each family member if you share the laptop at home. I set up 4 different desktops just to test it out and it was great.
Software: It comes with Windows 11 Home which I was not used to. I don’t like the smaller size of the Start Window. It can only hold a few program icons before you have to scroll to a new screen for more. This is a disappointment for me. The program menu is not on the left side. You have to click on the “All Apps” button to see the program menu. The icons are not sizeable, they default to an icon with writing under it, and the window cannot be enlarged. In fact, it cannot be moved at all, yet it sits in the middle of the laptop screen with a LOT of wasted space on both sides of it, and I wonder what they were thinking when Microsoft came up with this idea. I also dislike how Microsoft always tries to force you to use their products and this laptop is no exception. When I browsed to find the Firefox download on the internet, the screen told me that I did not need Firefox and that I already had the best browser recommended. However, if I scrolled down, it did have the Firefox browser download below that. Microsoft Edge and Bing kept popping up so I had to remove them from my task bar and I also removed them from my start menu, keeping them only in the program menu. It comes with a Microsoft 365 30 day trial package of Word, Excel, etc. It also comes with McAfee LiveSafe 12 Month Subscription.
I am happy with the speed of changing from one screen to another and opening new programs. Also, the screen looks great and the speakers sound good too. I do a lot of photography work and I’ve had my share of problems with less than desirable screens. I do require a very good screen for my photography. This laptop’s screen looks very good to me. My photos are bright and clear without any discoloration, muddiness, or noticeable pixels. I streamed a movie and the sound quality was good as was the screen resolution during streaming. I also played a couple of different kinds of games on the laptop and had no complaints. The battery life is mediocre, but that’s not an issue for me. I do most of my work next to a plug, so I can easily charge my laptop as I use it.
I would recommend this to a friend!
Share this review:
0points
0of 0voted this as helpful.
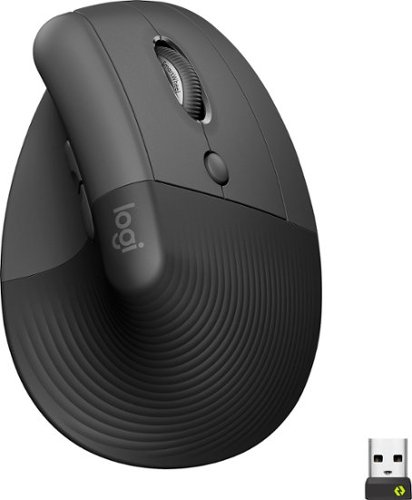
Desk life getting you down? Lift yourself up with Lift Vertical Ergonomic Mouse – a comfy and intuitive wireless mouse with quiet clicks crafted specially for small-to-medium hands. Available in right and left. Lift’s unique 57-degree angle elevates your wrist to give a feeling of relief — and sends a wave of comfort through the forearm and upper body. Scrolling feels second nature with SmartWheel, which easily shifts from precision to speed-scroll. Customize Lift ergo mouse using intuitive Logi Options+ Software.
Customer Rating

3
Bluetooth not found. Difficult software install.
on May 2, 2022
Posted by: MarilynB
from Texas
First of all, the set up is not nearly as easy as they would have you believe. I have a Bluetooth computer but my computer never recognized the mouse through its Bluetooth, so I ended up having to use the USB Bolt. Secondly, once I used the USB Bolt, the mouse started working immediately, but I could not customize the mouse without installing the software and when I was installing it, the installation window suddenly closed and I could not easily get back to that install again.
Here’s what happened. After the window closed, I went through my programs to look for the app and it was not there. So I went to my Dowloads folder to double-click on the exe installation file, but it was also not there. Because the install file was not located in my Downloads folder and because the pop-up to download it never showed up again, I went on the Internet and found the file I needed to install. I downloaded it just fine, but every time I double-clicked on it, nothing happened. I tried this over and over again. All of the troubleshooting suggestions didn’t work at all. I kept looking for the app somewhere on my laptop because I thought that “maybe” it had installed, but it hadn’t. I even went to the Program folders to see if it was there, but it wasn’t. Finally, I noticed that every time I clicked on the exe install file, it gave me a long convoluted path to where it said it was temporarily putting the exe file for the install. I thought that maybe that had already happened but for some reason that file was not running. So I wrote down the path to find the file. (It’s in a hidden folder, so you have to unhide hidden files and folders first.) The path was C:\Users\(my computer name)\AppData\Local\Temp\Iu and the file was the exe file with the green icon. Warning: the path they told me it was in was not there. So once I got into the Temp folder, I opened every folder there looking for the correct one. The folder it was in was called “Iu”, not LogiTech… Once I double-clicked on that green icon exe file, I finally got the app to open and I got a window pop-up that said I needed to restart my computer to go to the next step, so I did that. Then once it restarted, that app opened on its own and finished installing. After that, I finally had access to it. I’m wondering how many people would know how to do that.
In that app, the main thing I wanted to do was reassign the customizable buttons on the mouse. I made the circular button below the scroll wheel to be “Speaker On and Off.” Then I made the two buttons on the left side of the mouse to be “Volume Up” and “Volume Down.” I made the center button on the scroll wheel to open the “This PC” folder in File Explorer. I played with all of the other settings but I liked them as they were so those were the only changes I made. Some of the other settings you can change are: your pointer speed, the way your Scroll Wheel scrolls, and more.
I thought getting used to the shape of the mouse would be difficult but it was not. It felt natural from the beginning and finding and using all of the buttons on the mouse was intuitive and natural.
My complaints about the mouse are:
• Installation of the software was VERY difficult. I have no idea why the install window closed on its own prematurely, but you really have to know what you’re doing to get back to the installation again.
• I was very disappointed that it didn’t work with my Bluetooth. My Bluetooth was on and working and as soon as I did a scan, all of the other devices in the room were found immediately. I really wanted that to work in order to free up a USB port.
• A rechargeable battery should be one of the perks of this device. I prefer to plug my mouse into power to recharge it rather than go through AA batteries.
Things I like about the mouse are:
• The ergonomic design.
• The customizable buttons
• The ergonomic design.
• The customizable buttons
Would I buy this again? Probably not. I would prefer to get a mouse that recharges and works with my Bluetooth. It’s a good mouse but I really wanted those 2 features as well as the customizable buttons.
No, I would not recommend this to a friend.
Share this review:
0points
0of 0voted this as helpful.
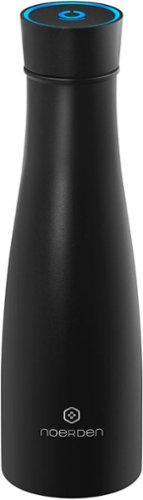
What do you look for in the perfect smart bottle? Hydration reminders? UV Sterilization? A temperature sensor? The NOERDEN LIZ has it all and more. All of the tech is found in its touch activated smart lid, which houses the UV-C light, temperature sensor, and LEDs. LIZ is beautifully designed, easy to use, and has a long-lasting battery – simply tap on the lid to activate its smart functions, wherever you are.
Customer Rating
3
Not smart enough - lacking in important features
on December 24, 2021
Posted by: MarilynB
from Texas
LIZ – Noerden Smart Bottle – 16 oz.
The bottle arrived securely packed in a box with the bottle and smart lid, a charging cord, and the User Manual and a Safety Statement booklet.
The bottle was not charged, so I began by plugging in the cord and attaching it to the correct place on the bottle, but every time I set the bottle down, the charger fell off. It is held on magnetically and it must be a weak magnet because I was trying to set it down carefully. After 3 attempts, I set the bottle down first and then attached the charger to it. That worked. A red light on top of the bottle came on and continued to flash slowly while it was charging, which took about 2 hours. That same light will turn white when charging is complete. The manual states that all of the smart functions are disabled while it is charging. It also states that if it flashes 4 times after charging, you need to remove it from your bottle and set it aside for 10 minutes before attaching it to your bottle again. (Usually this occurs if you try to open it while the UV Sterilization is running.) When the battery gets down to 5%, it will flash red rapidly if you touch the lid. But a full charge should last about a month if you do one UV Sterilization per day.
All functions and/or indicators are used through the LED light/button on the top of the lid:
• Press and hold to turn on or off the lid. The light will flash white rapidly when turned off and once when turned on.
• Shake your bottle so that the contents touches the inner part of the lid, then tap the center once to find out the temperature range. It will give you 3 possible ranges based on the color of the light on the lid. Red is over 140 degrees F, Yellow is 98 to 140 degrees F., and Blue is less than 98 degrees F.
• Tap the lid twice to turn on the UV Sterilization. The lid will slowly flash white while sterilizing. It will turn off when done, or you can tap twice again to turn off. If the lid is opened during the sterilization process, it will automatically go into safe mode to prevent the UV rays from causing you any harm. I had to tap the top 3 or 4 times to get this feature to come on, but it did, so if you have problems, keep tapping!
If the temperature in the bottle is below 140 degrees F, the lid will automatically remind you to drink every 2 hours. It will flash the color of the temperature range (blue or yellow.) If you touch or open the lid, the 2 hour timer will start over. If you miss seeing that reminder, it won’t flash again until 2 hours later.
Make sure you read the manual because there are some important safety “do’s” and “don’ts”.
Pros:
• The design looks sleek and classy.
• UV Sterilization – Kills 99.9% of bacteria and viruses.
• 12-24h hot and cold temperature insulation.
• The design looks sleek and classy.
• UV Sterilization – Kills 99.9% of bacteria and viruses.
• 12-24h hot and cold temperature insulation.
Cons:
• The charger falls off easily and since the charger is a unique shape, you will have to replace it with the same kind of charger if you lose it.
• You must remove the lid to drink. There is no straw so you must tip the bottle to drink.
• There is no beep, so you have to look at the light on the bottle to see the reminder. If you aren’t looking at the bottle when it flashes, you may miss the reminder. Just set reminders on your phone. This feature is pretty useless.
• The 2 hour reminder is not adjustable.
• It is not Bluetooth connected to an app to keep track of your intake. Noerden has an app, but you must manually enter your intake into it.
• The bottle only holds 16 oz, so you will have to refill it throughout the day.
Bottom line: I think this smart bottle is misnamed. In the past, I had a smart bottle that I could drink from without removing the lid, knew when I added a beverage to it and knew how much was in the bottle. (The bottle’s straw had sensors.) It knew how much I drank and kept track of it via a Bluetooth linked app on my smart phone. The reminder to drink was adjustable through the app and if you ignored the reminder, it would remind you again in a set number of minutes that you could adjust via the app. This bottle’s only usefulness is the UV Sterilization and keeping your beverage hot or cold for 12 to 24 hours. By day 3 of owning this bottle, I found myself keeping the lid off and using a long stainless steel straw in the bottle, because having to remove the lid every time I wanted to take a sip was annoying. If you are getting this for the UV Sterilization feature or the fact that it keeps your beverage hot or cold for 12 to 24 hrs, then this bottle is for you. If you are getting it to help you remember to drink water throughout the day, a free app on your smart phone might be a better choice.
Mobile Submission: False
No, I would not recommend this to a friend.
Share this review:
0points
0of 0voted this as helpful.
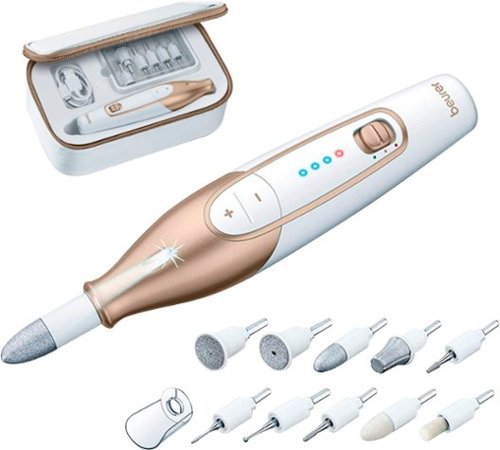
Get flawless nails with the MP64 Cordless Nail Drill. This manicure and pedicure set comes with 10 high-quality sapphire attachments and a portable storage case. The included dust shield collects nail dust for a mess-free manicure. The LED light illuminates the nail bed so you can easily see the treatment area. Powerful and adjustable, change the speed up or down and switch the rotation direction. Suitable for acrylic nails or those with sensitive skin. Get 2 hours of use per charge with the included USB charging cable. Maintain salon-quality nails at home by shaping, filing, and buffing for beautiful nails anytime.
Customer Rating
5
So excited to have this! And I love it!
on October 23, 2021
Posted by: MarilynB
from Texas
This wonderful manicure/pedicure set was well thought-out to include just about everything you might need. It comes with a cloth zippered case and has form fitting places in the form of a plastic insert which holds the device and all of the accessories neatly. The plastic insert can be removed if you prefer. The case retains its shape if you remove the insert. The inside lid of the case has a mesh pocket where you can keep the power cord and the manual. The case does not have a handle.
In the case: Power cord with a micro USB end to charge up the device, Dust shield, 10 attachments, and a User Guide. No plug for the cord. The attachments are:
Sapphire cone – to remove dry skin and calluses from feet and manicures the toenails.
Coarse Sapphire wheel – Files nails quickly
Fine Sapphire wheel – Files nails. Finer than the coarse wheel to file more gently and slowly
Felt cone – For buffing and polishing
Cylindrical Grinder – Grinds and smooths toenails
Pointed Grinder – Removes ingrown toenails. Small for precise use.
Round Sapphire Grinder – Removes corns. Use carefully.
Needle-shaped Cutter – Precision tool. Used on ingrown nails or parts of dead nails.
Fine Sapphire callus file – Removes calluses on the soles and heel of the feet.
Crystal callus file – Use on thick, hard skin or large calluses on soles or heel.
Charge up your device for about 3 hours before your first use and the charge should last about 2 hours according to the manual. You have to have your device turned off to charge it. It will flash red and green if it isn’t. It will flash with 3 blue lights if everything is OK. When the 3 blue lights are solid, it is charged.
The power button on the device has 3 positions. Up, Middle, and Down. Down turns the attachment counter-clockwise and you will see a red light. Up turns the attachment clockwise and you will see a green light. The middle position is off. I thought I would not need to change the device from clockwise to counterclockwise and back again, but I found myself changing it while I was working to make it easier, so I see why this feature was included.
The plus and minus buttons on the device control the speed. There are 3 speed settings. The instructions say to always start at the lowest speed and only increase the speed if needed. I never used it any faster. I thought the slowest setting was more than adequate. There is an automatic switch-off after 20 minutes.
The plus and minus buttons on the device control the speed. There are 3 speed settings. The instructions say to always start at the lowest speed and only increase the speed if needed. I never used it any faster. I thought the slowest setting was more than adequate. There is an automatic switch-off after 20 minutes.
I like that the device is cordless, because I was holding it at all sorts of different angles to do my pedicure. Nail dust was flying everywhere so I attached the Dust Shield to keep it from flying up in my face. It worked great for that. It doesn’t catch the dust. It just protects it from getting it in your eyes or accidentally breathing it in. There is an LED light. If you use one of the larger attachments, it will block the light from shining where you are working. Also it was too difficult to try to always keep the light on the area I was working. I did use it though. I would stop for a second and shine the light on the spot to better see how it was looking.
My First Pedicure with the Beurer:
I started out using the coarse sapphire wheel on my toenails. That quickly got them filed down. I switched to the Fine Sapphire wheel to smooth the edge and “fine tune" my nail filing. Next, I used the Sapphire cone to remove my cuticles from my toenails and to decrease some of the slight thickness of the nails on my great toes. Then I switched to the Pointed Grinder to get the cuticles at the corners and to fine tune any cuticles that I had missed, as well as getting the corners of my great toe nails. I followed that up with the Felt cone to buff my toenails. I used both the Fine Sapphire Callus file and the Sapphire Cone on calluses and dry skin on my feet. I really loved the sapphire cone and how it made my rough skin feel baby smooth. I used the Sapphire Cone mostly for that. You do not have to use a lot of pressure for the attachments to work. In fact, very little pressure will be much safer while providing excellent results. Also use the attachments in circular movements, except when shortening the nails.
I started out using the coarse sapphire wheel on my toenails. That quickly got them filed down. I switched to the Fine Sapphire wheel to smooth the edge and “fine tune" my nail filing. Next, I used the Sapphire cone to remove my cuticles from my toenails and to decrease some of the slight thickness of the nails on my great toes. Then I switched to the Pointed Grinder to get the cuticles at the corners and to fine tune any cuticles that I had missed, as well as getting the corners of my great toe nails. I followed that up with the Felt cone to buff my toenails. I used both the Fine Sapphire Callus file and the Sapphire Cone on calluses and dry skin on my feet. I really loved the sapphire cone and how it made my rough skin feel baby smooth. I used the Sapphire Cone mostly for that. You do not have to use a lot of pressure for the attachments to work. In fact, very little pressure will be much safer while providing excellent results. Also use the attachments in circular movements, except when shortening the nails.
At first, I was trying to keep my feet positioned over a small waste basket, but dust was flying everywhere, so I ended up sitting on a bath mat and letting the dust fall onto the mat, which is easily washable, or can be vacuumed.
Before retirement, I was an RN and often took care of diabetics, including their foot nail care. I would have loved to have had this tool. I feel with proper use (not too much pressure and using circular motions) it would be very suitable for them with minimal risk. When I was working, only an RN was allowed to do the nail care on a diabetic’s feet. The reason for this was because of the risk of injury using the sharp cutting tools that were the only things available at the time. I mention this only to emphasize the importance of being extraordinarily careful when doing pedicure care on diabetics. I really think this device would be ideal, as long as the user doesn't use too much pressure or use the tinier cutting attachments.
Subsequent uses of the device have been just as successful as the first. I really love this and think it is 100% worth it! I would definitely recommend this.
Mobile Submission: False
I would recommend this to a friend!
Share this review:
+1point
1of 1voted this as helpful.
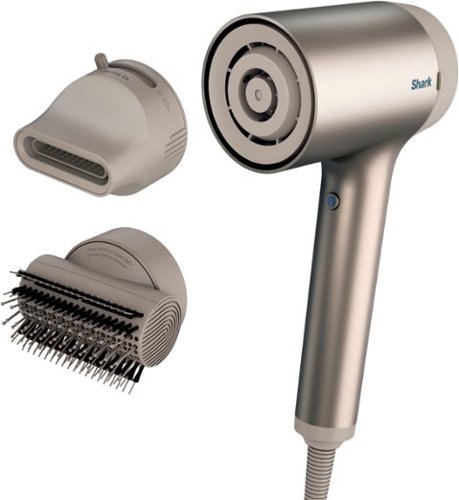
The Shark HyperAir delivers premium air power and next-generation intelligence that give you an easy, healthy hair-care experience with ultra-fast drying and no heat damage, for styles that last. Attach the IQ 2-in-1 Concentrator or IQ Styling Brush and Shark HyperAIR intelligently sets the heat and airflow settings for you, taking the guesswork out of styling.
Customer Rating
5
Love it! No learning curve. Great results!
on September 19, 2021
Posted by: MarilynB
from Texas
In the box: Hair Dryer, 2-in-1 Concentrator attachment, Styling Brush attachment, Cleaning tool, User Manual, and Warranty information. Measuring the cord from where it comes out of the hair dryer to the tip of the plug is 99 inches or 8.25 feet.
The features are so many and so well thought out! You have 3 airflow strengths, 3 heat settings, and a Cool Shot button to choose from. As if that wasn’t enough, the concentrator has 2 choices for airflow precision and it rotates! The Styling Brush also rotates and it has bristles meant for smoothing as well as bristles meant for detangling.
I tested the dryer using regular shampoo, no conditioner, and no other hair products since I wanted to really put it to the test. (Normally, I would use a heat protectant and a volumizing product.) I started out with freshly washed, towel-dried hair using the Pre-Styling Mode of the Concentrator attachment to get my hair mostly dry. At this point, you could use a round brush to style your hair while you pushed the concentrator’s tip out for “Precision Mode” airflow. It rotates so you can get the exact angle you need. Then you can press a “Cool Shot” button and hold it in to cool off and lock in your curl or wave. I didn’t use this feature on my hair, but I pressed the “Cool Shot” button and it works just as described. The heat stops and you get room-temperature airflow.
My next step was to switch to the Styling Brush. When I attached the Styling Brush, the temperature stayed on high and the airflow automatically turned down to medium, but you can tweak these settings if you want to. In order to get more volume for my thin, fine hair, I started with the brush under each section near the scalp and brushed straight up and out. I kept the brush horizontal for the front sections and vertical for the back, top, and sides. The rotation you choose is locked in place and you have to press in a button on the side to rotate it, so it doesn’t accidentally move while in use. My hair style was completed in less than half of my usual time, but that wasn’t the main thing that sold me on this. My hair was very smooth, shiny, and exactly in place how I wanted it with the ends slightly curled under. I’ve never had my hair turn out so smooth without a flat iron. It must be the combination of bristles they use. I was very impressed.
Normally, after drying my hair most of the way, I used to take out my hot air brush that has a round bristle brush on it, to try and achieve this look, but it rarely turned out how I wanted it (I could get the style, but it usually looked frizzy and fly-away), and it took so long!! Half of the time, I would end up using my flat iron to try to smooth the style. Sometimes, I would get a bend or crease where I didn’t want one and had to flat iron that out and redo that section. With this product, I have had the exact results I’ve wanted every time I have used it. There was no “learning curve”.
I also have a high forehead so I like to have bangs, which I keep swept a little to one side. No matter how hard I’ve tried, these bangs either end up going into my eyes, splitting on one side, or I have to use hairspray to keep them in place. Every time I have used this Styling Brush, my bangs have ended up where they belong and stayed in place all day. I don’t even know how I achieved that, but I they have stayed in place without any hair spray.
There are two other attachments that you can buy if you want them. One is a curly hair diffuser that has prongs that can be extended or retracted depending on your hair length. The other is a wave maker for making beachy waves on longer hair. I don’t need either of these because my hair is not curly and not quite long enough for beachy waves.
After using, I cleaned it by using the hook end of the cleaning tool and ran it between the bristles to clean the Styling Brush. The other end of the cleaning tool is a brush to use to clean out dirt and dust particles between the bristles.
Weight: The dryer is heavier than I’m used to, but since I didn’t have to hold it as long, it was actually less of a “workout” than usual.
I would definitely recommend this product. I have never had my hair look this good. I’ve used it several times now, with the same excellent results every time.
Mobile Submission: False
I would recommend this to a friend!
Share this review:
-1point
1of 3voted this as helpful.
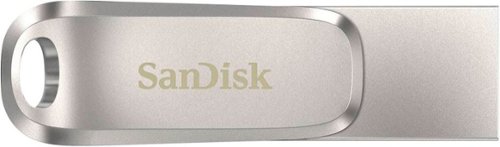
Enjoy extended storage for your smartphone with this 512GB SanDisk SDDDC4-512G-A46 flash drive. The dual USB 3.1 Gen 1 connectors enable quick transfer of documents between devices, while the all-metal housing with a cover can swivel to provide protection to the connectors. This SanDisk flash drive can be attached to a key ring for portability during your out-of-office assignments.
Customer Rating
5
Fast and Compact with Large Capacity
on August 1, 2021
Posted by: MarilynB
from Texas
The SanDisk 512GB flash drive is a compact dual flash drive. One end is male USB Type-C and the other end is a female USB-A. There is an attached cover that you can flip to one end or the other, which clicks into place.
I love the file storage capacity of 512GB (with 460GB usable space) and how compact it is. It has a key-ring hole in the case, but with no cover to protect the open end from dirt and dust, I will probably not use it on my key-ring. Instead, I placed it in a zipper compartment in my wallet.
The case is metal, so it gets very warm when in use, but not so hot that it burns and not so hot that you can’t hold your hand against it for a long time. This happens with all of my metal flash drives, but it means that the heat from the drive is being dispersed to the outside which helps to keep the drive’s chip cooler.
If you’re using it on a smart phone, this drive plugs into your charging port, so you won’t be able to use that port for charging at the same time. A splitter or wireless charger may be your answer, but my splitter didn’t recognize the flash drive. This should not be an issue unless you are transferring a large number of files at a time. With my first attempt at backing up my entire phone (including the movies on my attached 256GB microSD card) I ran my battery down to 4% before I stopped the transfer.
I tested the speed in the following different ways: I tried to transfer all of my phone’s photos and movies, but I stopped the transfer when my phone was about to die. At that point, I had transferred 57.2GB from my phone to the flash drive at 9.3mb/sec. It started out at 35 to 40mb/sec, but eventually slowed down. This is typical with large transfers, so my next tests were to transfer files in smaller batches which will result in much faster write speeds.
I transferred a 2.00GB movie from my phone’s microSD card to the flash drive at 19.4mb/sec. (1 minute and 43 seconds.)
I transferred 7.23GB from my laptop to the flash drive at 18mb/sec.
I transferred the same files (7.23MB) from the flash drive back to my laptop at 97.7mb/sec.
I transferred a 2.00GB movie from my phone’s microSD card to the flash drive at 19.4mb/sec. (1 minute and 43 seconds.)
I transferred 7.23GB from my laptop to the flash drive at 18mb/sec.
I transferred the same files (7.23MB) from the flash drive back to my laptop at 97.7mb/sec.
I used both the "My Files" app which was already on my phone and the “Memory Zone” app which is supplied on the Flash Drive. The speed wasn’t different by the method, but the “Memory Zone” app seemed easier since I could decide to choose the files by “type” or by “location”.
Overall, I liked the drive very much and would recommend it as a fast, compact drive with a large storage capacity.
Mobile Submission: False
I would recommend this to a friend!
Share this review:
0points
0of 0voted this as helpful.
MarilynB's Review Comments
MarilynB has not submitted comments on any reviews.
MarilynB's Questions
MarilynB has not submitted any questions.

The SURFboard SB8163 DOCSIS 3.0 Cable Modem features 16 downstream x 4 upstream channels for high-speed internet access. It is compatible with major US Cable Internet providers and is best for cable internet speed plans up to 400 Mbps.
Will this Modem work with Time Warner, want to eliminate the $10.00 monthy rental charge?
This is the one that Time Warner told me to buy. I bought it and it works perfectly.
8 years, 2 months ago
by
MarilynB
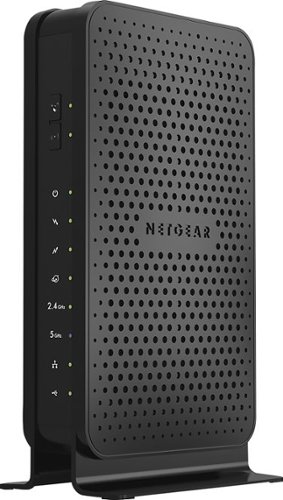
The NETGEAR Dual-Band N600 Router with 8 x 4 DOCSIS 3.0 Cable Modem with N600 simultaneous dual band WiFi router and integrated DOCSIS 3.0 cable modem, provides 8x faster download speeds, up to 340 Mbps. It's CableLabs DOCSIS 3.0 Certified to work with U.S. cable Internet providers.
Compatible with Sensi Wireless Thermostat?
Is this Modem/Router compatible with my Sensi Wireless Thermostat? I have an Xfinity Modem/Router right now but it will not connect. The only way it would connect was when they opened my wireless network up so it was no longer password protected. Obviously that isn't something that is safe to do so I decided I would just buy another one and stop renting from Xfinity. The only info they could tell me at all was the encryption codes must not match up.
I use it with my thermostat, but it is a Honeywell thermostat. I can manage the thermostat with my phone app, using this modem (which is a secured network). When we went on vacation this summer, I set the thermostat higher than normal while we were gone and when we arrived at the airport, I was able to use the app to lower the thermostat so that the house was cool before we arrived home.
8 years, 4 months ago
by
MarilynB
Texas
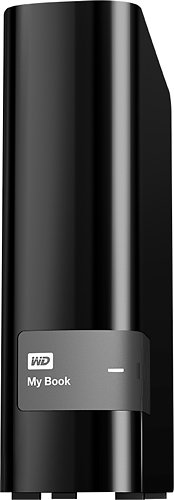
With password protection and hardware encryption, this WD My Book external hard drive allows you to protect and privatize your stored documents. The 4TB capacity delivers ample space for videos, photos, music and other files.
USB Interface 2.0
does it support USB 2.0 Interface?
Yes, it works fine with USB 2.0
9 years, 10 months ago
by
MarilynB
Colorado
With password protection and hardware encryption, this WD My Book external hard drive allows you to protect and privatize your stored documents. The 4TB capacity delivers ample space for videos, photos, music and other files.
Does WD stand for Western Digital. AC powered Hard Drives are faster than just USB?
WD does stand for Western Digital. I don't think the A/C powered hard drive makes a difference in the copy speed. I did notice that it copied about 4 to 6 times faster on my new computer than it did on my old one. Probably because my new computer could read and write faster with its i7 Core and more memory.
9 years, 10 months ago
by
MarilynB
Colorado
With password protection and hardware encryption, this WD My Book external hard drive allows you to protect and privatize your stored documents. The 4TB capacity delivers ample space for videos, photos, music and other files.
can this simply be used for extra storage
Im not getting this to just have my files backed up..my reason for purchase is simply to gain plenty of extra storage.
Yes, you can just copy files onto the external hard drive. It works great for that.
9 years, 10 months ago
by
MarilynB
Colorado
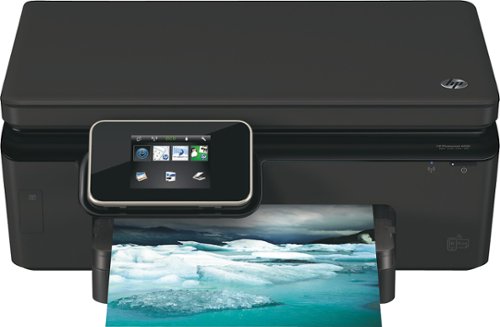
HP Photosmart 6520 e-All-in-One Printer: Quickly connect this e-all-in-one printer to your home or office Wi-Fi network with HP Auto Wireless Connect, so you can print, scan and copy documents. The included HP Photosmart software simplifies scanning.
why won't my shotcut icon for my hp6520 printer show on my main screen
I have deleted and reinstalled the printer 3 times using the cd that came with the printer but still no icons?
It is easy to put a shortcut on your desktop for your printer. Go to Control Panel and choose Hardware and Sound. Then choose Devices and Printers. Once that window opens, find your printer and right-click on it. Choose "Create a shortcut". Now go to your Desktop. Your shortcut icon should be there. I tested these steps on my own computer as I typed them and my icon was there. Another way is to go to your "Programs" folder. The path should be C:, ProgramData, Microsoft, Windows, Start Menu, Programs. Now click on HP and look at your choices. To just put the printer icon on your desktop, open up the folder called HP Photosmart 6520 series. There is a shortcut in that folder. Copy and Paste the shortcut to your desktop.
9 years, 10 months ago
by
MarilynB
Colorado